jason's hyperion blog

essbase from the trenches

Vess + ODI to extract Essbase metadata

Well, apparently it’s Friday Fun Day over here in Seattle. I was going to head up to the mountains for the weekend but plans changed. So how about a little frankendriver Vess update with some ODI goodness thrown in?

Vess has some really interesting data integration possibilities that I’ve mentioned before, one of which is being able to drop it into Oracle Data Integrator and use it as you would any other JDBC driver. I hadn’t really tested this out though, until yesterday. It turns out that it works surprisingly well.

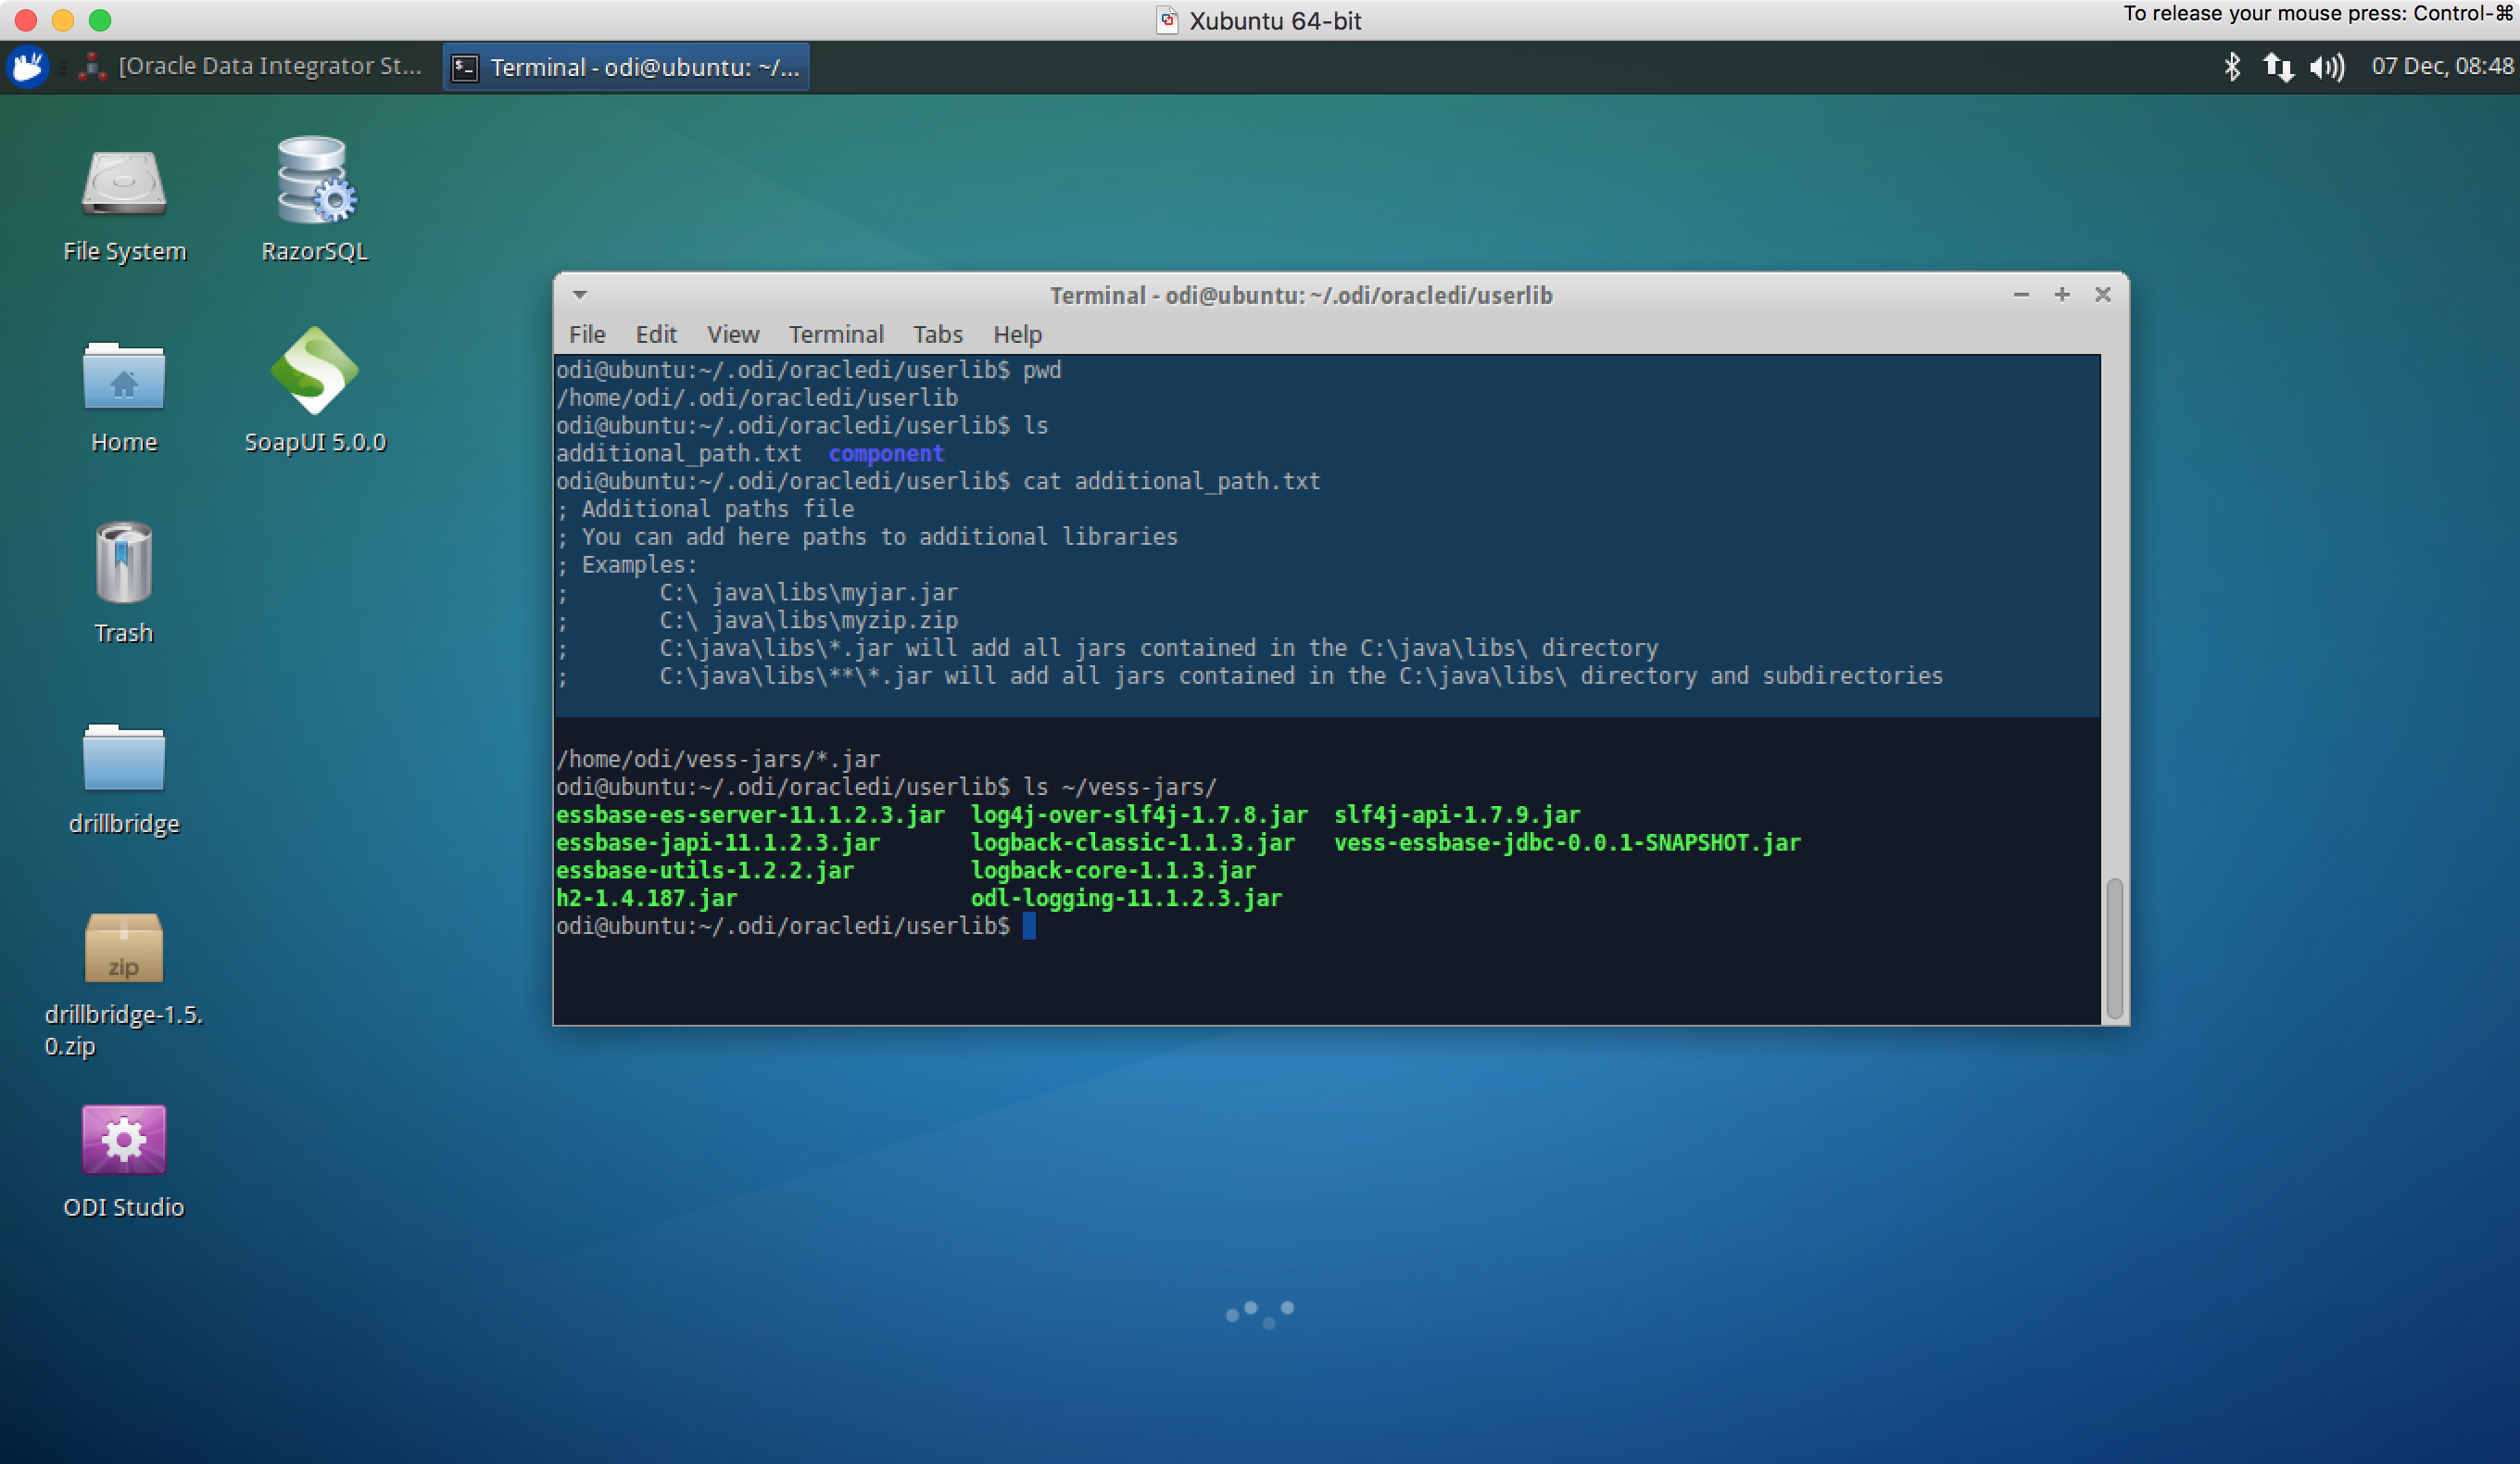
First off, the Vess driver files need to be added to ODI. I added it to my standalone agent/client:

Adding Vess Java JAR files to ODI12c

As you may or may not be able to tell, adding new drivers to ODI is mostly just a matter of dropping the JAR files into a folder, editing the additional_path.txt file to include that folder, and then starting the client.

I created anew technology type within ODI that was basically just a copy of the Hypersonic SQL driver. Internally, Vess is kind of shoehorned around an H2 database driver, which is actually a bit of a cousin to Hypersonic. In any case, they’re at least close enough to share the same ODI technology type.

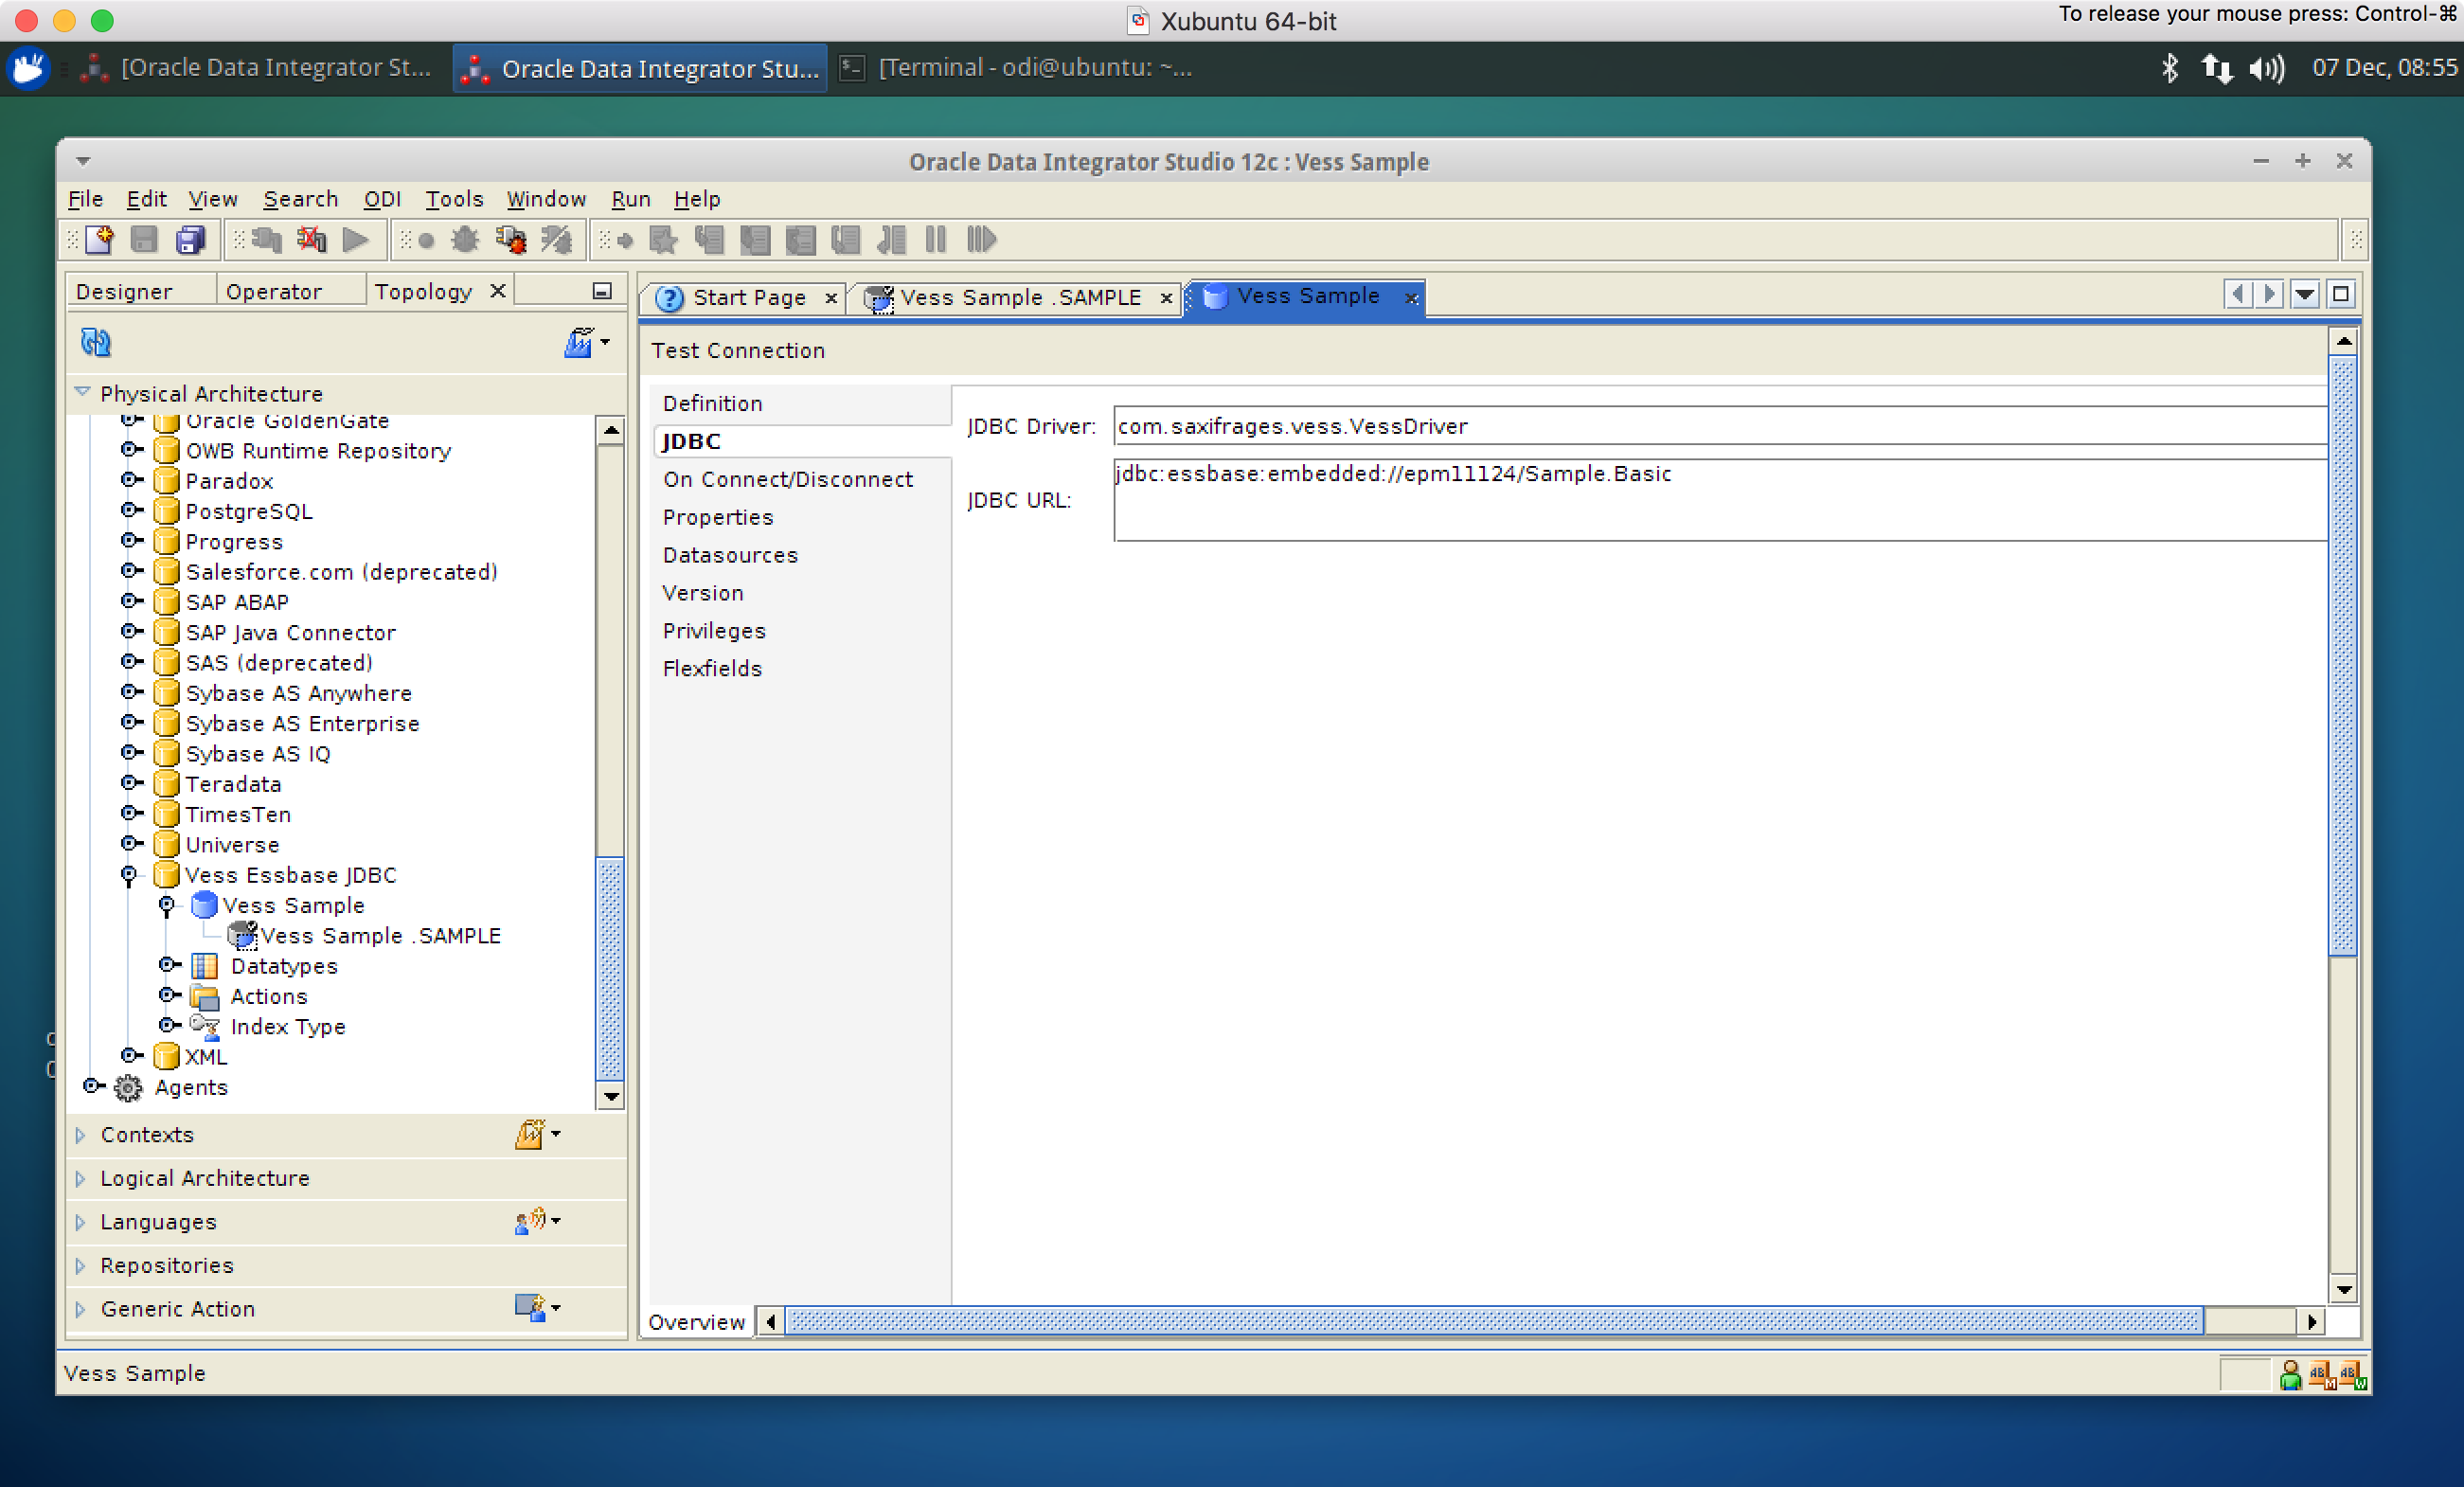
After creating the new technology, I defined a new physical server:

Setting up Vess physical topology

As I’ve shown before, Vess has its own JDBC URL syntax that generally includes the Essbase/APS server as well as a reference to an Essbase app and/or cube. In the above screenshot you can see the specific Vess JDBC driver class referenced as well as the URL to use embedded mode to communicate with one of my local Hyperion servers.

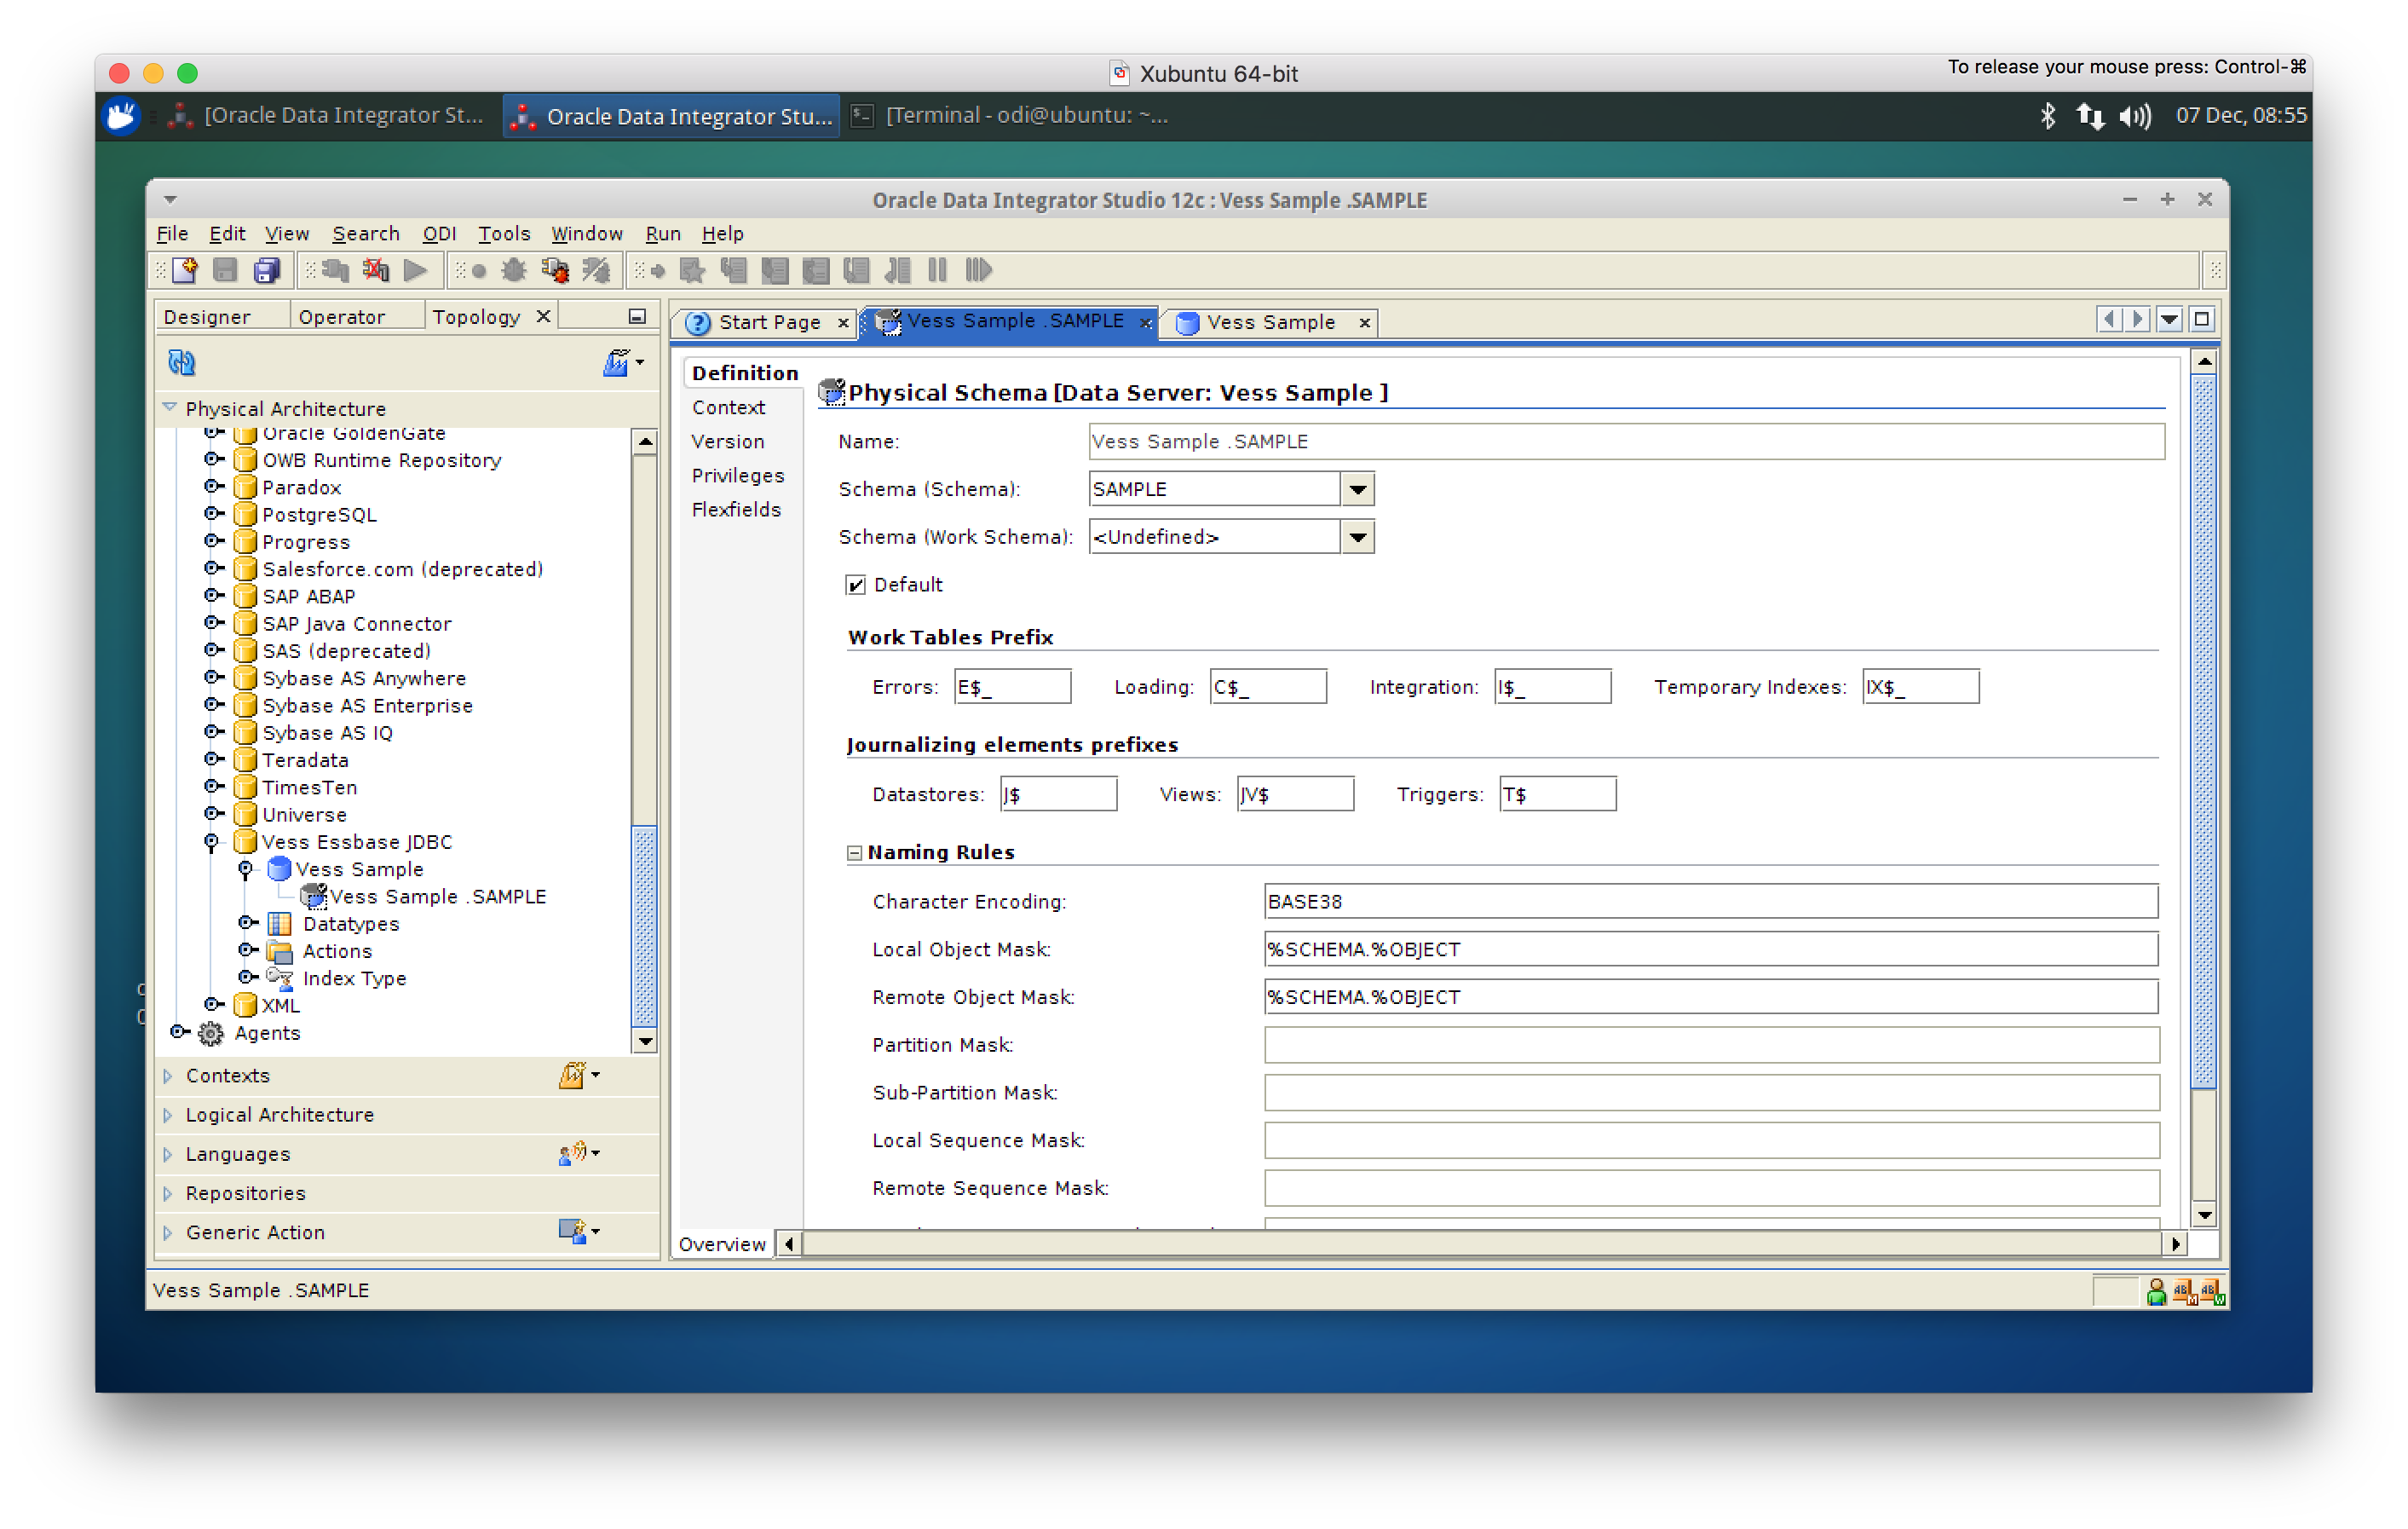
Next I needed a data server. Nicely enough, due to the fairly complete metadata that Vess supplies through the JDBC driver model, the list of schemas populated automatically (in this case, SAMPLE) and I knew things were looking good:

Setting up the physical schema

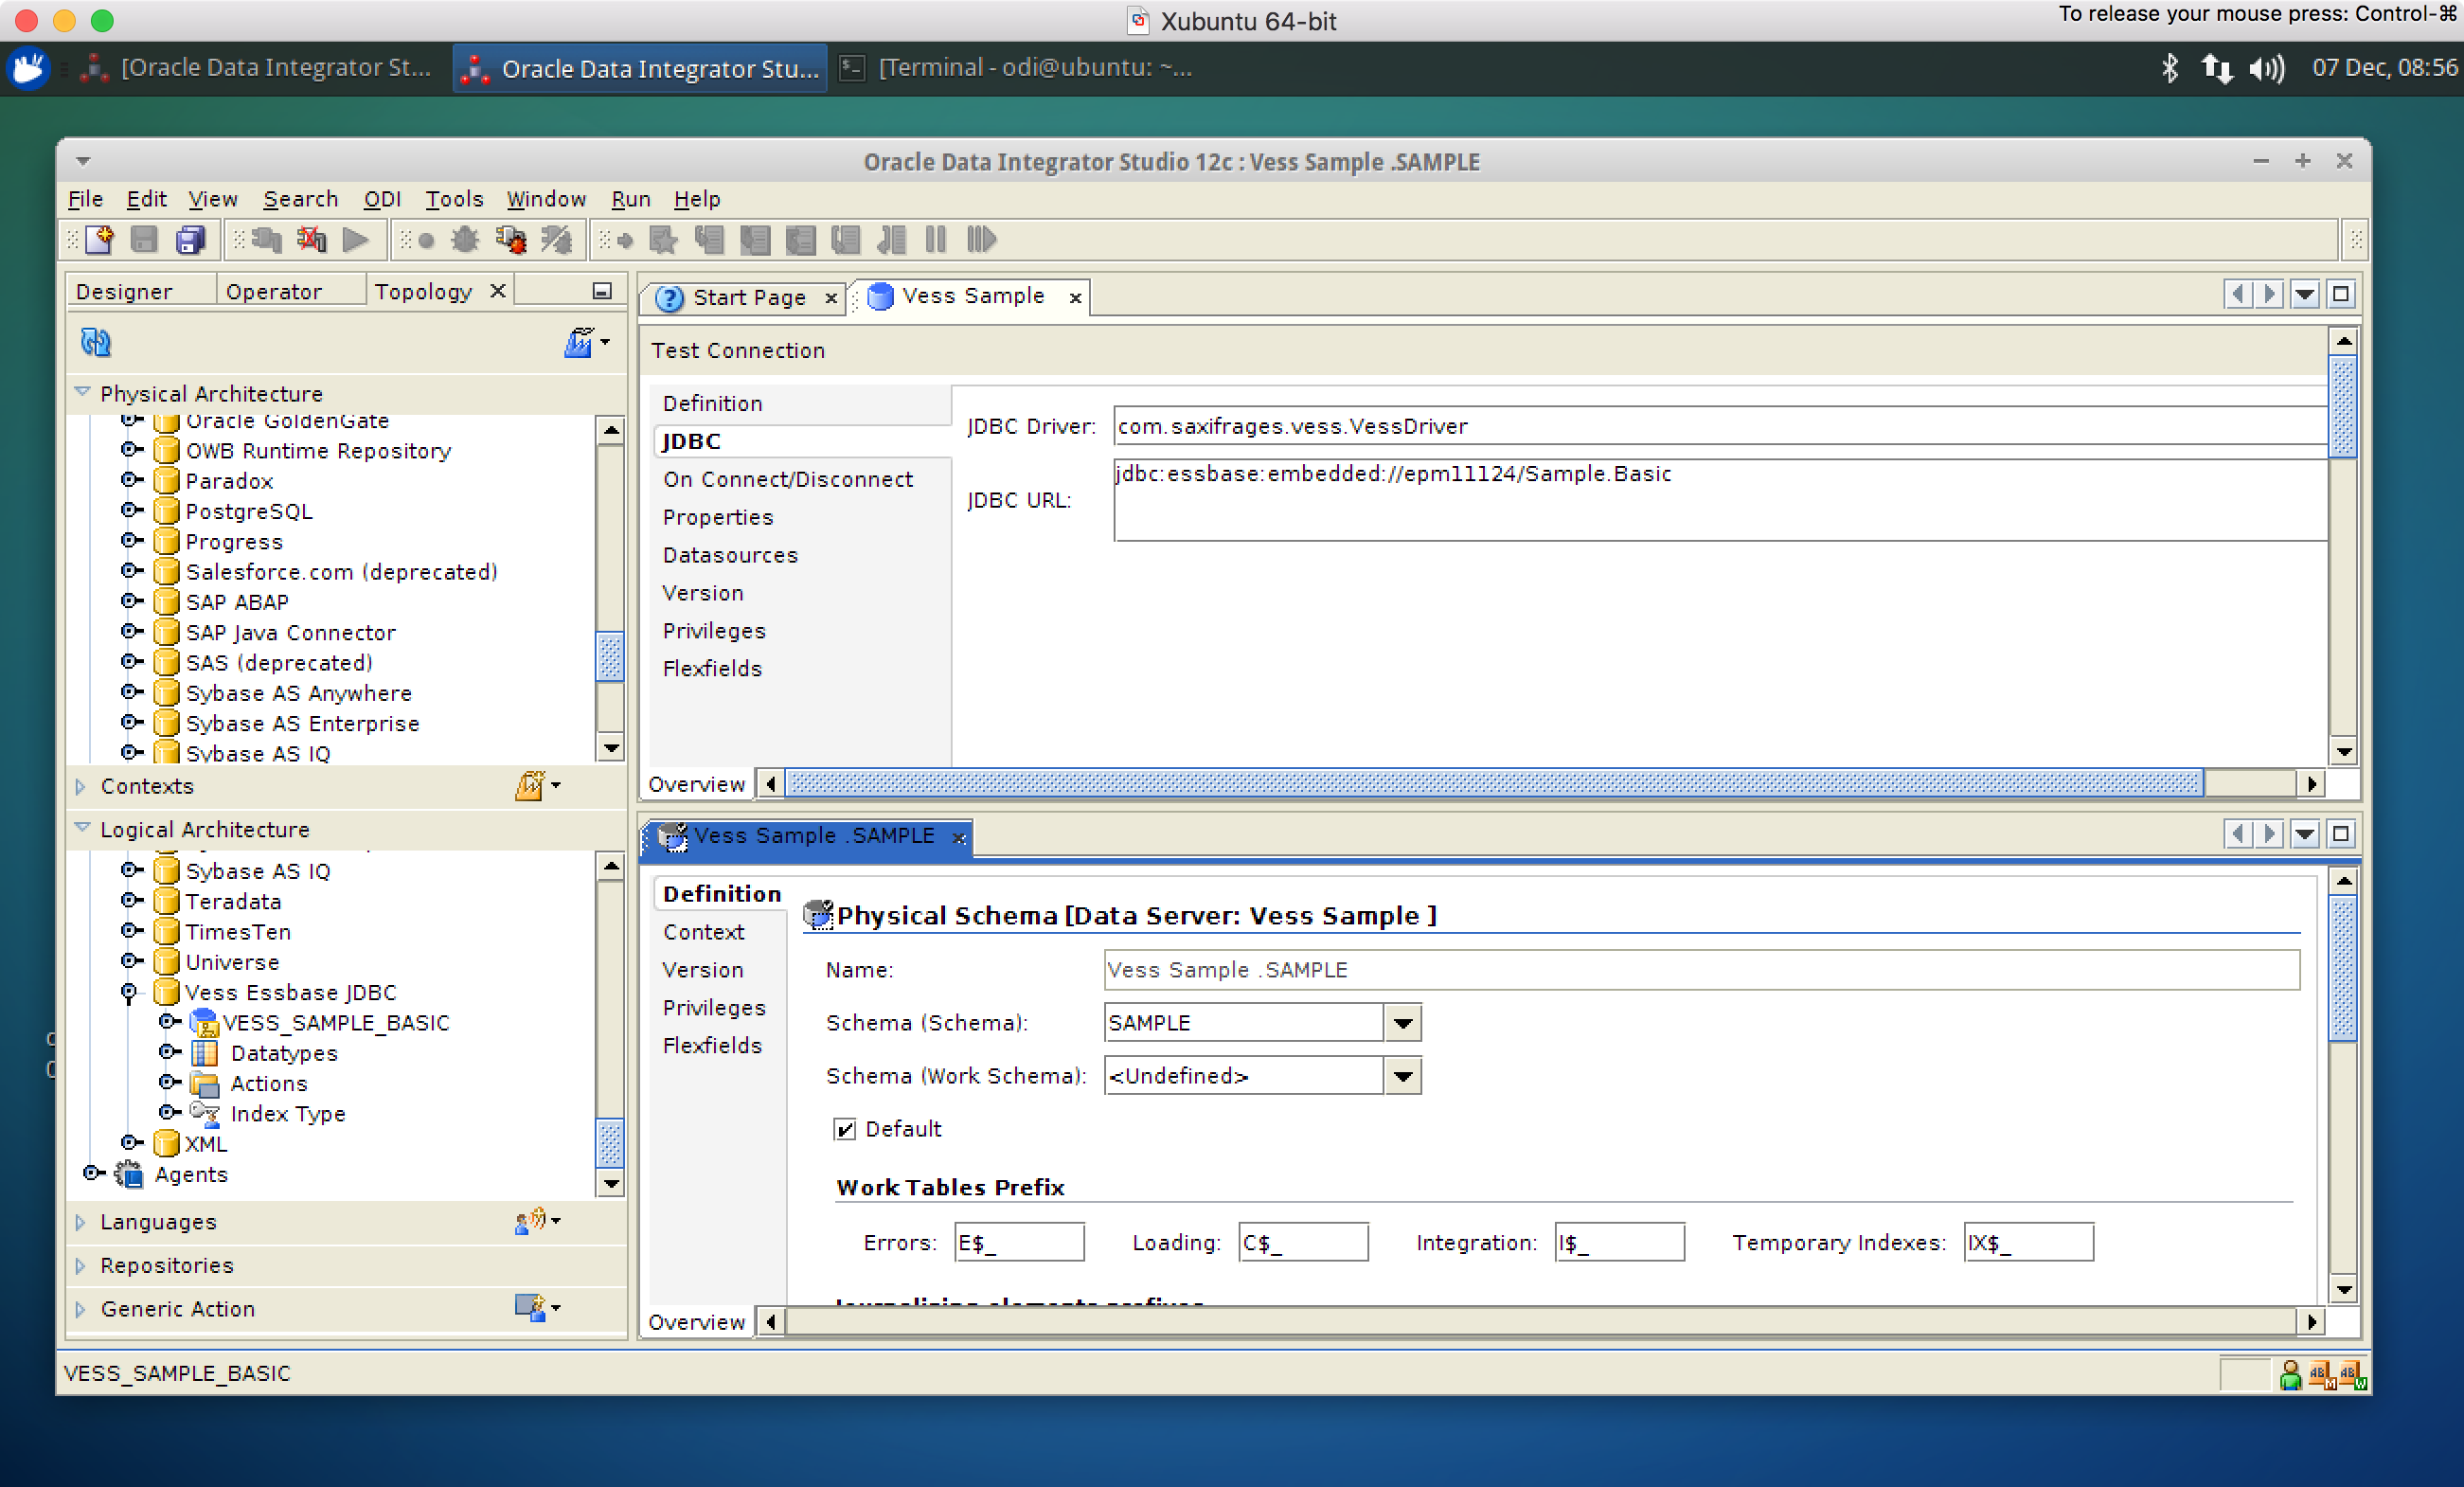
Here’s the same screens but shown together, along with a new logical schema named VESS_SAMPLE_BASIC:

Logical topology shown with JDBC configuration

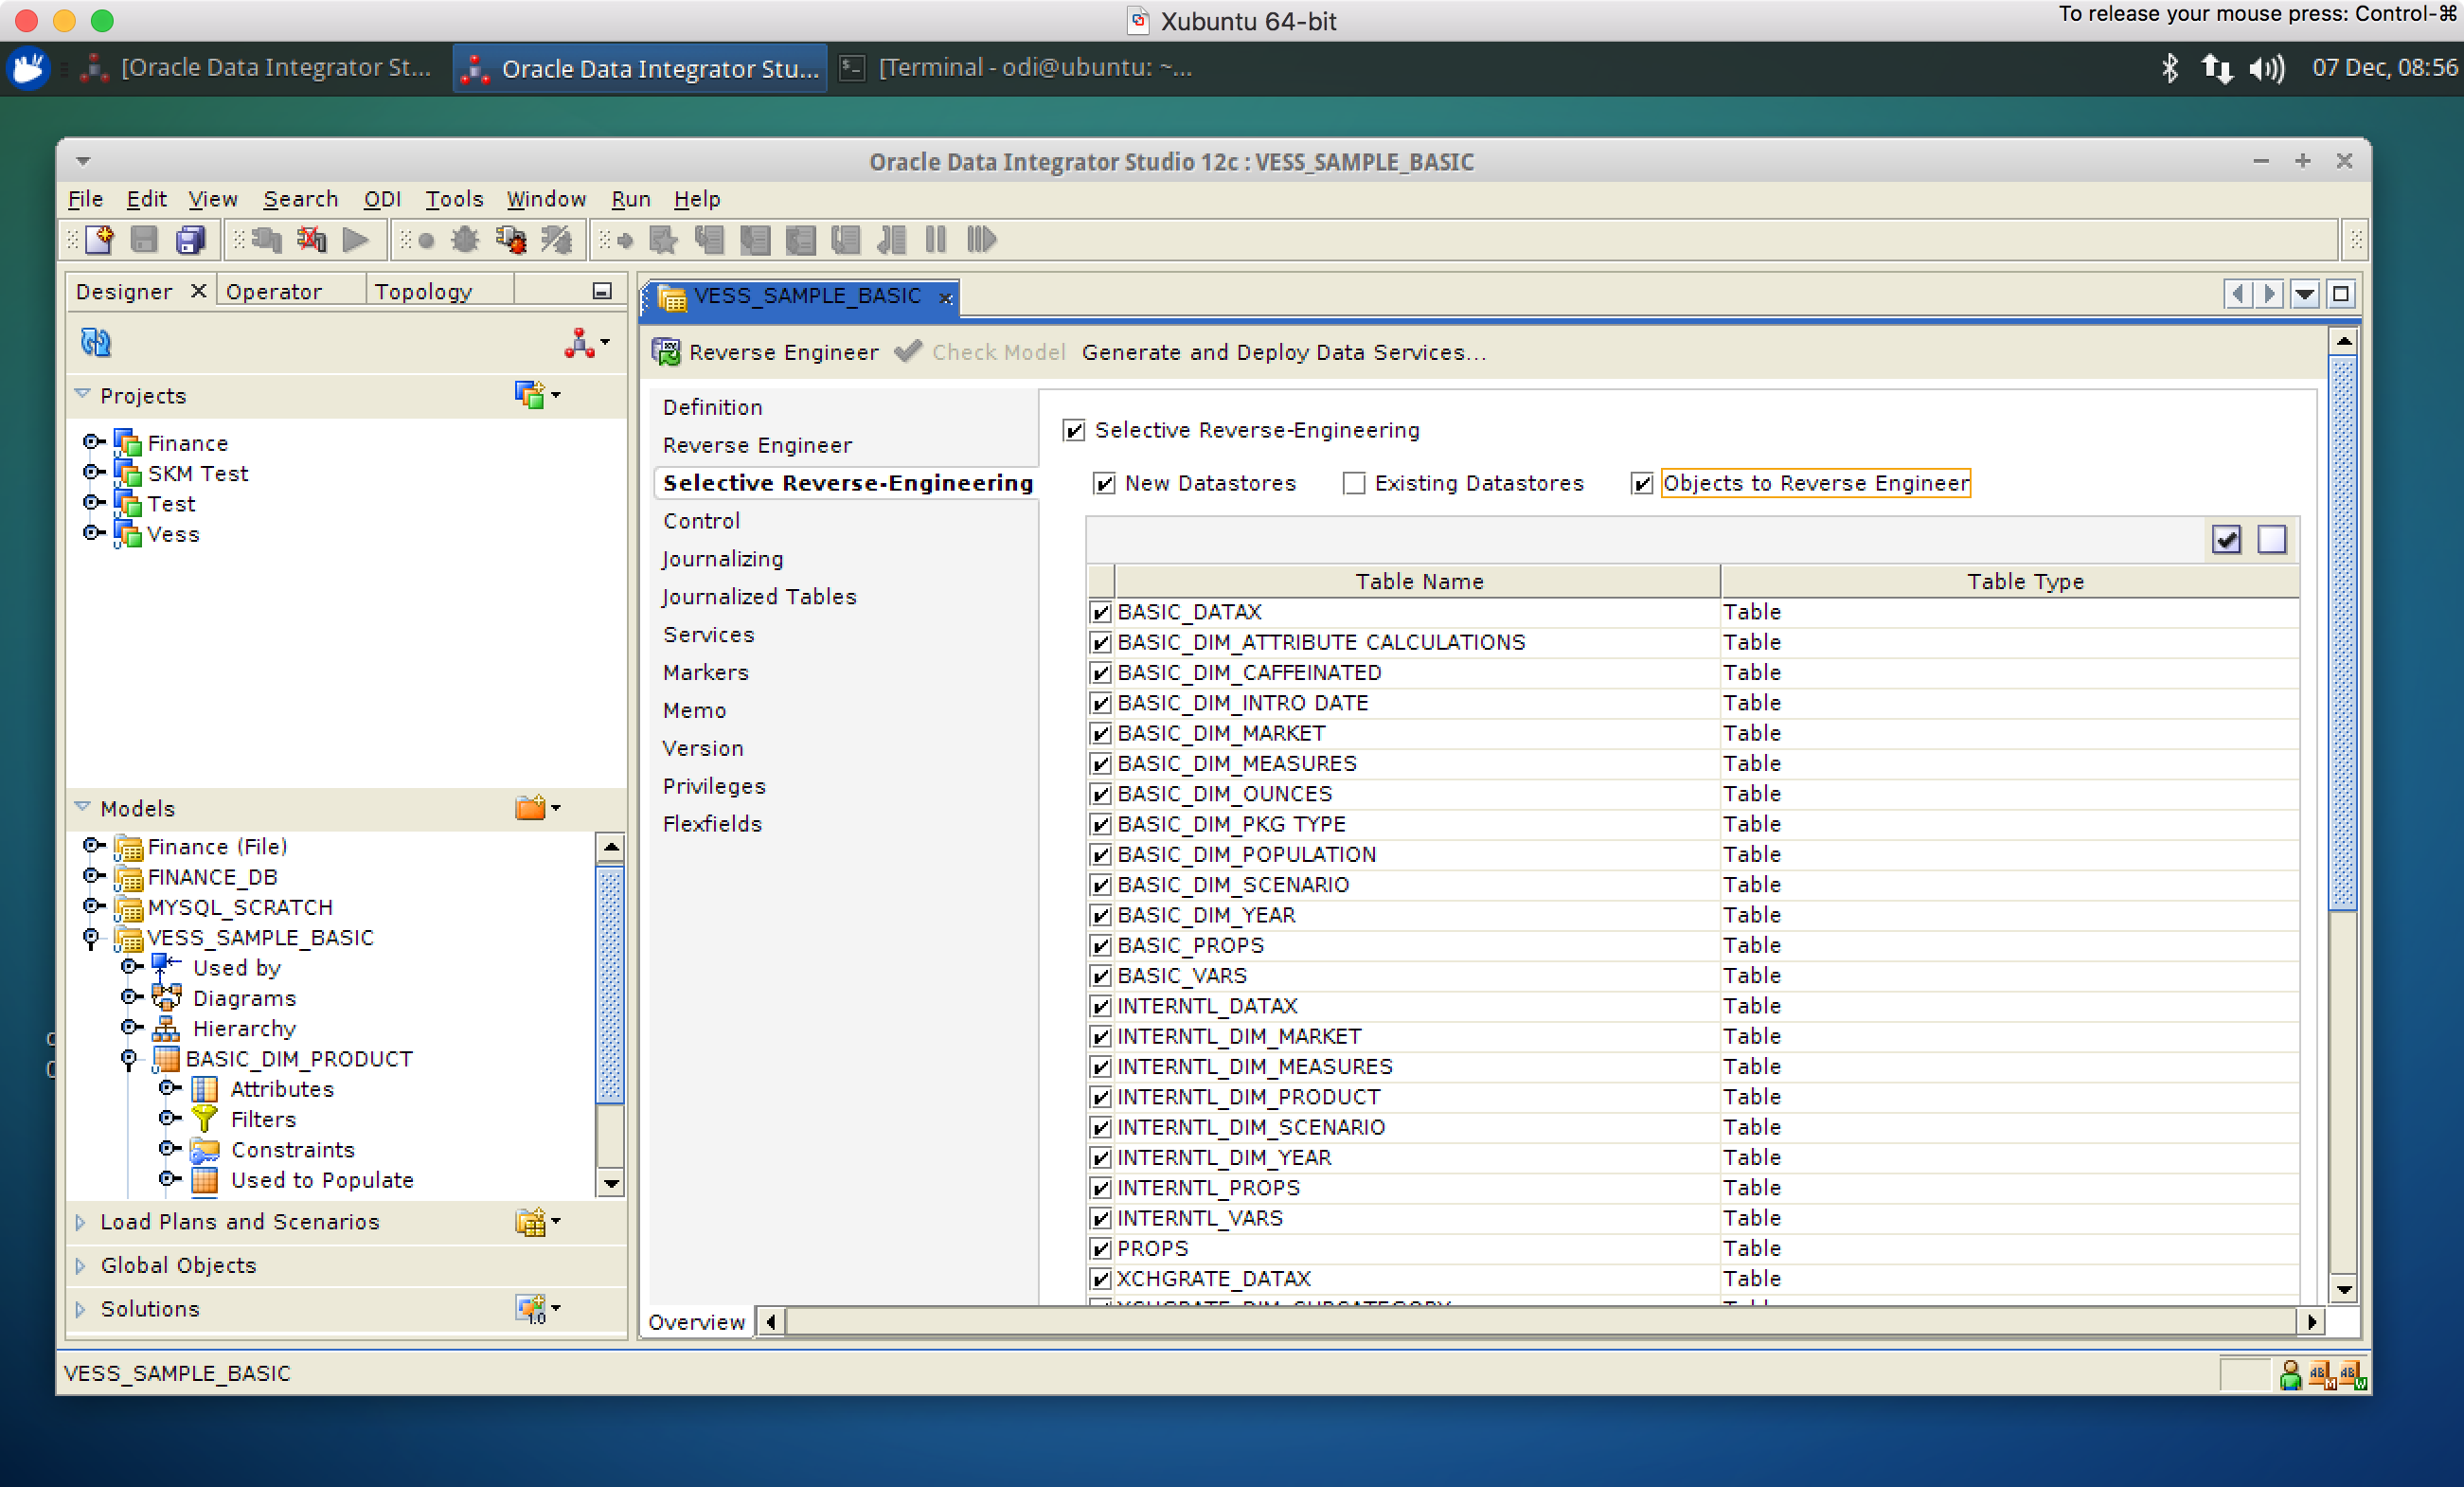
With the physical and logical topologies setup and just associated through the Global ODI context (never use Global except for possibly some one-off testing like this, by the way), I went over to create the model.  I selected the Vess technology and logical schema, and much to my enthusiastic amazement, when ODI went to reverse engineer the model, it brought back all of the Vess tables perfectly:

Reverse engineering models works out of the box

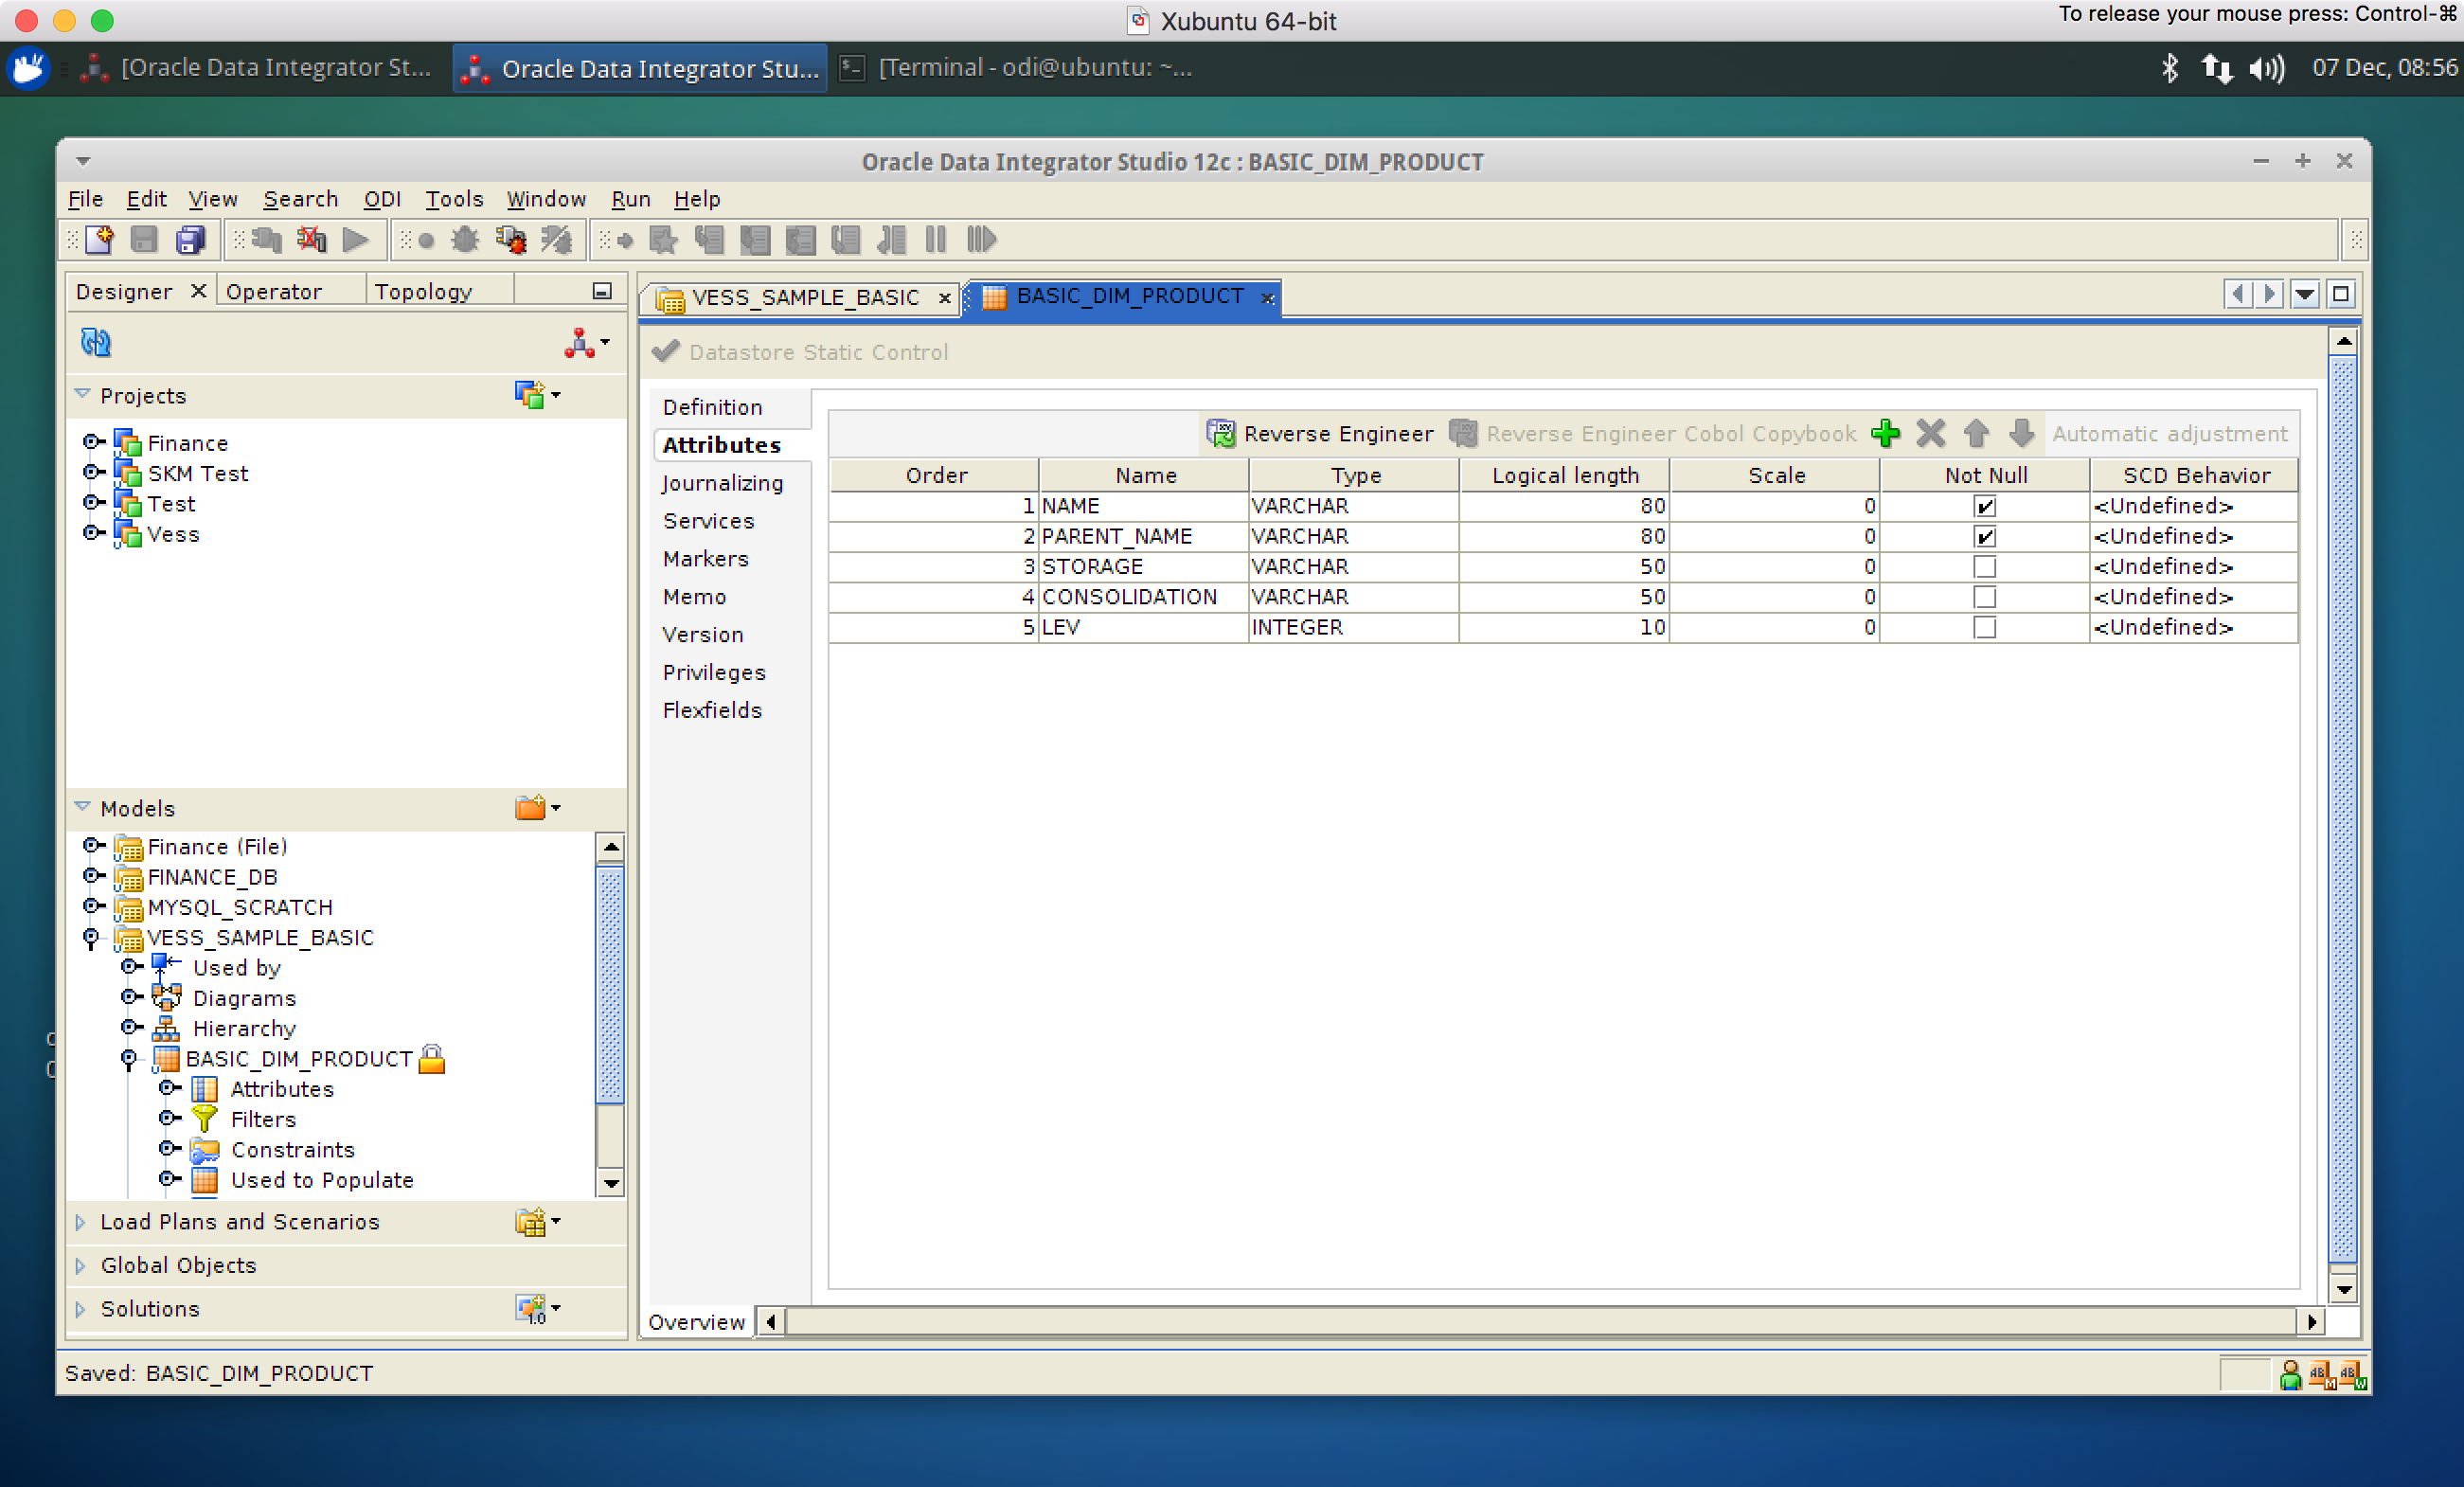
For the sake of simplicity I just brought in the BASIC_DIM_PRODUCT table:

Viewing attributes on Vess table

You may also notice that the logical lengths, data type, and not nullability status are all brought in perfectly as well, again because Vess goes out of its way to model this column metadata as accurately as possible.

In the world of Vess, it models a schema after an Essbase application, and then tables for each database and its content. In this case, that means that the table SAMPLE.BASIC_DIM_PRODUCT is the table that models the Product dimension in Sample/Basic. I find that this is a good model to balance performance and keep things organized well enough.

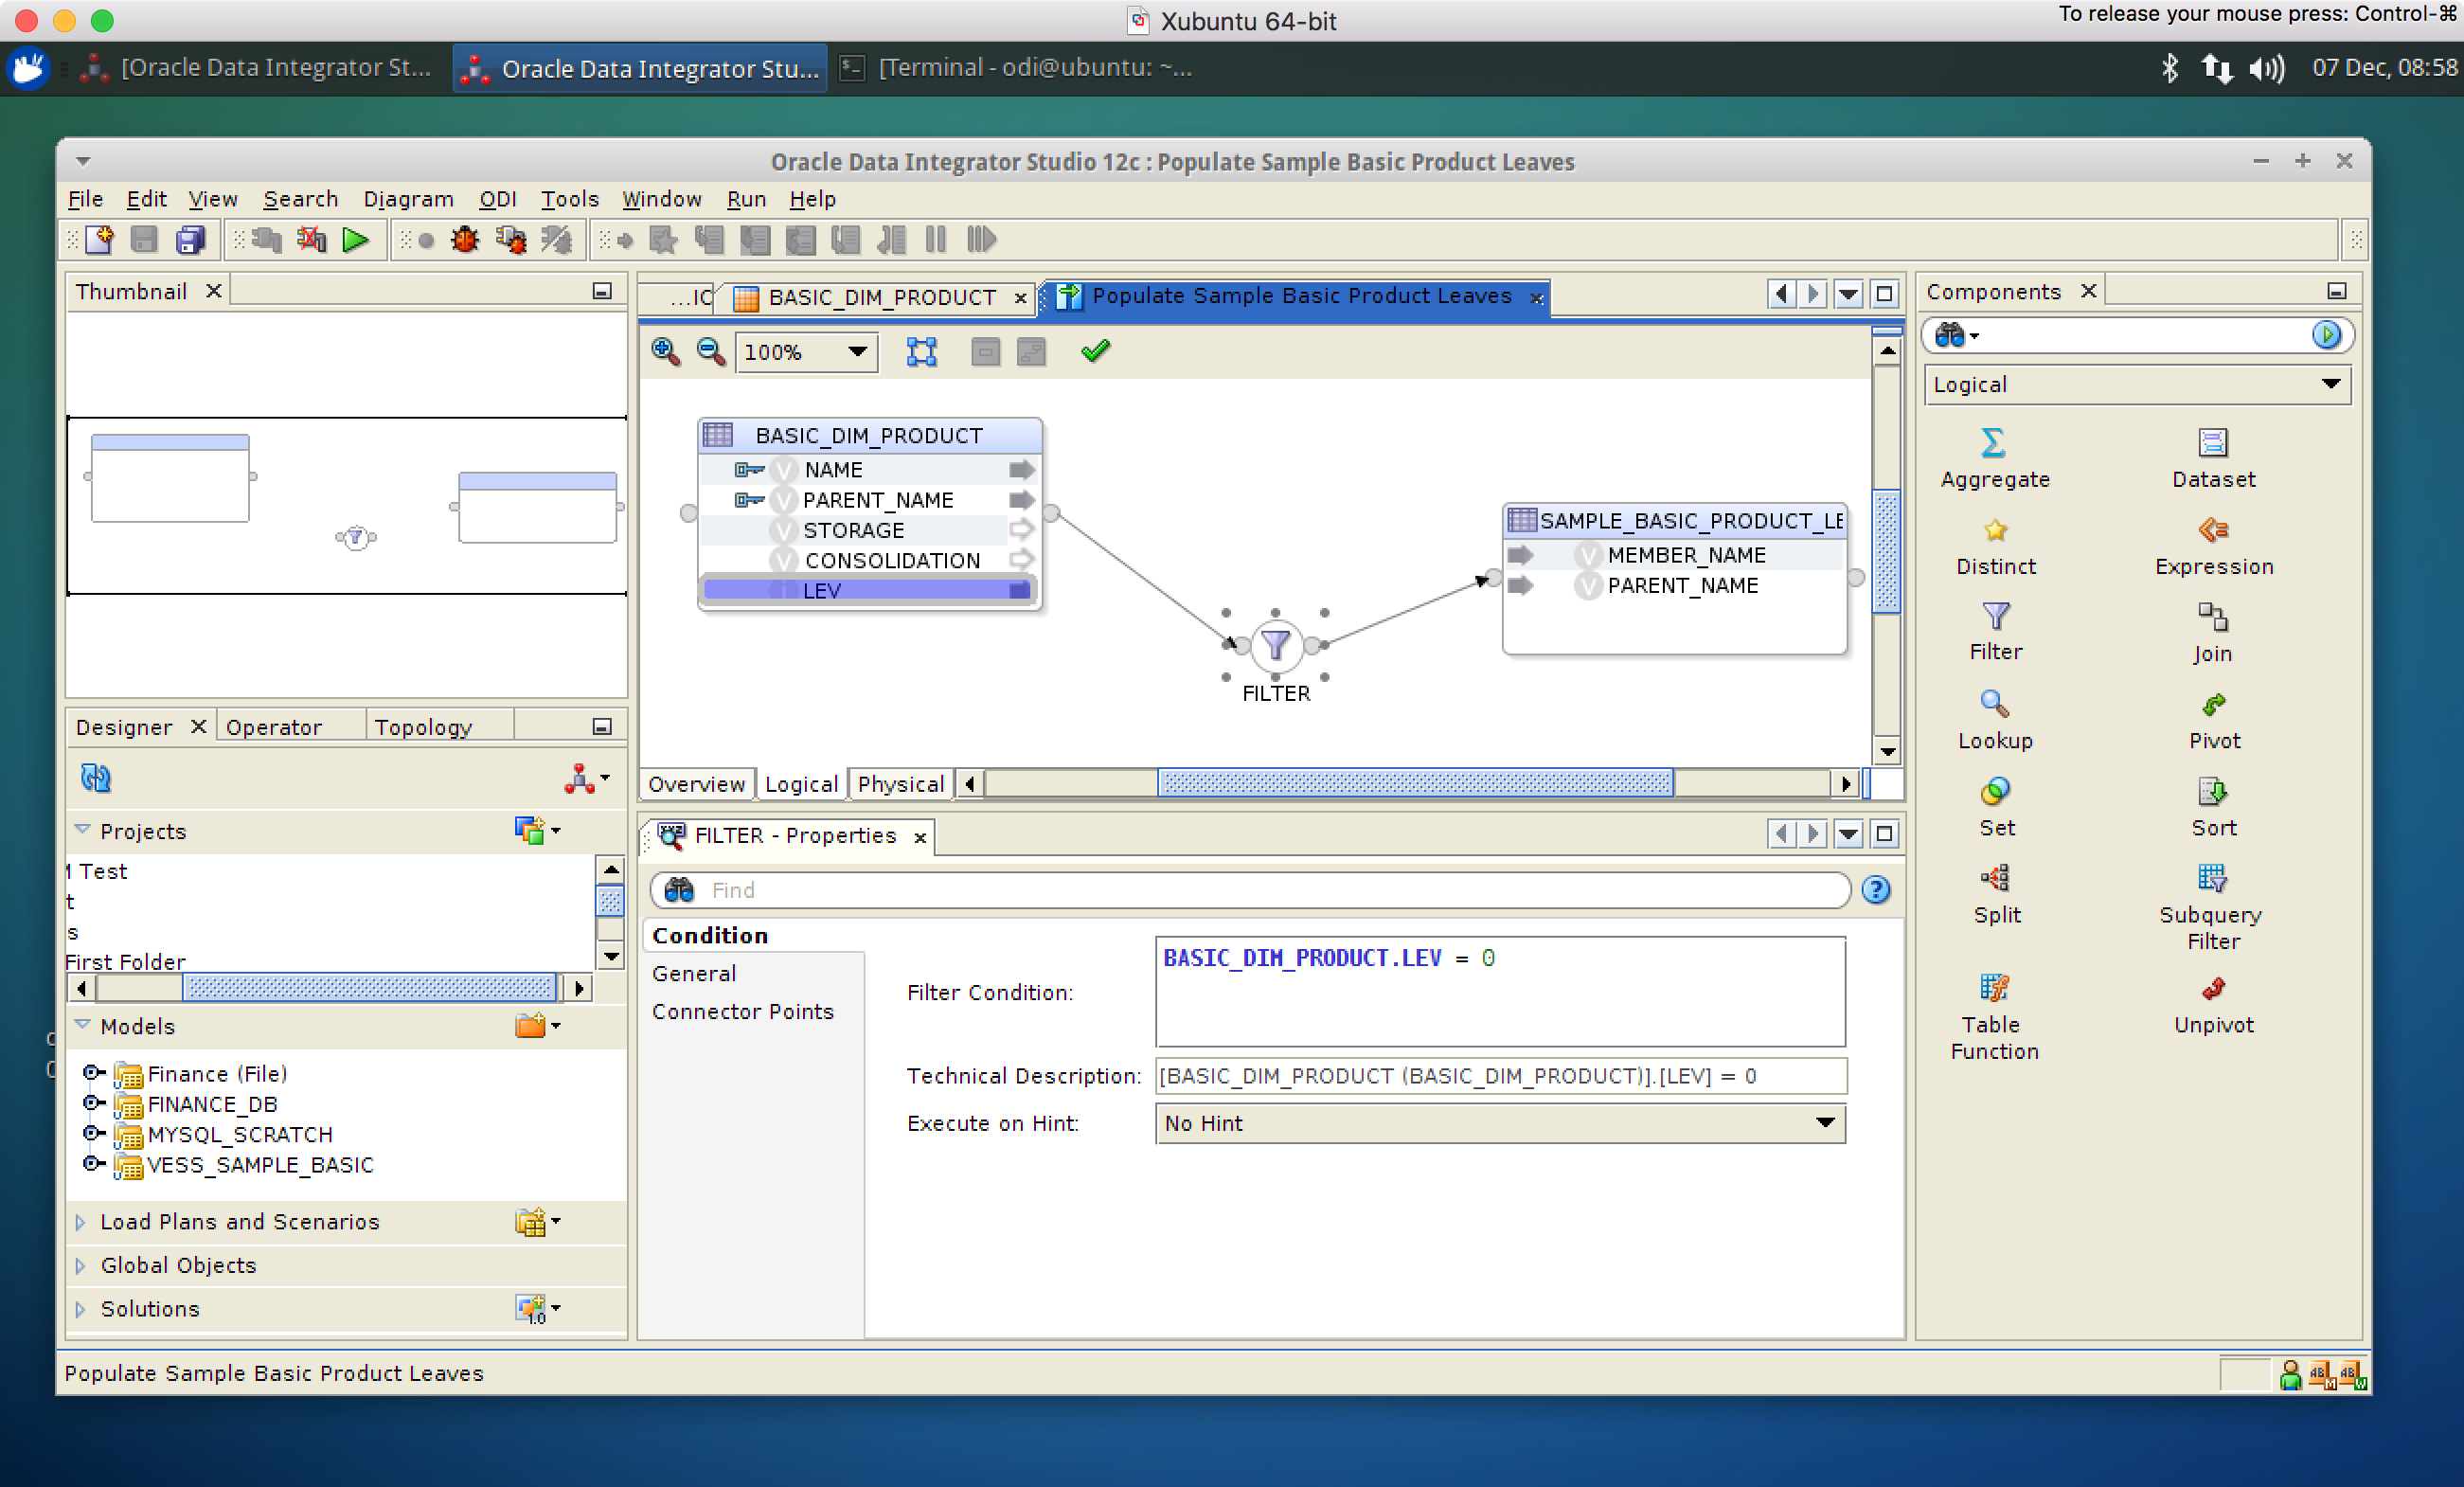
For testing purposes, I decided to make a simple mapping that will extract dimension data, then filter it to only level-0 members, then populate that into a simple table in MySQL.

Creating a mapping to extract Vess outline data

This is just a bread and butter mapping in ODI, with the simple condition criteria shown in the bottom middle pane.

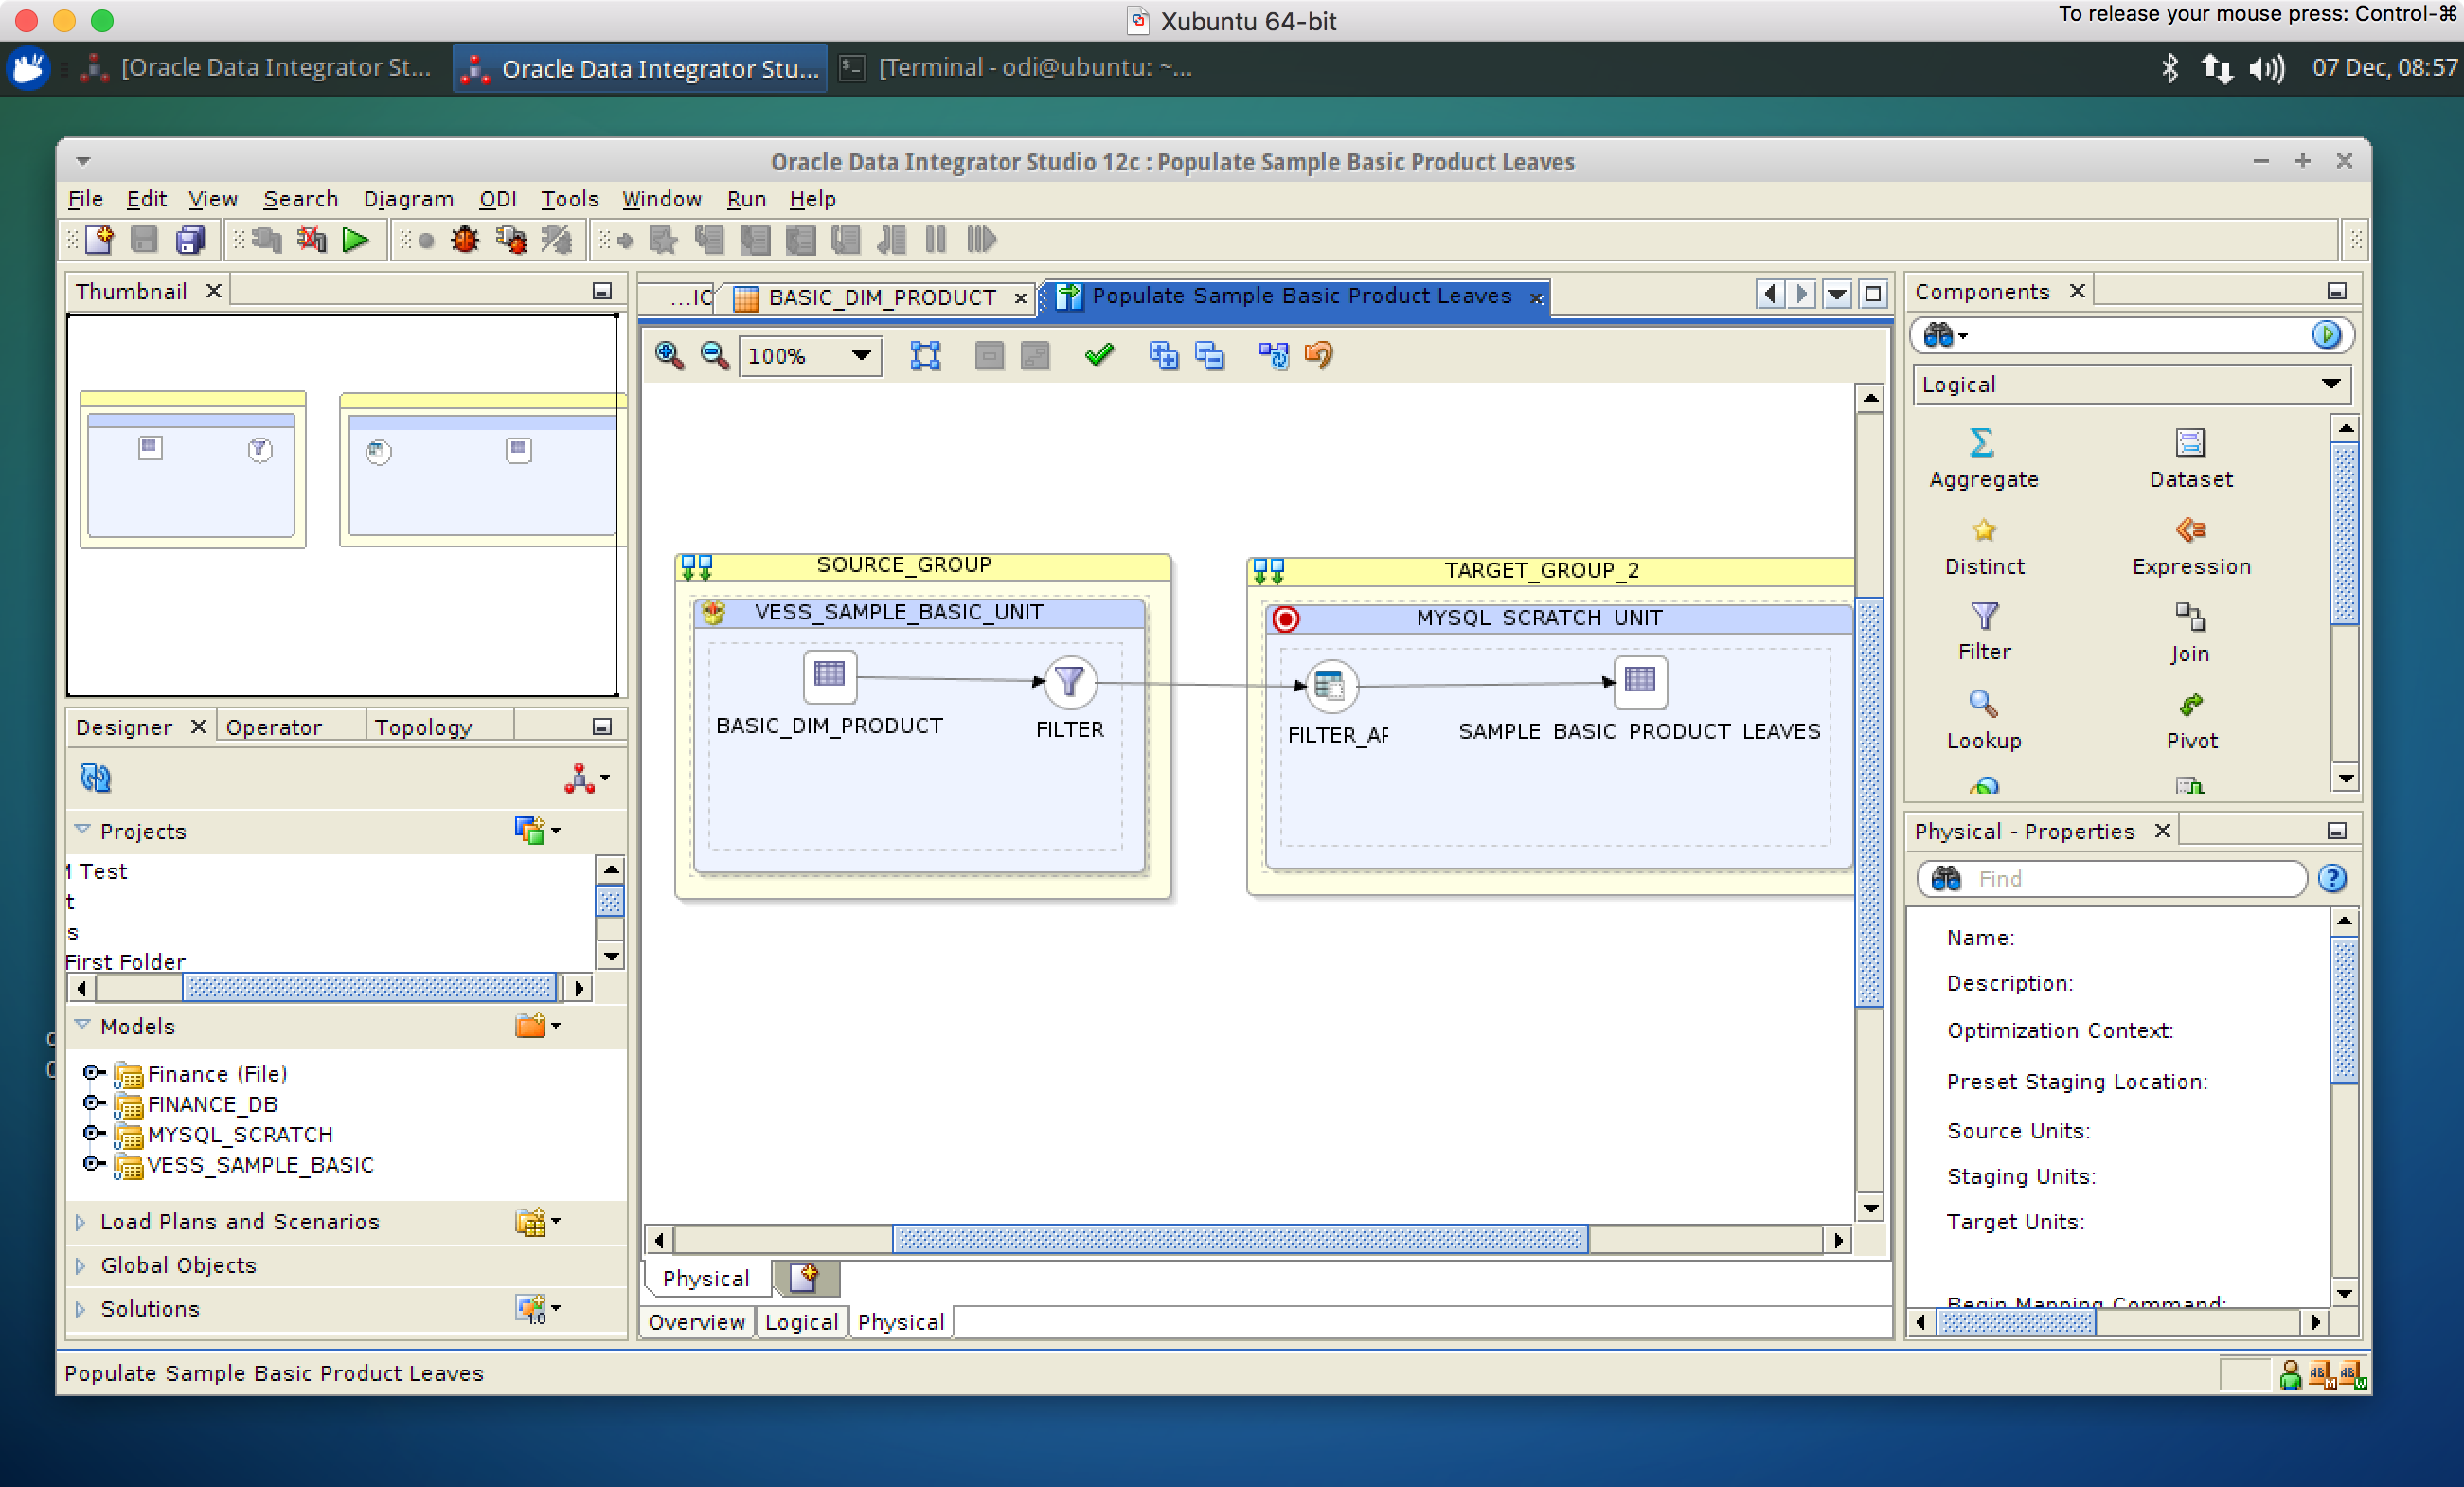
After that, we just need a simple physical implementation (using the target database as the work schema for this):

The mapping relies on a work table in MySQL (in this case)

And then try running it:

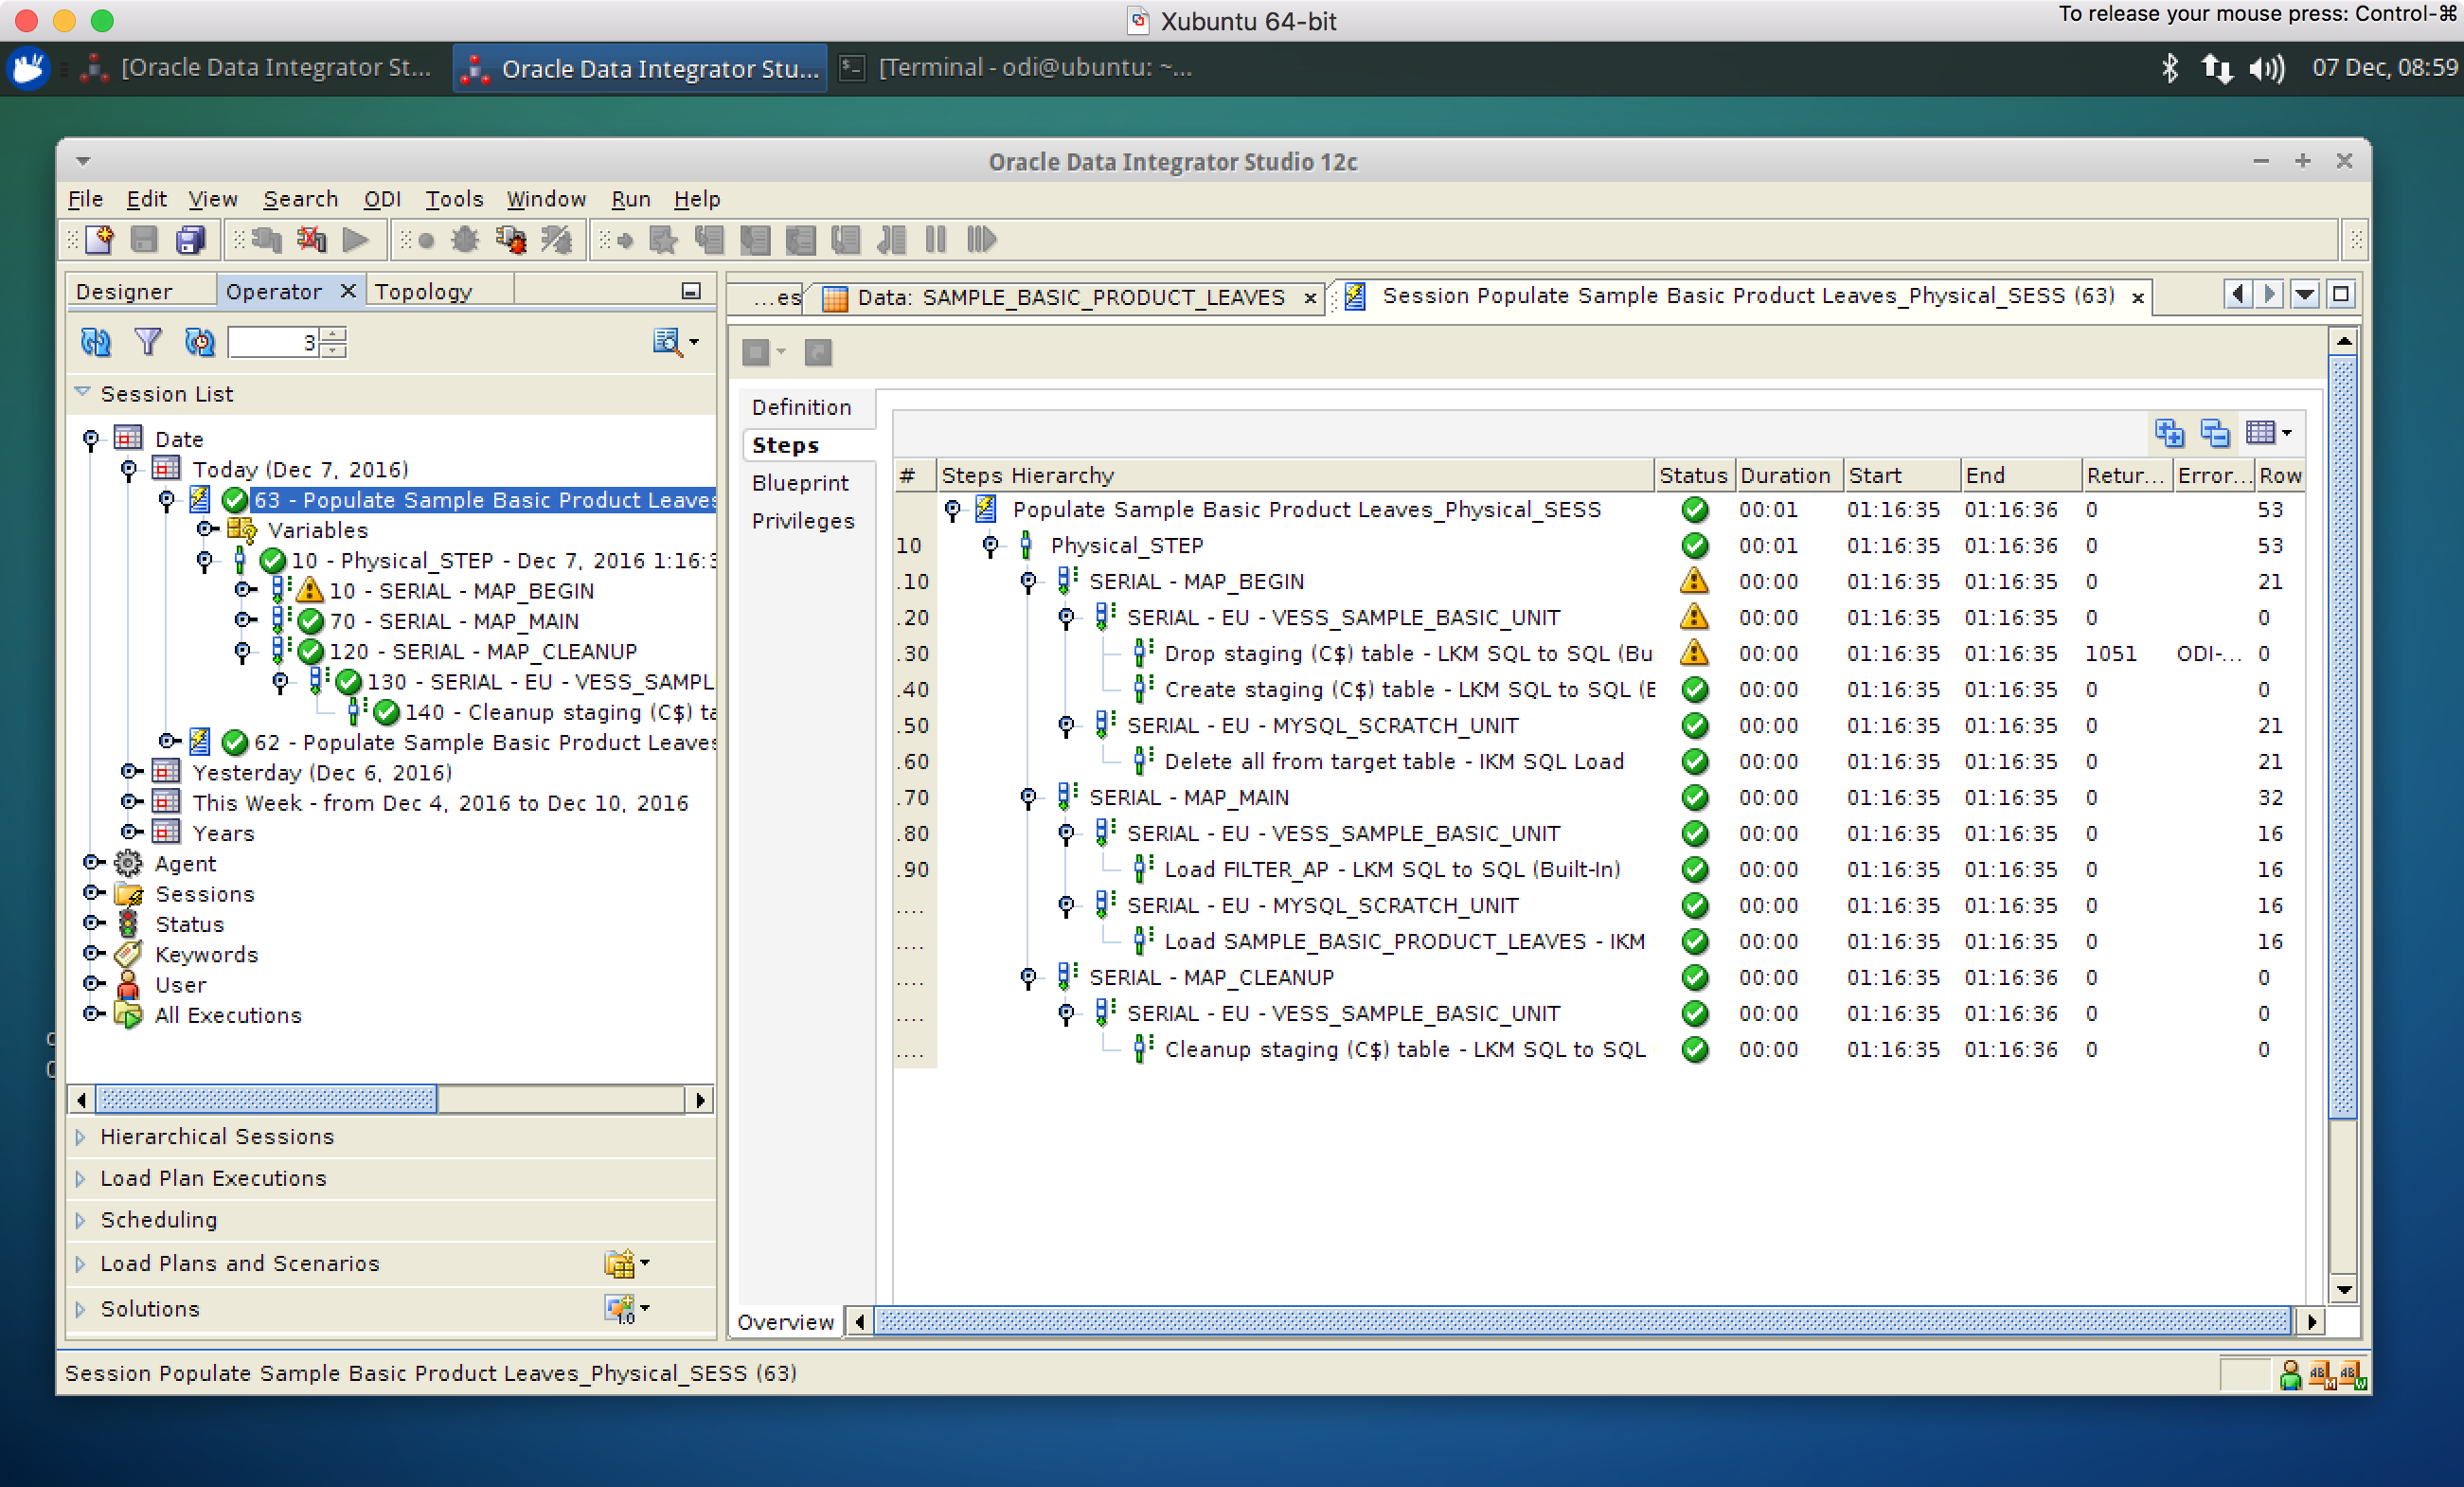
Viewing the execution in Operator

And it worked! Of course, given that these were disparate data sources with a vanilla IKM, ODI just did a row-by-row mapping, which isn’t ideal for large data movement but works fine in this case.

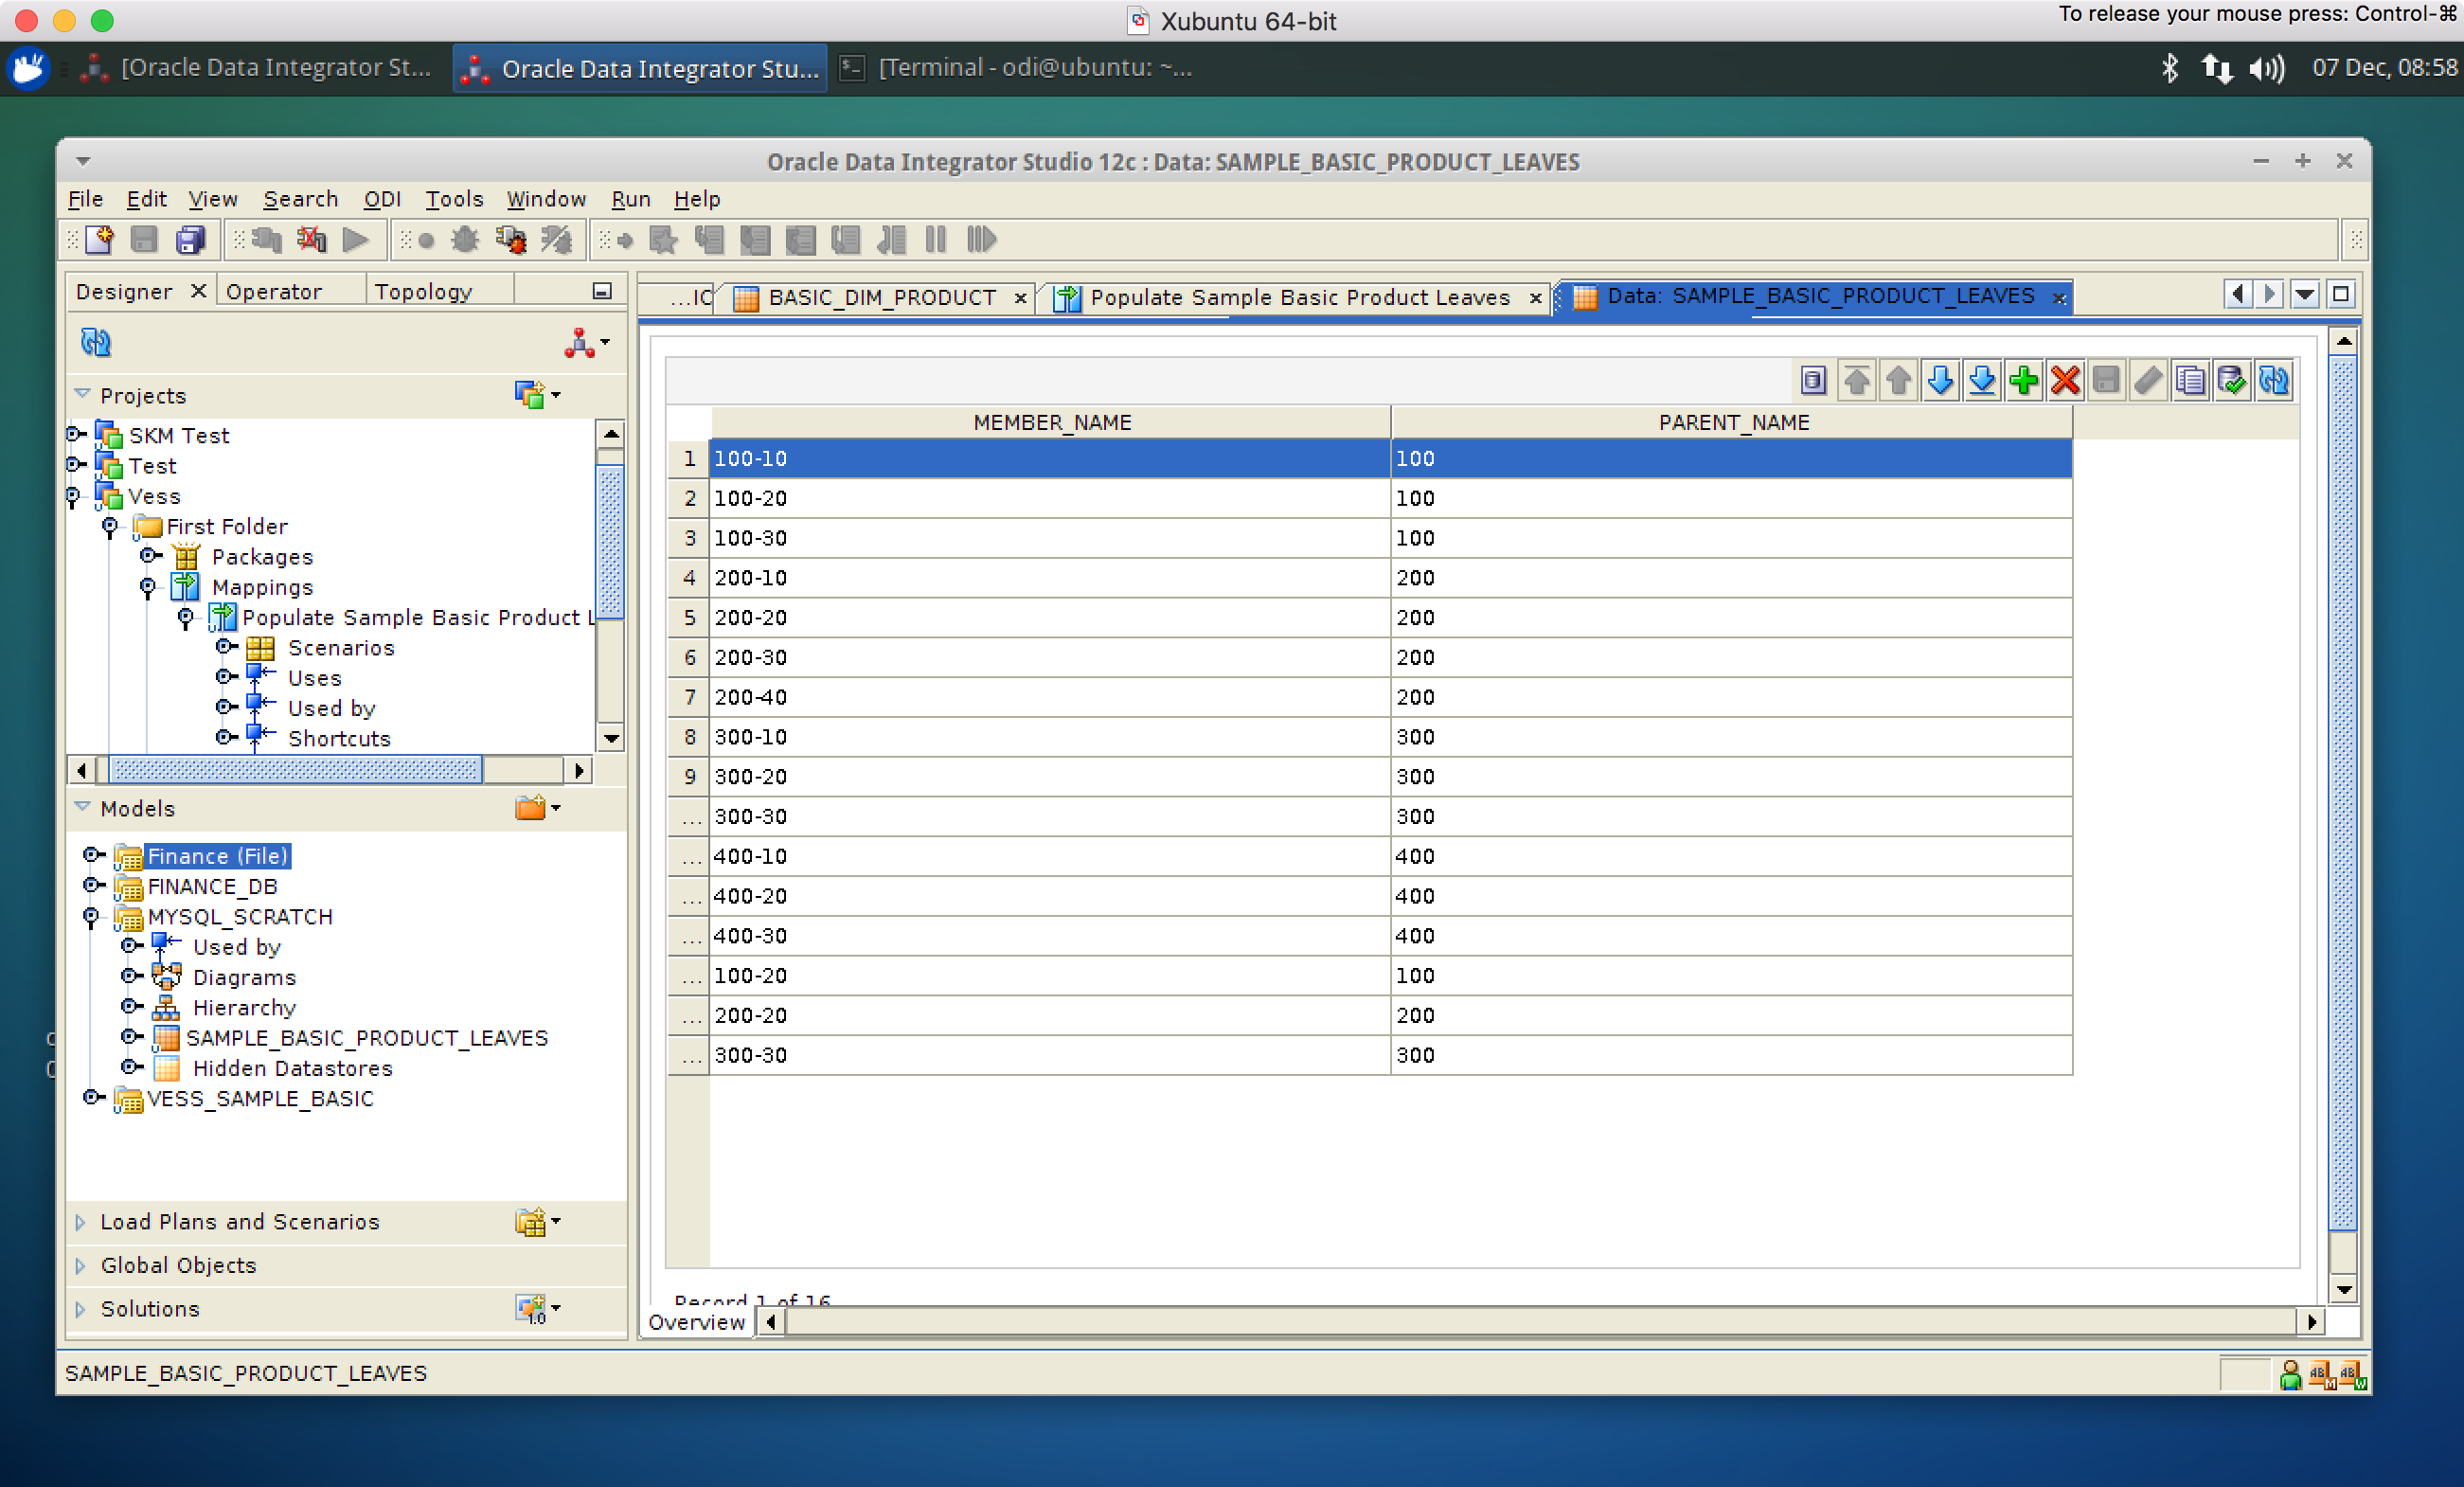
And sure enough, after inspecting the target table in MySQL, all of the proper data was indeed there:

Viewing the data in the target MySQL table

It looks like I might need to do a small tweak since the shared members under the Product Diet Cola hierarchy got repeated here, so I can either do a DISTINCT or look at tweaking the extraction algorithm a bit. We’ll see.

Next Steps

Vess continues to be an interesting side project. For the moment I have turned off the data extraction tables as I am reworking the way that data from a cube (as opposed to metadata) is “projected” into tables. I think it needs to be a little more flexible in order to be useful in other tools, such as DVD. If you want to test with Vess, please email me for a copy. Many of you have, although some of you are only interested in the data extraction piece, which is still a work in progress. So if you want to play with the outline and other stuff (substitution vars, database stats, server sessions, and others), you’re more than welcome to give it a shot, just send me a message. The pure data stuff is coming along as time permits!

Dynamic Calendar with Comments in Dodeca

I keep telling myself that I’m going to do more blog posts that are short and sweet, instead of these epic 6,000 word monsters, but I’m just having too much fun. Today’s article is going to be a little bit of thinking outside the box. Outside the box – but inside the grid. This is actually inspired by a use-case I saw a Dodeca customer present on at Kscope this year.

The basic original idea was “Why not make a calendar view in Dodeca?” Those of us that are heavy in the Essbase/Excel world are used to modeling financial data, but spreadsheets are used for countless different activities. Create a workout plan. Create a list of your favorite movies – and even make a calendar.

In the context of Dodeca, a calendar, whether it be static or dynamic, is a really cool use of the tool, if a bit unorthodox. A lot of financial departments and companies have very complex but methodical financial processes, particularly around the “close period”, and keeping everyone on track and coordinated is important. And companies that have Dodeca already have a very quick and very easy way to make dynamic spreadsheets centrally available to their users without having to email around a bunch of Excel files.

For today’s post I am going to start off with a basic calendar, then absolutely turbocharge it. The user is going to be able to select a month and year from Dodeca selectors and the calendar will dynamically update. We’re going to make it so we can add comments to each cell of the calendar. The comments will be associated with arbitrary intersections of our choosing (a great feature of Dodeca comments that I’ll go into extensively in this post). We’re going to accomplish this using the built-in Dodeca comments functionality. Along the way, I’m going to show off some of the power and versatility of Dodeca comments and use practically every option available.

To be clear, this is going to be a pretty technical post (even by my standards), but I want to emphasize at the outset that the techniques here aren’t limited to this “dynamic comment calendar concept”. In particular, the way that I’m going to setup and leverage comment ranges and the Excel OFFSET function will be applicable to many contexts. These techniques are very powerful and can provide the basis for powerful, rapidly developed solutions that users will love.

Dynamic Calendar in Excel

The first thing we need to do is create a dynamic calendar in a spreadsheet. In this case, I want to be able to have two input cells (the year and and month) and then generate a properly aligned calendar based on that. Like this:
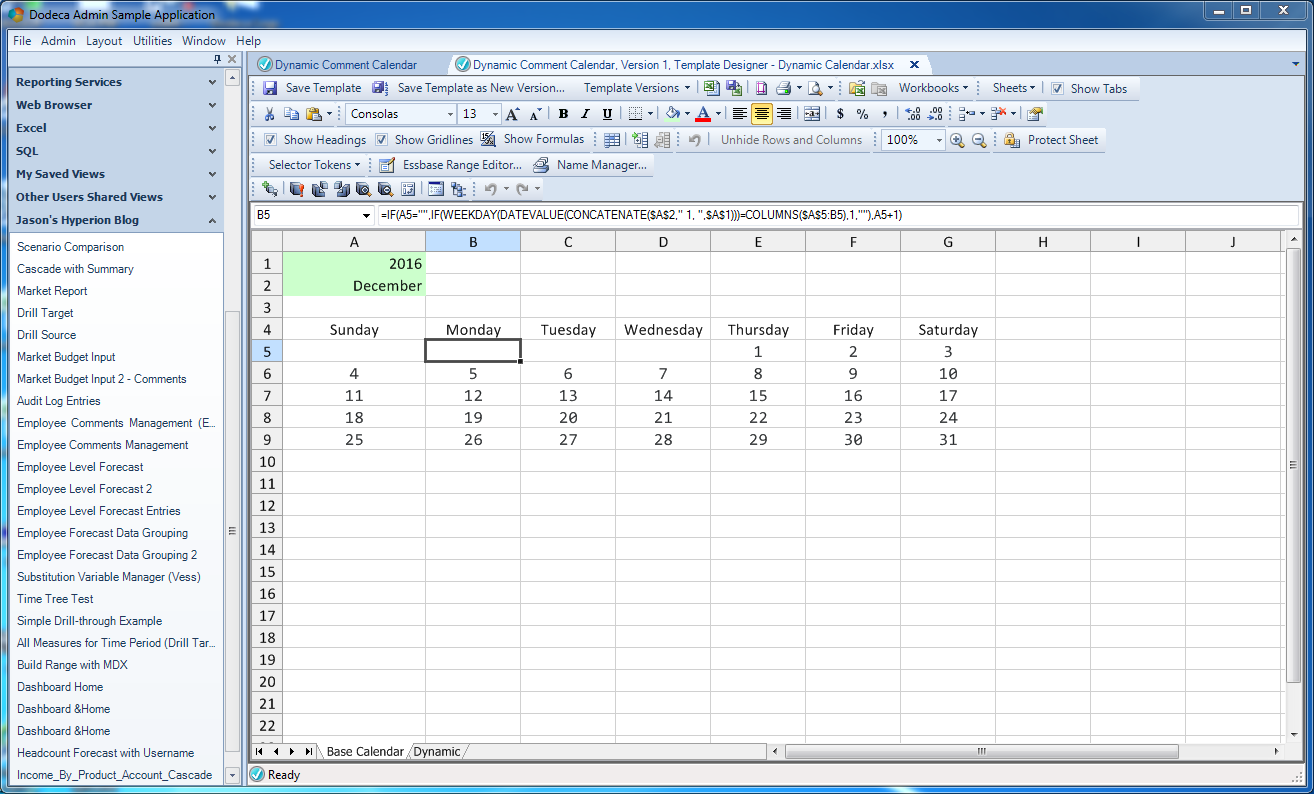
A dynamically generated calendar in Excel

A dynamically generated calendar in Excel

I thought when I originally Googled for something like “dynamic calendar in Excel” there would be a million hits, some of which included a ready to go Excel file that I could steal borrow be inspired from. After a bit of searching I found an incredible step-by-step guide on setting up the formulae for a dynamic calendar in Excel that I started with. You can see in the above screenshot that I’m on a cell that’s blank at the moment (based on the month/year) but actually has a formula in it (as with the other cells). Here’s a peek under the covers at what the other formulae look like:
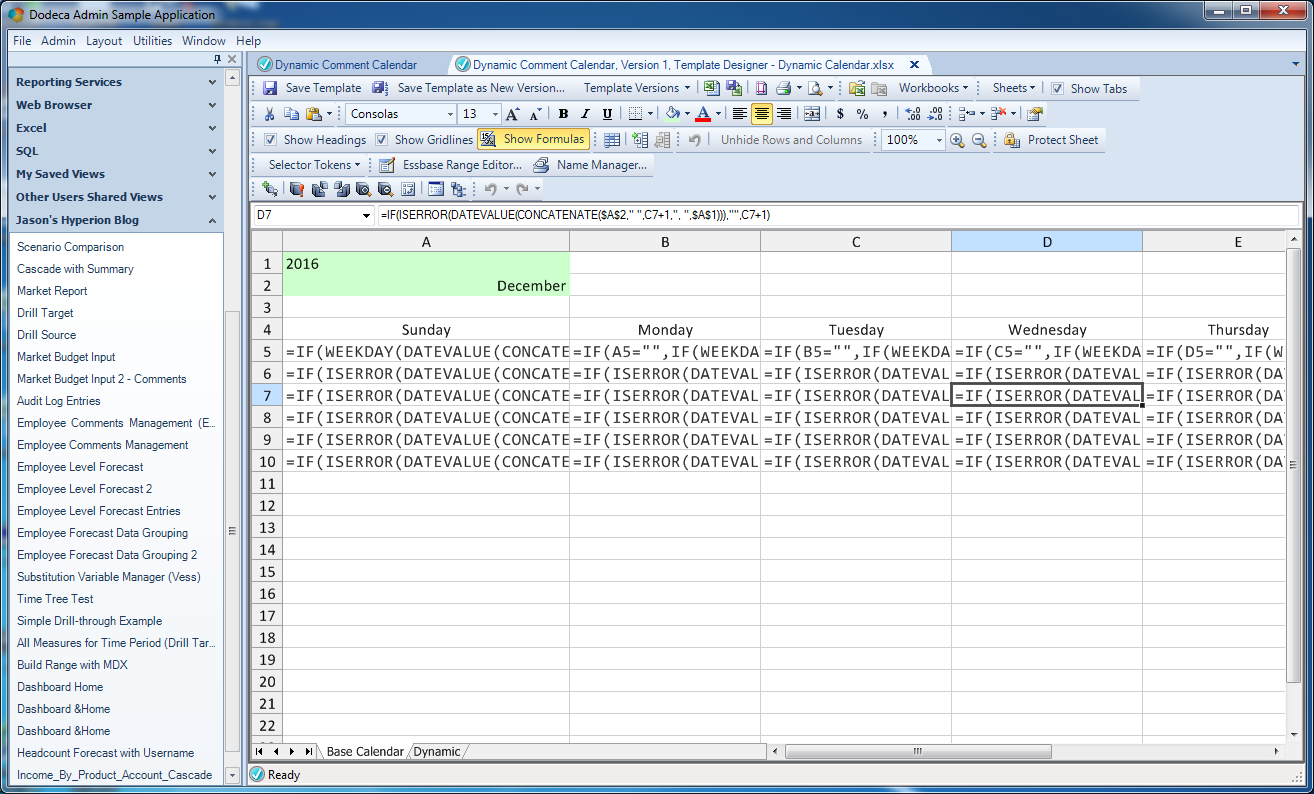
Formulae used for dynamic calendar

Formulae used for dynamic calendar

This is a great start to the calendar: we can now get a properly laid out month for any combination of year and month. If you have your Dodeca hat on then you should already be thinking: “Hey, we can just put selectors in for the month and year!” and you’d be on the right track.

Now I’m going to tweak the layout a bit to accomplish the following things:

  • Add four cells below each calendar entry that will eventually have comments in them
  • Selectorize/tokenize the inputs (to create [T.Year] and [T.Month] that will be filled in with user selections
  • Add a title to the calendar that is dynamically updated
  • Add a row to help with offsetting cells (row 4 in the below screenshot, I’ll explain in a bit)
  • Add a column to help with identifying particular comments (column J in the screenshot, again, I’ll explain in a bit)

Here’s how things are looking now:
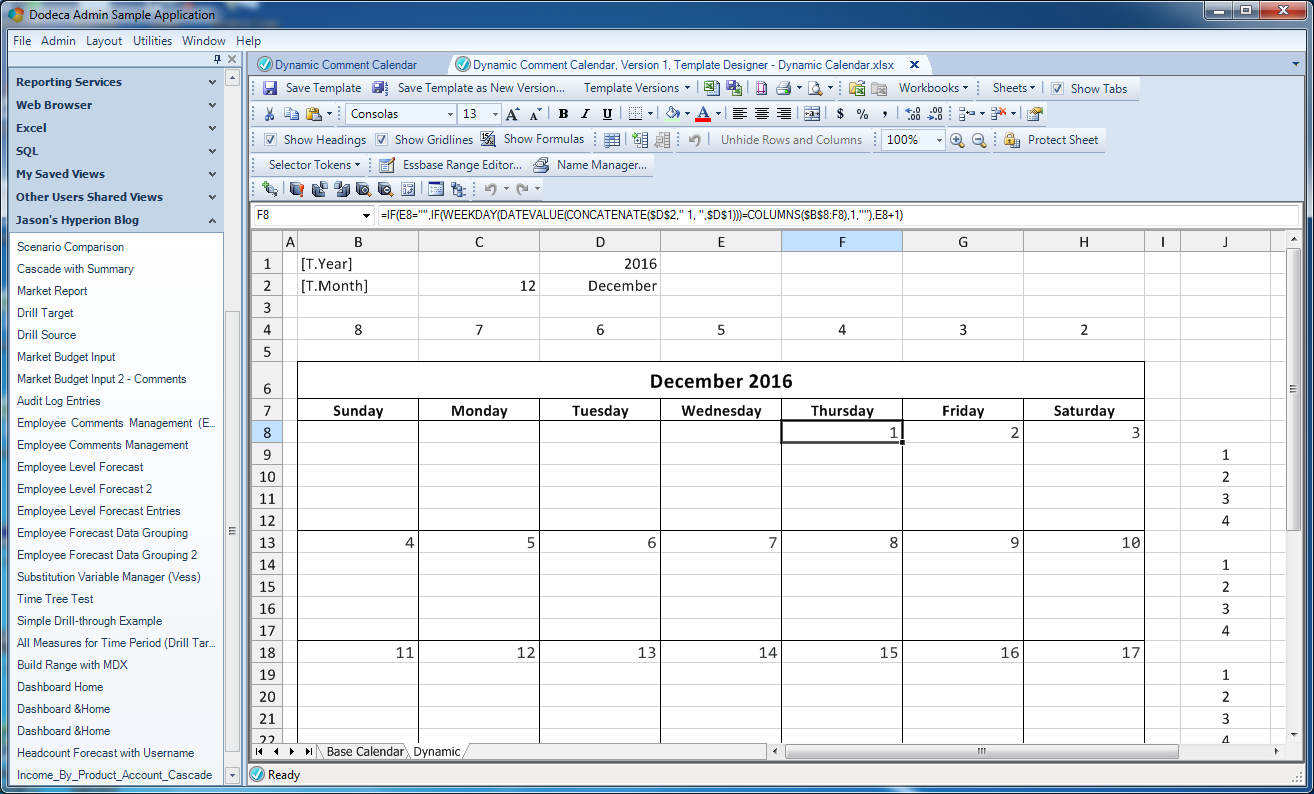
Formatting the dynamic calendar a bit

Formatting the dynamic calendar a bit

A Brief Aside: “Dev Mode” Selector Values

I want to point out a small but useful technique that I’m using for the selectors to help with development. It’s very common in Dodeca (and Excel of course) to have cells that depend on other cells. For example, in the above screenshot, the title of the calendar is just a concatenation of two other cells (the month and year). It’s also pretty common to have formulae that expect the input value to be something particular, such as a number or the name of a month. For example, I can generate the full text month name of a particular date by using the formula =TEXT(DATE(2015, 2, 1), "mmmm"). In this case, the DATE function takes three parameters (year, month, day), and the TEXT function takes a date value and a formatting code (“mmmm” means full month name). If one of the parameters to the date function, however, is not a number, then the function fails and anything dependent on that cell will also be invalid.

Frequently the process of developing a view in Dodeca is to build a normal spreadsheet using some temporary/dummy values, then the very last thing we do is swap in a selector token such as [T.Month] – but in doing so, we can break formulae that are expecting a number. So I want to point out a small but useful technique I am using that helps me get around this issue without having to constantly change tokens back and forth.

Check out the following screenshot:
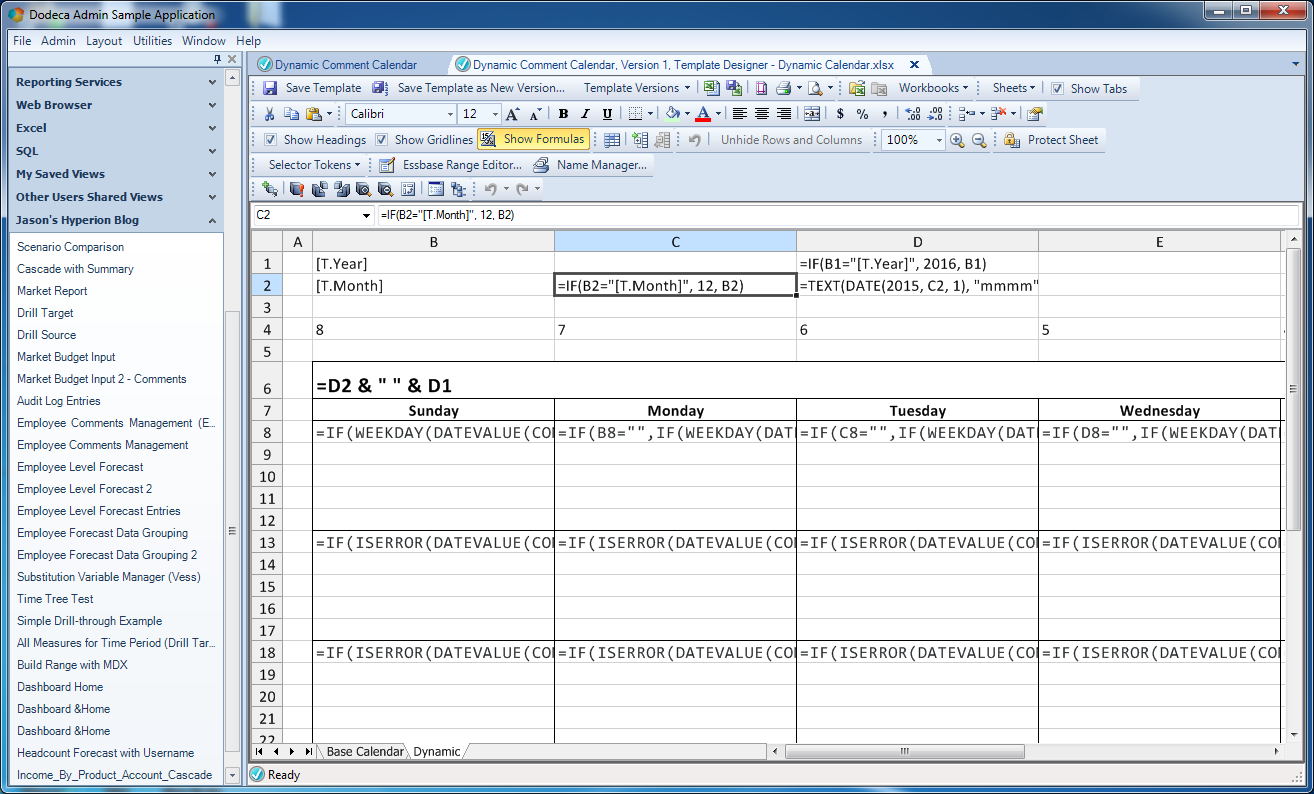
"Dev mode" selectors

“Dev mode” selectors

I have my selector tokens in column B (cells B1 and B2). And next to the month token in cell C2 I have an Excel IF statement. What I’m saying is if the contents of the cell are the token name itself, then evaluate to [in this case] the value 12 (December) for testing purposes, otherwise, just use the value in the cell. And the next cell over (D2), I have my normal formula to generate the full month name, but rather than trying to process the token value over in cell B2, it uses the “sanitized” value in C2. I also did this for the [T.Year] token in cell D1.

With this small technique, I can develop my report as normal and keep it tokenized, instead of having to look at something like this:
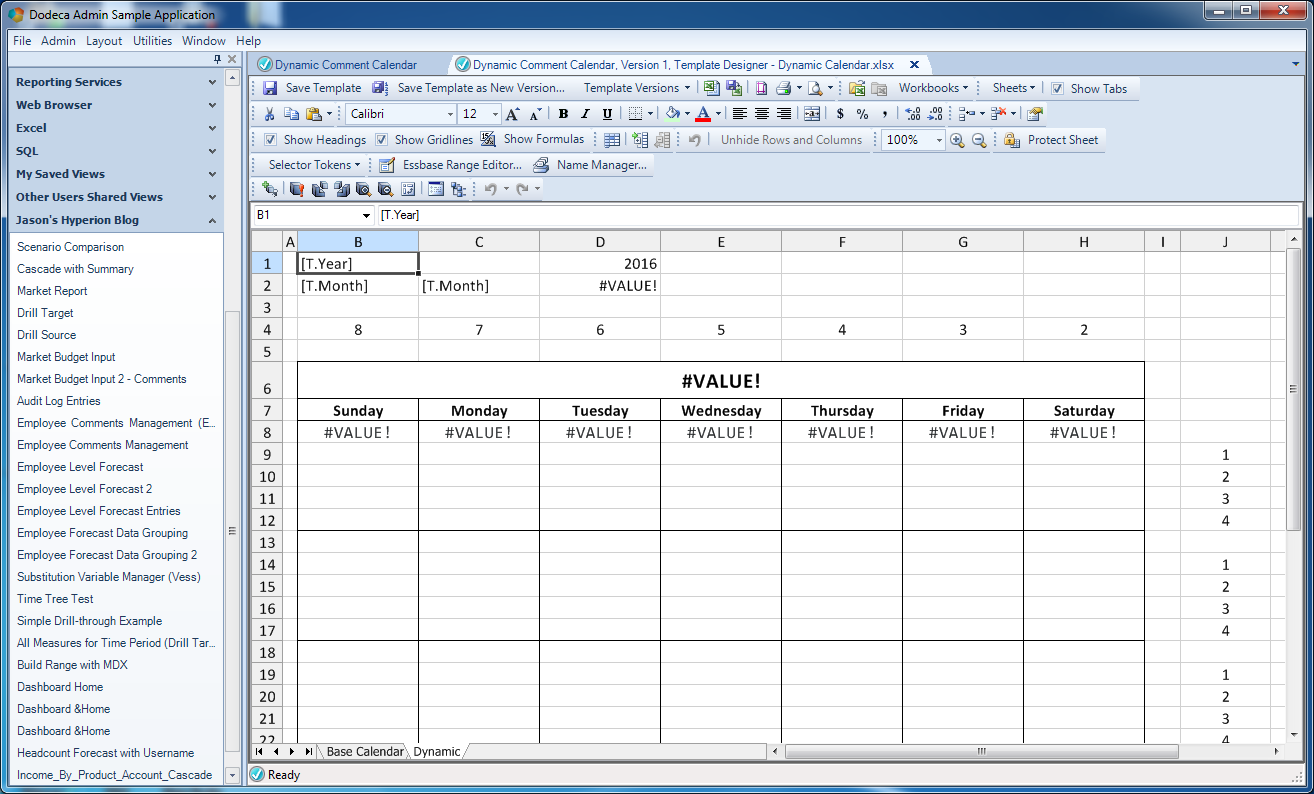
This is what it looks like without "dev mode"

This is what it looks like without “dev mode”

Again, it’s a small technique but I just started doing it and I have to say that it really smooths out the report development iteration cycle for me.

The Final Template

Now that things are dialed in formula-wise, the final steps to clean this up are pretty standard by now: hide rows and columns, turn off gridlines, and turn off row/column headers. These steps aren’t always performed but they make sense in this case. Now the template looks like this:
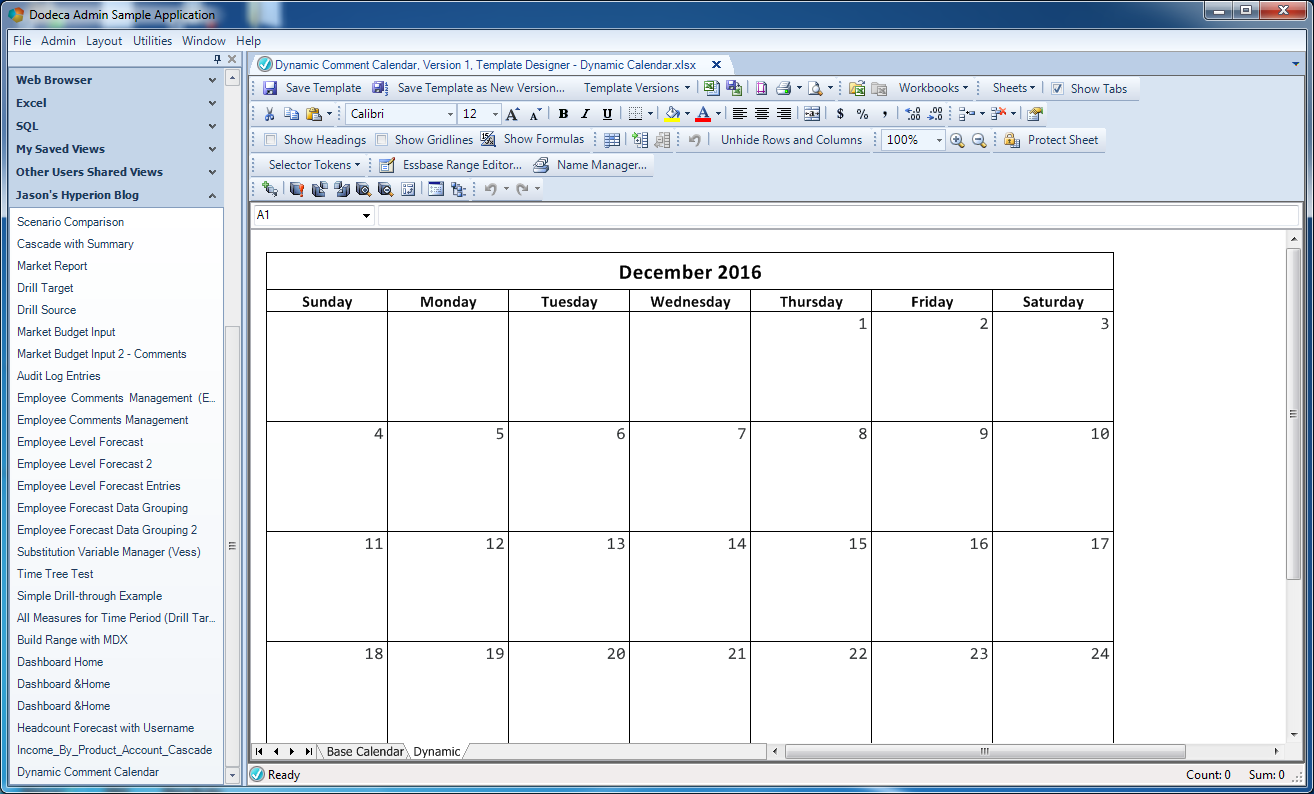
Cleaned up calendar template

Cleaned up calendar template

A Refresher on Dodeca Comments

I’m going to skip showing the basic view options and the selectors for this report since I’ve covered that numerous times in the past and it’s pretty straightforward for this report. Instead, I’m going to jump straight in to the comment configuration for this view and going into detail about how and why I set it up the way I did.

First, let me do a very quick refresher on comments. In Dodeca, commentary is a first class citizen with extensive configuration options. Every comment in Dodeca is associated with an arbitrary set of key/value pairs of our own choosing. Let me strenuously emphasize this: comments in Dodeca are defined by a unique combination of keys and values (Scenario = Actual, Year = FY16, Account = 1001) – and notably the key/value pairing exists irrespective of a particular view or Essbase cube. Further, our comment address/intersection is not forced or limited in any way by the dimensionality of the cube. In fact, the view I’m building here doesn’t even have an associated Essbase cube at all.

That said, for this calendar example, the address (key/value pairs) I want to use for each comment is pretty straightforward:

  • Year: the year the user chose
  • Month: the current month
  • Day: the day (cell in calendar)
  • Row: the offset in a given calendar cell. The way I designed this template is that each cell has four rows, not including the row with the day of the month. Each cell, therefore, is actually four individual comments. We will add an arbitrary key named Row, with a value of either 1, 2, 3, or 4, to uniquely identify the row for a given day.

When we setup comment ranges in Dodeca, one of the critical things we setup is to generate the key value pair string. For example, the key value pair string for a comment in the row of a cell for December 7th, 2016 would be like this: "Year=2016;Month=December;Day=7;Row=1" (in other words, it’s Key=Value pairings, with a semicolon delimiter). It’s up to us (the report designer) to generate this string somehow, whether it’s with a formula or whether it’s in a cell that we then reference with a formula.

Very often when I setup comments (and as I did in a previous comments example), I just generated the key/value pair string in a column of cells using an Excel formula, then referenced those cells. I could certainly employ that approach here. How this might look would be to insert 7 columns (one for each day of the week), and then a number or rows to the template, put in the proper formulas, and then setup the comment range accordingly (and of course hide all of these rows/columns on the final view).

Determining Comment Addresses with OFFSET & Friends

I’d like to do something a little more elegant, though, without having to insert a ton of rows and junk. I’m going to use my good friend the Excel OFFSET function. Remember the extra row and column I put into the template earlier (shown here as row 4 and column J):
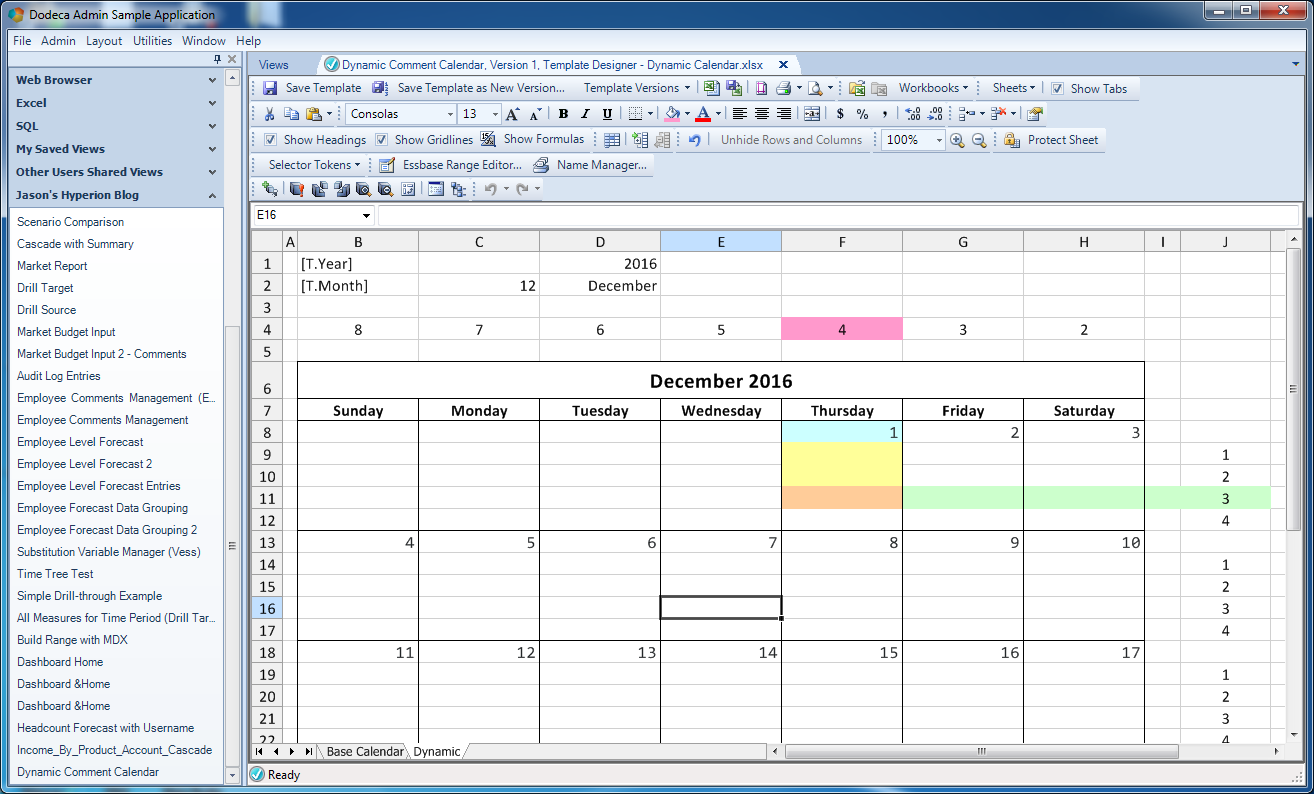
Understanding the "magic" areas of this layout

Understanding the “magic” areas of this layout

I’m going to use these to help me generate the address for each comment. Let’s think about this for a moment. We need a value to generate a unique address for any given cell in our calendar. For example, let’s say I put a comment into cell F11 (the third comment cell under December 1st). Relative to this particular cell, it’s very easy to determine what its year and month are (since these are located in fixed locations). Getting the number of the day of the month is a little trickier. For this cell, it’s three rows up and in the same column (the value of 1 in cell F8). Additionally, the unique Row number is 3, which in this case is 4 columns to the right.

Let’s start with how we can determine the day number for an arbitrary cell. Before we get to that, even, let’s start even more simply with how we can get the offset value (in the above screenshot, the pink colored cell containing 4, located at F4):

OFFSET(@ACell(), 0, @ColL(@CCol())$4

Say what? I just used a combination of native Excel functions and Dodeca functions. Dodeca has many functions that we can use in contexts like this and in Workbook Scripts, and we can mix them interchangeably in this context. The @ACell() function is very common, and it gives us a reference to the active cell being evaluated. Additionally, @ColL() gives us the column letter for a given column, and @CCol() gives us the numeric value of the current column.

Put all together, when this formula gets evaluated at, say, cell F11, we’re going to plug the current cell’s address into the OFFSET function, offset it by zero rows, and offset it by the number of rows indicated in the cell located above the current cell, in row 4. In other words, I’m using those helper values in row 4 to tell me how many columns to the right I need to offset for a given cell in the calendar. For example, in column F, the location of the row ID values is four columns to the right (in column J), and therefore I have a 4 in cell F4. In column G, the row ID values are only three columns to the right. It’s a little tricky but in essence it’s really not unlike the dynamic rolling quarters example I blogged about some time ago.

Now, nicely enough, the values in column J (the row IDs happen to also tell us how many rows up the day of the month is from a given cell. For example, in cell F11 (orange), the numeric day of the month is three rows up, in the same column. So we can use OFFSET again here to help us evaluate the day of the month for any given cell in the various comment ranges.

Now that we know how to generate the year/month/day/row for any given cell in the calendar (using a combination of OFFSET and intrinsic Dodeca functions), we have everything we need to generate a key/value pair string (remember, the format we want is something like this: "Year=2016;Month=December;Day=7;Row=1") for any given cell, which we will use in our comment configuration:
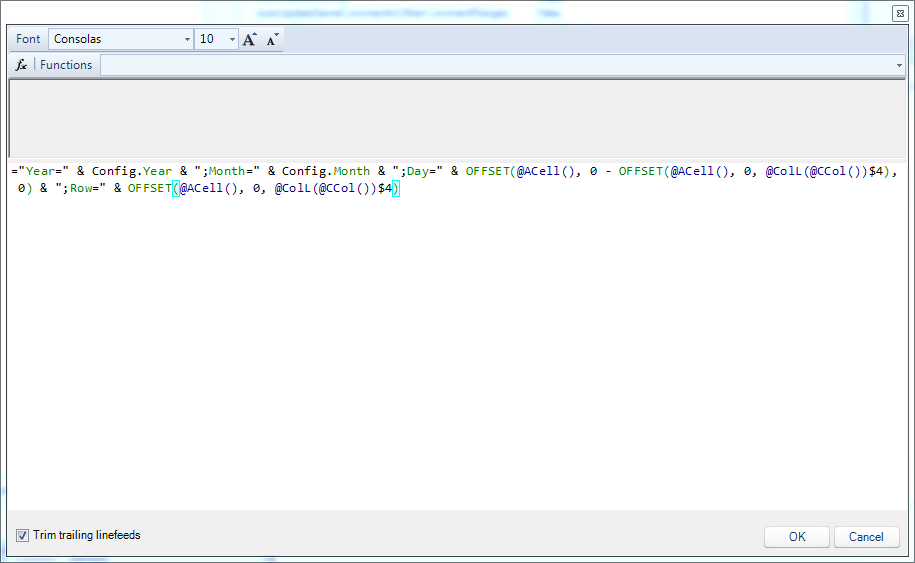
Formula to generate key value pairs for comment identity

Formula to generate key value pairs for comment identity

The rest of the formula is just generic string concatenation and referencing named ranges I created for the year and month. I’ve said it before and I’ll say it again: OFFSET is powerful. And with respect to Dodeca, it’s generally essential, not esoteric.

My friend, the OFFSET function

My friend, the OFFSET function

Advanced Comment Range Options

Now that I’ve hopefully given you enough of a primer on the byzantine clever way of generating the key/value pairs, let’s take a look at the entire comment configuration for the sheet:
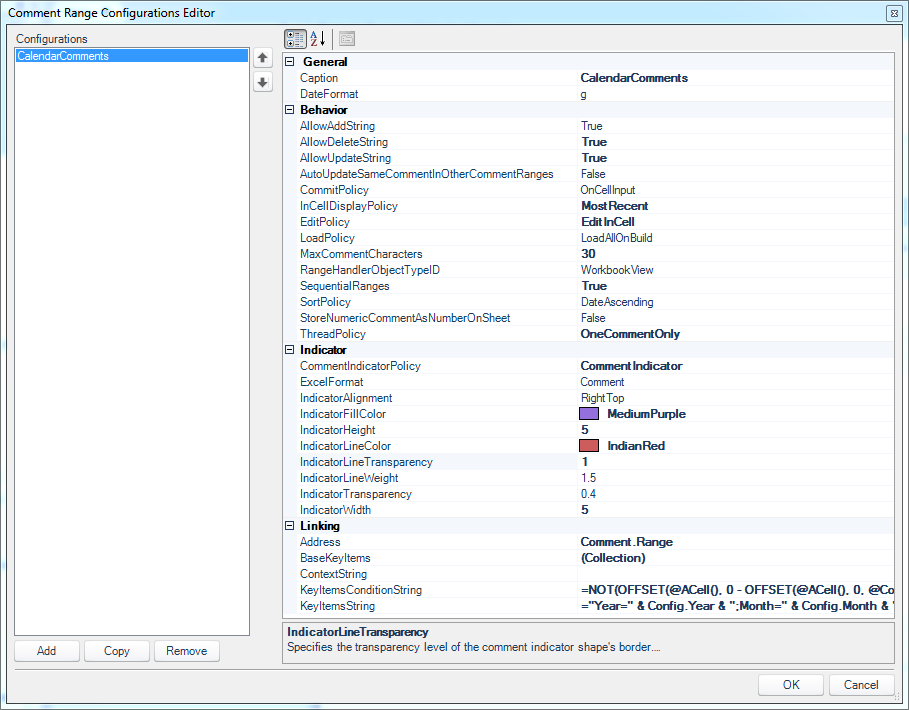
Comment Range configuration for dynamic comment calendar

Comment Range configuration for dynamic comment calendar

Let’s walk through the options I have changed from defaults (bold) or that are otherwise important:

  • Caption: this is just the identifier for the particular comment range on this view. We can have multiple comment range definitions in a view; in this case, due to our very clever setup, we are going to get all of our comment functionality defined in terms of a single defined comment range (not to be confused with the actual named range on the sheet itself).
  • AllowAddString/AllowDeleteString/AllowUpdateString: These options control whether comments can be added, deleted, and updated. For this view I want to be able to do all three things, so these are all True.
  • InCellDisplayPolicy: this is MostRecent. Dodeca has support for threaded comments and options surrounding the most recent comment. For the sake of simplicity we are going to say just to show the most recent comment always (so that our comment implementation is more akin to “what you see is what you have” rather than worrying about revisions to comments and such).
  • EditPolicy: Dodeca actually offers a dedicated editor for comments if we want it, but in this case I want to just edit them on the grid itself, so this is EditInCell.
  • ThreadPolicy: Again, there are extensive features regarding threading comments (like a discussion forum) but we’re going to keep it simple here for now with OneCommentOnly.

Next up is this interesting SequentialRanges option. Recall that we can have multiple comment range definitions in a view. But what if I want to have one comment range definition that can handle multiple defined ranges in my worksheet? I can just turn this option on, then just define names on the sheet using the Address I define as a prefix.

In other words, check out where my first named range is on the sheet:
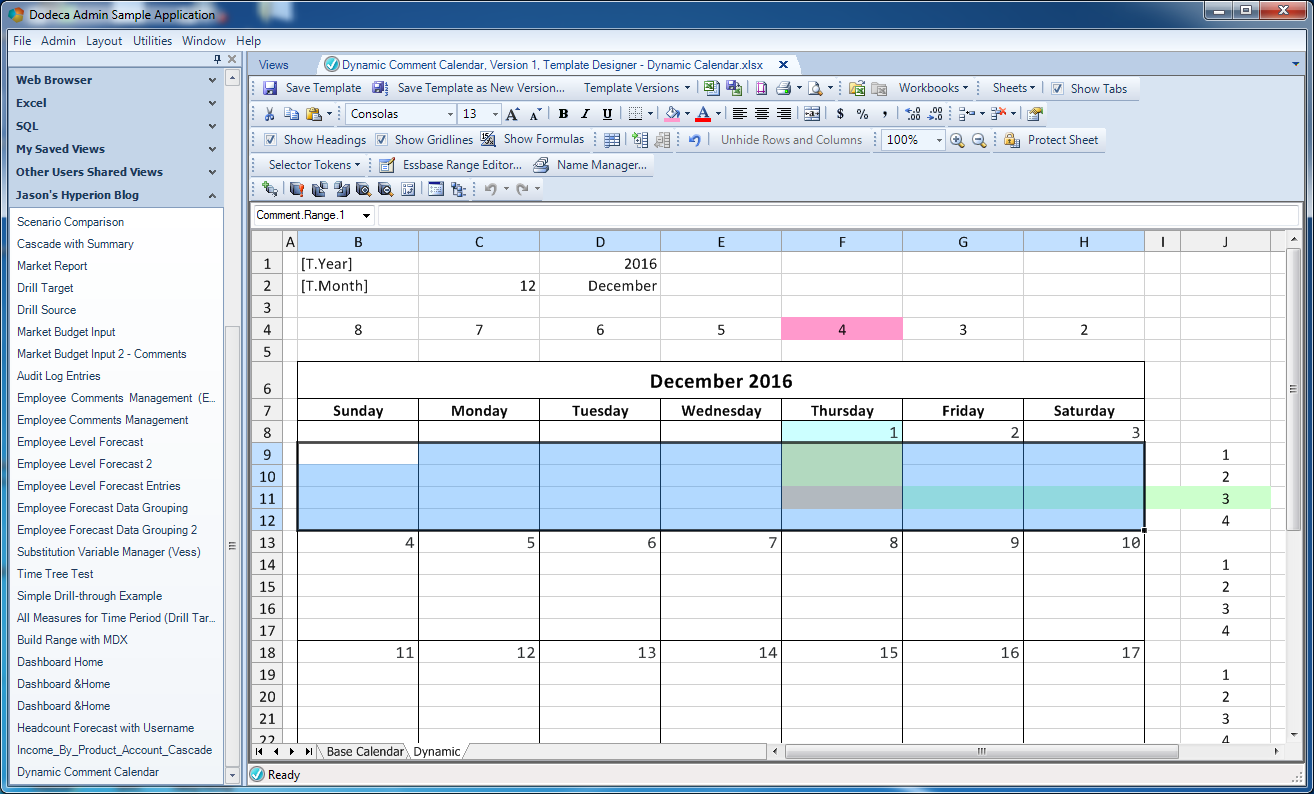
One of the comment named ranges on the calendar

One of the comment named ranges on the calendar

Notice that it is called Comment.Range.1. Each row in the calendar table has a similar name (Comment.Range.2, and so on). By turning on the SequentialRanges option, I can have this single definition apply to all of the different named ranges, so long as I name them with the proper suffix.

Again, there are many, many ways that you can use Dodeca to setup a view such as this. But my goal for the way I did it here is that I wanted the simplest possible spreadsheet and simplest possible definition of comment ranges. So this is a really powerful option that saves me from having to make six almost identical comment range definitions.

Regarding the Indicator options, I decided to spruce things up a little bit instead of the normal Excel comment indicator (a red triangle in the corner of the cell). In honor of my college football playoff bound University of Washington Huskies, I thought it’d be fun to go with a nice shade of purple for comments. The other minor options regarding the indicator should be pretty self-explanatory.

Last up is the Linking category of options. by now you know that the Address field in this case contains my prefix for named ranges (if SequentialRanges was set to False, then the name in Address should actually correspond to an exact name on the sheet). We’ve already covered the KeyItemsString value, so the very last option to talk about is this KeyItemsConditionString.

The KeyItemsConditionString is a chance for us to define a formula similar to the KeyItemsString, but it’s evaluated to determine if the comments should be enabled on a given cell at all. This is entirely optional but it’s very handy here. You may have noticed that due to the nature of a calendar, there are several cells at the beginning and end that are likely to be blank. If we just made it so everything in a given comment range was  a comment, it’d be bad, because we would have errors for cells without a numeric day. This option let’s us conditionally turn off comments. Check this formula out:
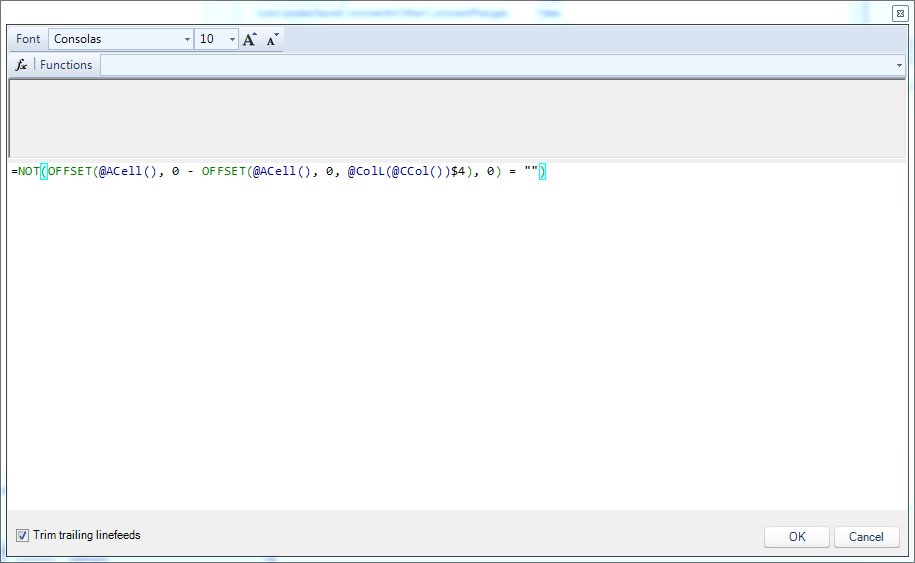
Our condition string for seeing if comments should be active for a cell

Our condition string for seeing if comments should be active for a cell

It’s pretty similar to part of the other formula for the comment itself, but we’re just checking to see if a given cell has a number for the day of the month. If it does, then we’ll allow comments in the four cells below the number. If not, it’s blank, this formula will evaluate to False, and the user will not be able to enter comments in.

Putting It All Together

Alright, we have a view, a template, selectors, magic formulas from the internet, and more. Let’s build the view and see what happens:
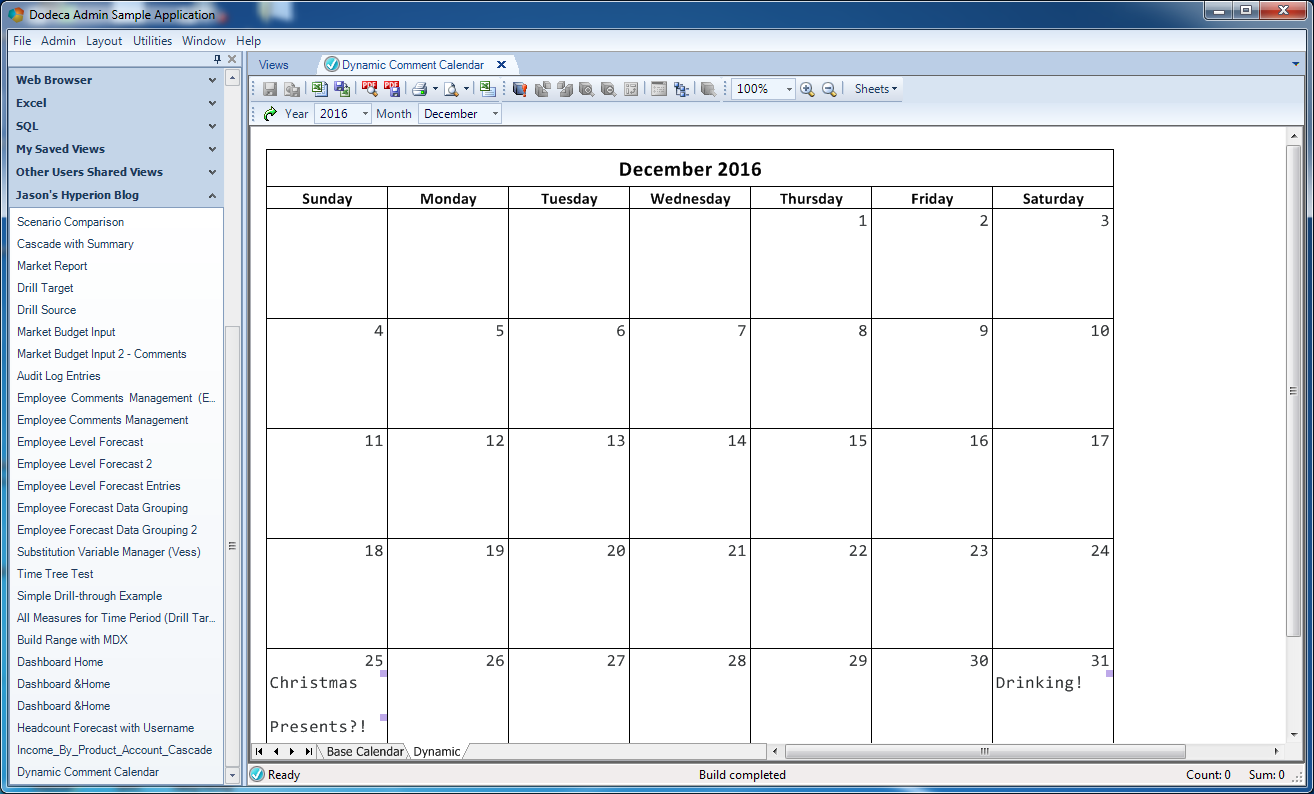
Running the view after having selected December/2016 and building

Running the view after having selected December/2016 and building

Things are looking good! Let’s type in a few comments to test things out, like on Christmas and New Year’s Eve. Based on the view configuration, as soon as I hit enter or otherwise leave a cell, the comments are sent back to the Dodeca repository, so there’s no Save button or anything we need to press. Now to test out the selectors, let’s change to the next month/year (January 2017) and take a look that the calendar updates properly:
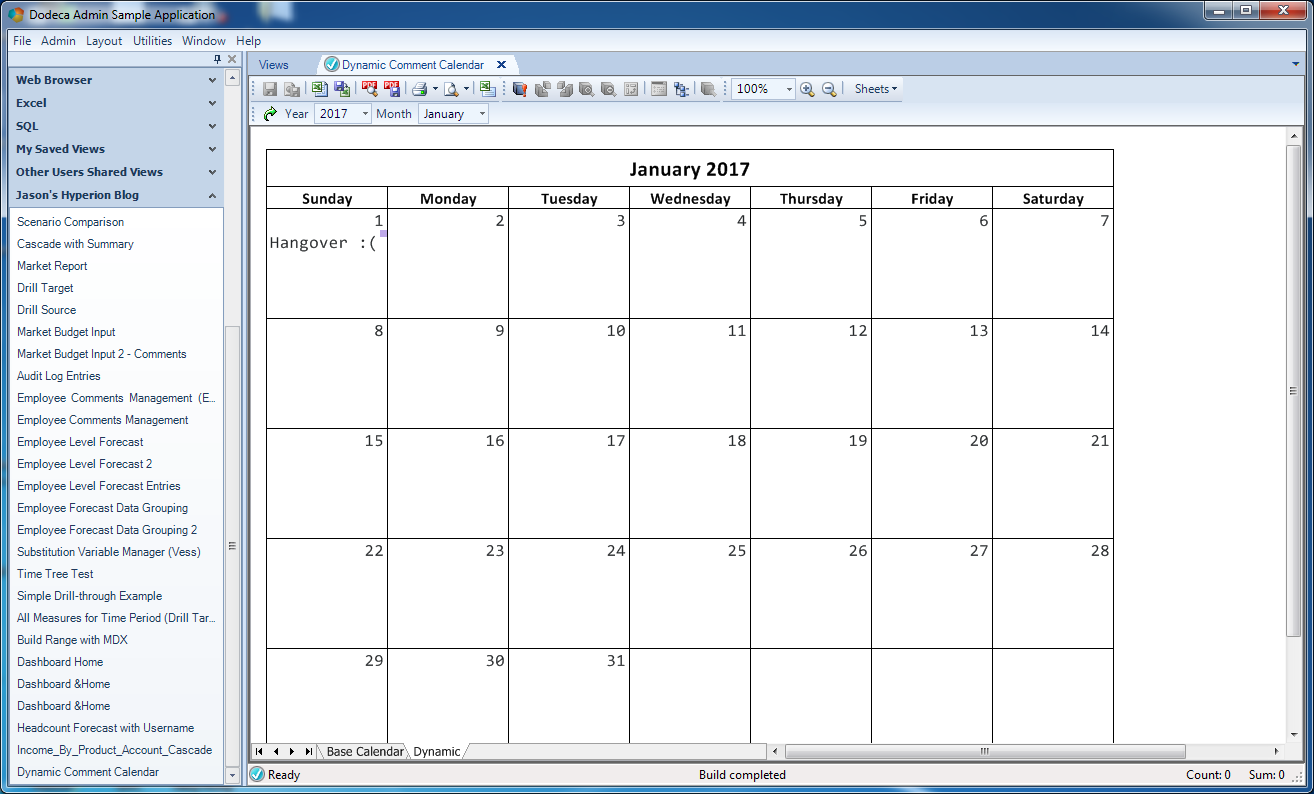
Change to another month/year

Change to another month/year

Sure enough, everything looks to be in the proper place and was updated. When I flip back to December 2016, I see that my comments have loaded in as expected.

Summary

This was a very technical post that covered a lot of ground. It focused on a bit of an unorthodox report type,  but it was a really (in my opinion) fun example of the power and flexibility you can get with Dodeca and its spreadsheet-based paradigm. Besides getting to use some everyday Excel functions to build a dynamic calendar and make it truly dynamic with some selectors, we’re able to use the extensive comment range options to setup a commenting system on this sheet that works exactly how we wanted it to, and didn’t even have to write a single line of SQL code. These techniques can and are used every day by many others to facilitate business processes around the globe.

As always, please don’t hesitate to reach out if you have any questions or comments!

Dodeca Technique: Essbase View with Cascaded Transaction Details Tabs

A support request came in the other week regarding some help on how to setup a particular report. The user wanted to create a view where the first tab would be a normal “bread and butter” Dodeca view that is based on Essbase retrieval ranges (and where the data shown is based on the values of different selectors. Additionally, when the report is built, for every item on the view (in this case, different products), create a separate tab within the workbook that has transactional details for that product.

So, just to visualize this a bit more concretely, check this out:

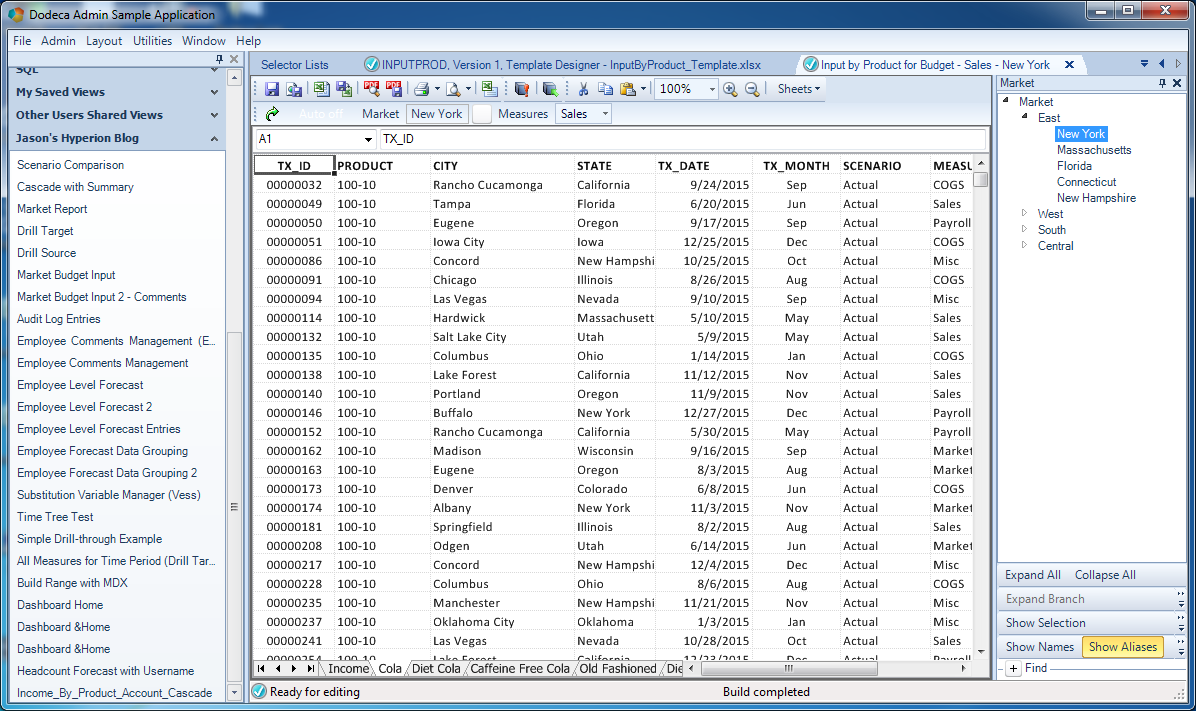
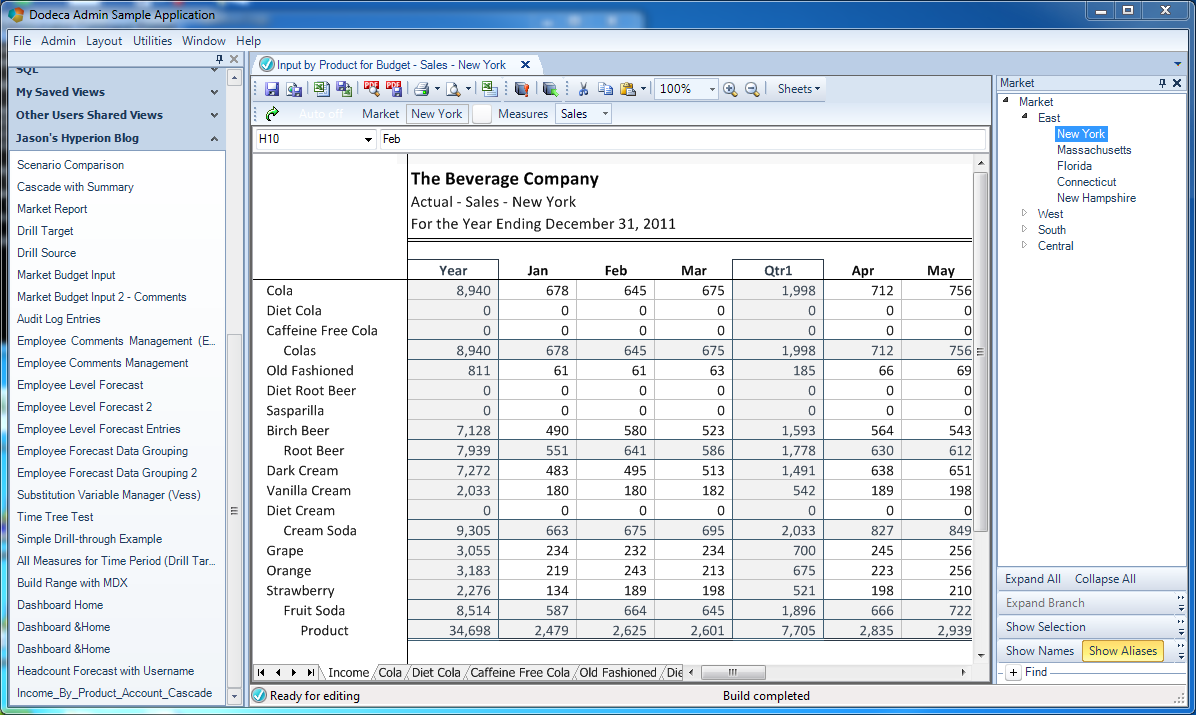
The built view!

The built view!

The first tab in this workbook is just a normal everyday Dodeca view with Essbase data. Note the series of additional tabs after the first tab, though: One for each product at the bottom of the Sample/Basic database. These tabs are all generated dynamically when the report is run.

Our Chief Software Architect (hi Amy!) wound up putting together an example that showed this technique off. After I took a look at it, I knew that I wanted to show this technique off (with a couple of twists), because it shows an absolutely amazing cross-section of functionality that highlight the power and flexibility of Dodeca. Even better, this report can be accomplished without any custom programming at all. This is all out of the box functionality that neatly ties together the ability to retrieve Essbase data, relational data, cascaded tabs, hidden selectors, Excel formatting, and more.

In this post, I’m going to walk through how I went about setting the report up, although I’m going to gloss over the nitty gritty on some of the techniques I’ve covered before (but will provide links to the relevant articles when I do so). So, first thing’s first, i want to introduce you to my sample data. This is a simple data set that I use all the time (hello drill-through!). It models some fake transactional data for the Sample/Basic cube:

Sampling of transactional data for Sample/Basic

Sampling of transactional data for Sample/Basic

You may notice the addition of certain fields not present in the Sample/Basic cube, such as a transaction ID, city, transaction data, and an account number (not pictured). This data represents the data we are going to want to show on the dynamically generated tabs in our report. In this case, we’re going to be filtering the data based on the product.

Also to provide some context for where this design process is headed, I want to show what the final report looks like, or at least, the main tab on the final report:

Main tab in workbook with Essbase data

Main tab in workbook with Essbase data

Again, the layout of our report will be that we have Essbase-based data on the main tab, and also that the user is able to choose a given Market (pictured is New York) and measure (pictured: Sales) to build this main retrieve and the dynamically generated tabs. So our job now is to build this Dodeca view and template.

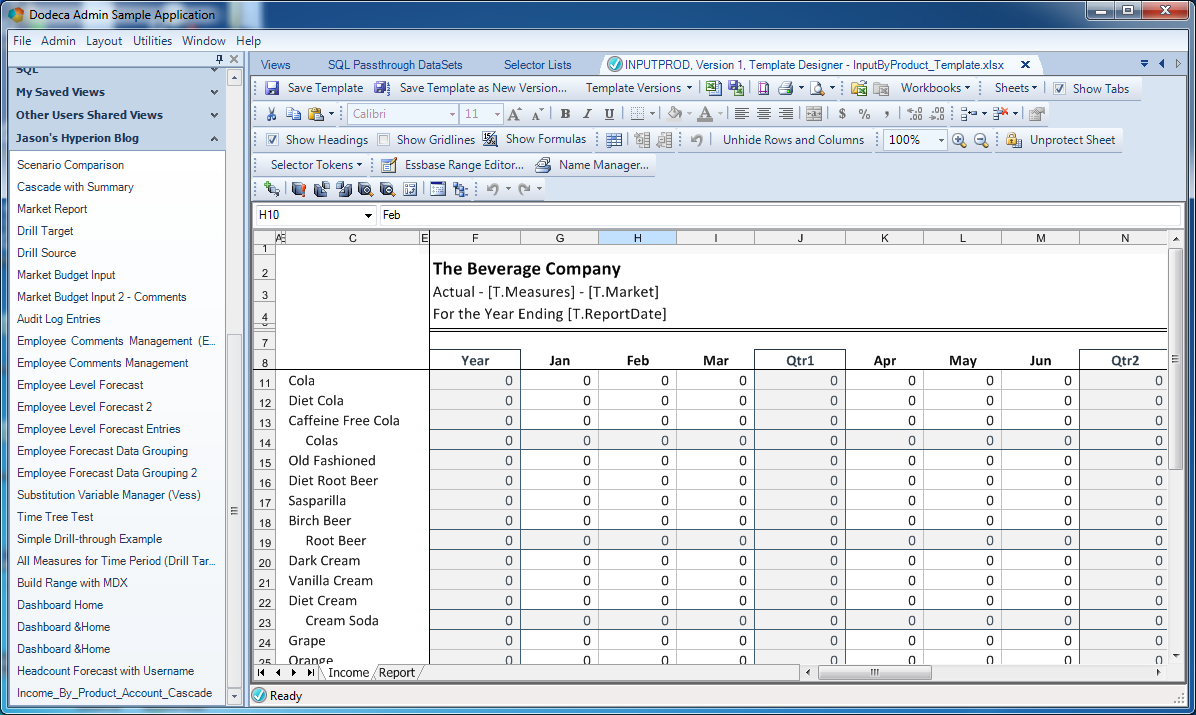
Let’s take a look at how the Excel template for this view is setup. First, we have the Income tab, which is based around an Essbase retrieve:

The main Essbase retrieve-based tab

The main Essbase retrieve-based tab

Again, the user will be able to choose the measure and market that they want, although in this case, the list of products is just hard-coded. As I’ve shown before, the grid of data is a named range that Dodeca will automatically retrieve from the view’s associated Essbase connection when the view is built. If you’re interested, you should have a look at how to setup an Essbase-based retrieve range report in Dodeca for some background.

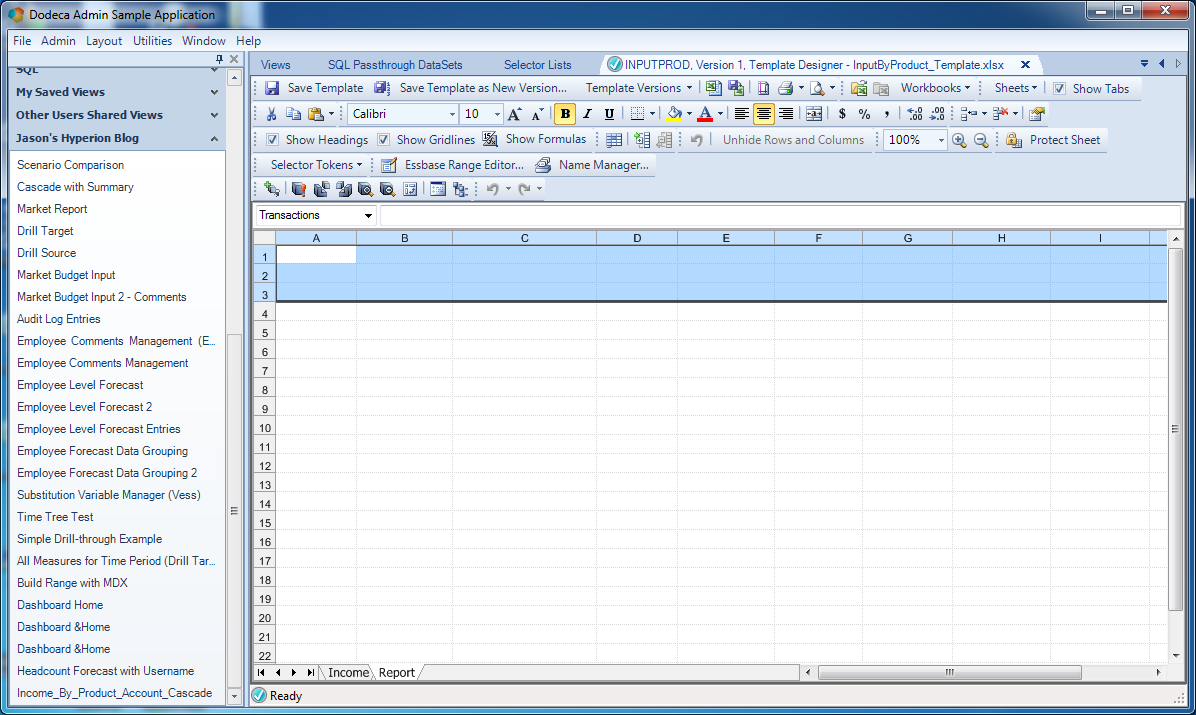
Let’s jump over to that second tab (Report) and take a look at things:

The template layout for transactions

The template layout for transactions

This is a pretty spartan layout, but it gets the job done. As I’ve also shown before, we have a named range (in this case named Transactions) that will serve as the insertion area for some relational data. We have 10 columns (one for reach column we bring back in the SQL query). The reason the range is three rows tall is because we are going to bring back headers from the SQL query (check out some of my previous articles for details on the nuances of building views based on relational retrievals).

Check out one of my earlier articles on relational data-based Dodeca reports for more background on these are setup and work. You can also check out a post on cascading reports in Dodeca for some background on those as well.

It’s important to note at this point that the Report tab is the tab that’s going to serve as the basis for our cascade. We’re going to configure this view such that for each different product in the cascade, it’s going to execute the SQL query we’re going to setup, plug in the current product, add the results, name the tab, then insert a new tab for each subsequent product. We’re going to achieve all of that behavior just by configuring our selector and view properties, and not have to do any custom programming or manually define tabs or anything (woohoo!).

As a brief aside, one thing I want to point out is that typically I’ve shown examples in the past where we had just one tab we really cared about for a given report. But there’s really nothing stopping us from putting in multiple tabs, and as part of the view building process, Dodeca just iterates through them all and builds them accordingly. This is really great, especially if we want to generate books with very disparate layouts and other things.

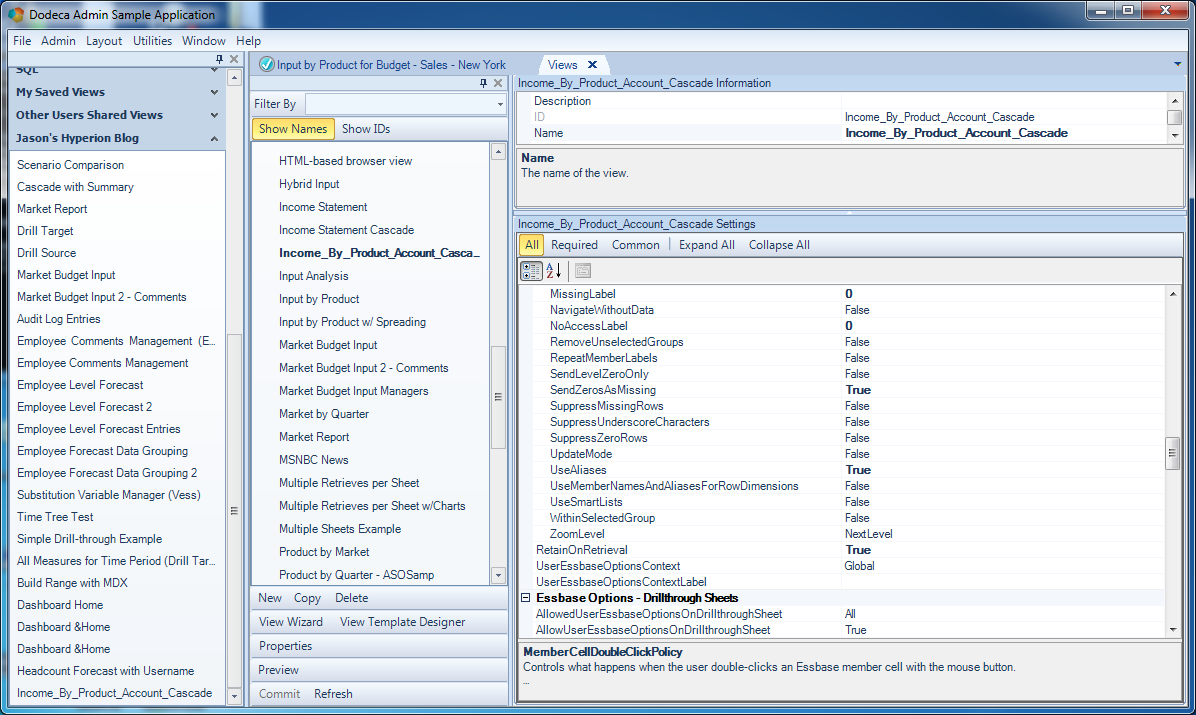
With our template mostly squared away, let’s take a look at the configuration of the view itself now. First of all, the view type here is an Essbase Excel view. This is the view type typically used for containing data based on retrieves from Essbase – but don’t let the name fool you. This view type also completely handles relational retrievals in addition to those from Essbase.

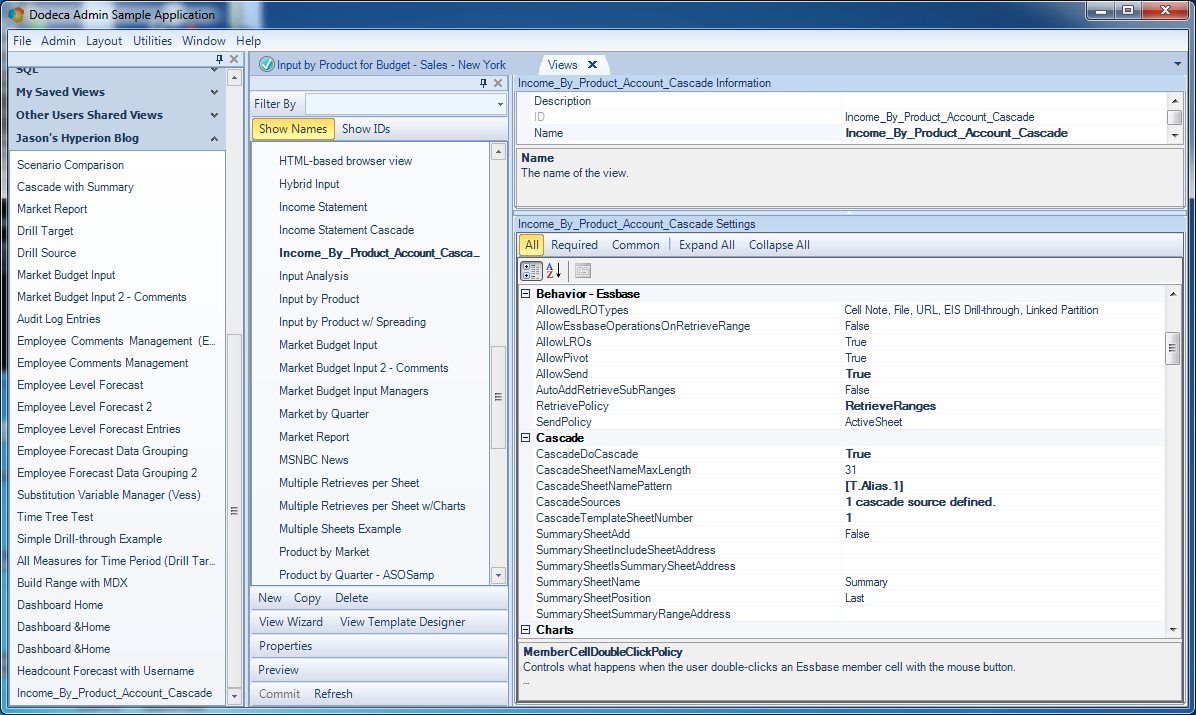
The real crux of this report is the configuration of the Cascade settings. I’ve shown the power of the Cascade options before, but there are a couple of nuances here that are incredibly powerful and useful for our purposes:

Cascade configuration for the view

Cascade configuration for the view

First of all, cascading is turned on of course (CascadeDoCascade = True). We have one source defined in our CascadeSources. This is the Product selector. While the report itself has three selectors (Market, Measure, Product), for the purposes of cascading we get to choose the selectors that will actually participate towards the different permutations that are generated. In this case, it’s only Product.

Next, we get to choose a pattern for how the name of a given dynamically generated cascade sheet (tab) is determined. This is where things get a little interesting. If you go back and look at the data in my transactional model, you’ll notice that the product names are raw member names (such as 300-10), rather than the alias (“Cola”). So I have kind of this mismatch: I want to use the member name to filter the query, but I want to show the alias in the tab. I can easily accomplish this (no code!) by referring to a special token called [T.Alias.1]. The suffix of this token (the “.1”) an index for a given cascade selector, starting with one. In other words, if I had two selectors participating in the cascade, and I wanted to refer to the alias of the current member in the second selector, I’d use the token [T.Alias.2].

Lastly, notice the CascadeTemplateSheetNumber parameter, set to 1. The first sheet in the workbook has an index of 0, and the second has an index of 1. What we’re effectively specifying with this parameter is the sheet to use (the second tab) as the basis of the cascade. It’s a small option that we probably won’t use too terribly often in practice, but it is incredibly useful here.

Moving further down the list of view options, things are mostly set to defaults, although I want to point out that UseAliases is set to True. This is a fairly standard option to have on (since when the Essbase retrieves are performed, we want them to contain aliases instead of member names). As I’ll show later, this actually effects our Essbase selector a little bit, so just keep that in mind for now.

UseAliases is set to on

UseAliases is set to on

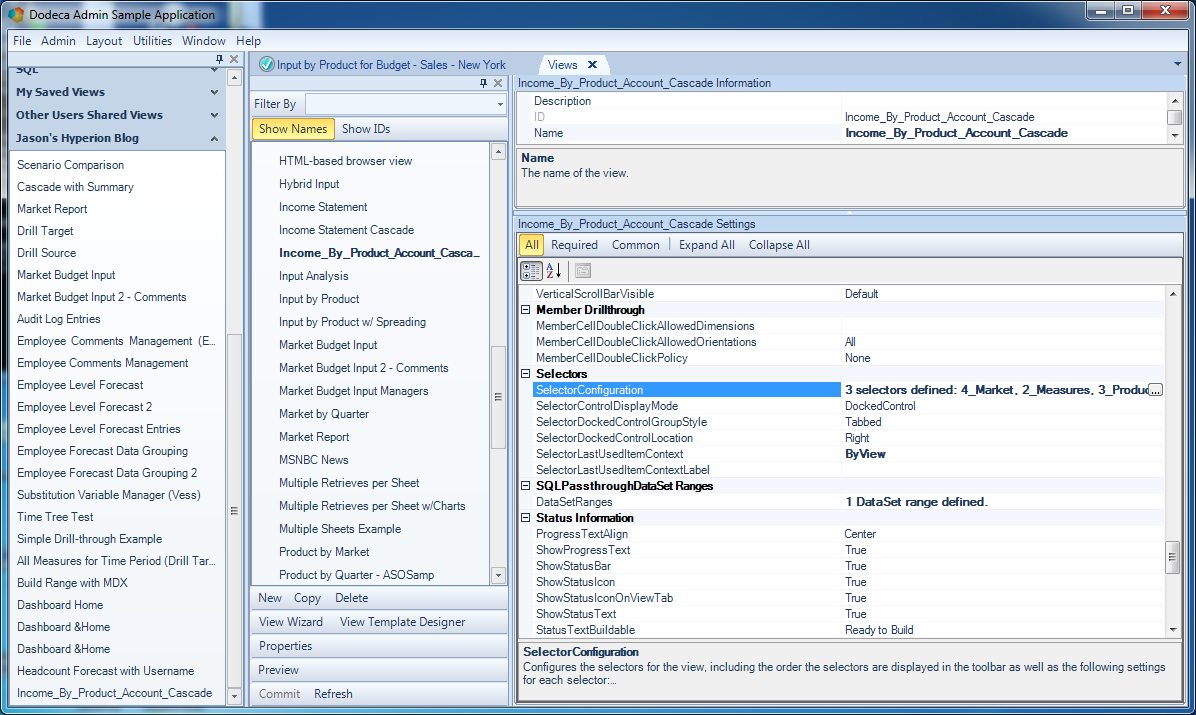
To round out the view configuration, just notice that we have three selectors (two will be shown to the user, the last is hidden and used under the hood), and there is 1 DataSet range defined. The DataSet range is used to marry up the relational data and populate it into a given named range on one of our worksheets. In our case, it’s that range named Transactions that I showed earlier – on the same sheet that forms the basis of the cascaded sheets.

Three selectors are defined (although one will be hidden)

Three selectors are defined (although one will be hidden)

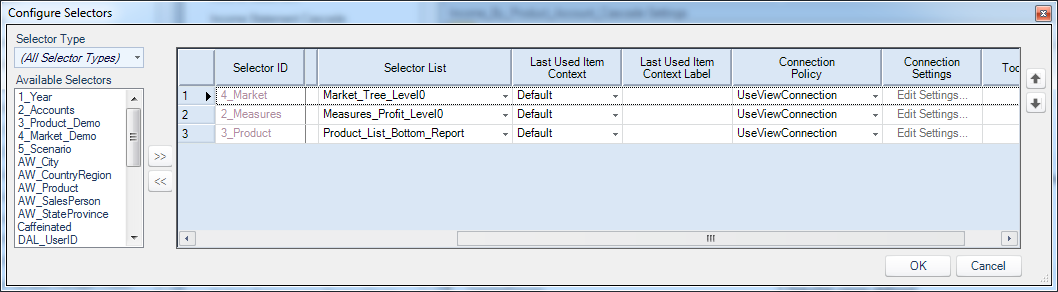
Let’s actually take a closer look at the SelectorConfiguration:

The three selectors for the view

The three selectors for the view

In Dodeca, the selector more or less corresponds to a given dimension. The Selector List object closely related but a little different. The selector list chosen for a given selector represents the exact items and UI for displaying them that will be available to a user.

For example, our report contains a selector for Products. We might then choose from one of multiple corresponding selector lists for that selector that have different properties. For example, one might just show a flat list with all the level-0 members of the Product dimension. One might show a hierarchical tree of values including parents. And yet another might be a hierarchical tree where we can select multiple items, but can’t choose anything that is higher than level-0. We have a lot of flexibility. Along those lines, while the selector lists in play for this report for the Market and Measures are straightforward (normal lists where the user chooses a single value), we have something a little different going on for this Product selector.

You see, we can generate the items available in a selector list however we want: from a hard-coded list of values, dynamically based on a report script, from SQL, and even other ways. For purposes of this report, we want the contents of the Product selector to be all of the level-0 members of the Product dimension – but we don’t want to type all of those things in manually. Further, for this selector list we want it to be totally hidden from the user. The reason we are doing this is that we want the selector to be populated with values from the Product dimension, and then when the report runs, those values (because they are part of the cascade sources) will be used to generate the permutations of sheets such as Cola, Diet Cola, and so on.

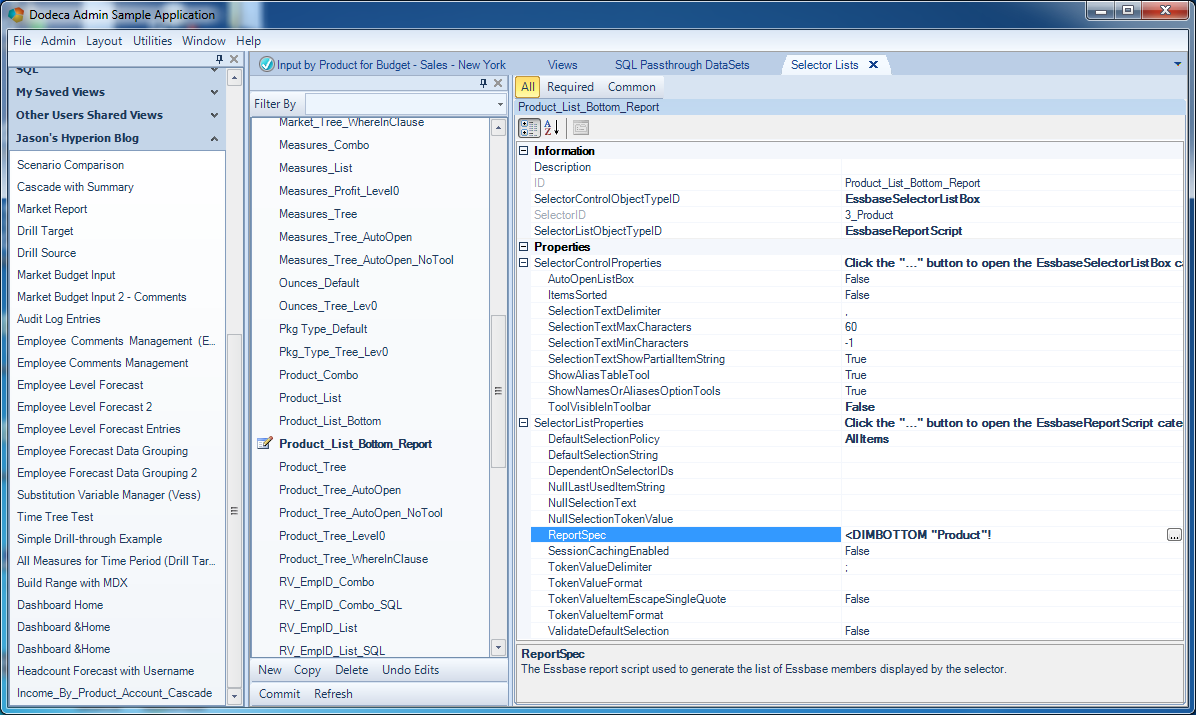
The specific selector list for Product is one that I designed for just this report, called Product_List_Bottom_Report. Of note for this selector configuration (but not pictured in the above screenshot, is that the selection policy is set to Multiple, meaning that we’re allowed to select multiple things from it). Let’s open up this selector list:

Selector List definition for Product

Selector List definition for Product

This type of selector list (EssbaseReportScript) is a selector whose contents are generated dynamically based on an Essbase report script. The report script code is simple here: <DIMBOTTOM "Product"! – meaning that the items in the list are the bottom level (level-0) items underneath the member/dimension “Product”.

This selector list has some interesting and powerful properties set. Most notably, we have ToolVisibleInToolbar and DefaultSelectionPolicy. With ToolVisibleInToolbar set to False, it means that this selector list won’t have a UI component in the view (hidden from user) – but it’ll still be totally functional for our purposes. Next, with DefaultSelectionPolicy set to AllItems, every item in the generated list will automatically start off being selected (in UI terms, if it were visible it’d have its corresponding checkbox checked). You could call this the “Hidden Selector” technique where we want to generate certain member names and have them be useable for purposes of using as part of a cascade or our report.

Excel Formatting FTW

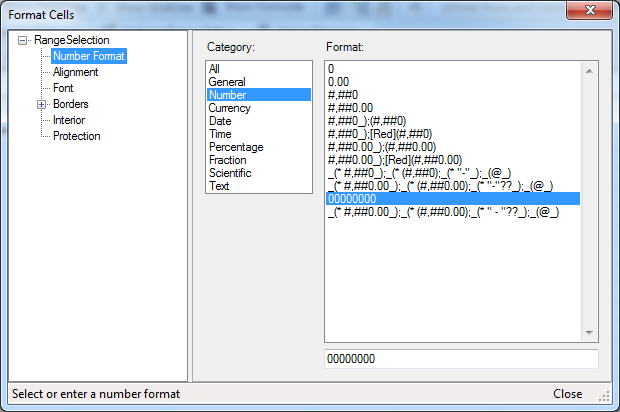
I visit this topic often, but it’s for good reason: one of the great things about Dodeca is that users and developers get to leverage a ton of existing Excel knowledge to increase their productivity and shorten their learning curve. This is true of formulae, formatting, and more.  In the transaction details sample data I have, there is a TX_ID that is numeric but stored in a CHAR(8) column. Without specific formatting to display this, Excel by default would just not show the zeros, but I actually want them to show. So, a little Excel formatting to the rescue:

Special number formatting for the transaction ID

Special number formatting for the transaction ID

A custom format of 00000000 tells Excel to format the number and show all leading zeroes. I also wound up applying the Date format to the date columns so they’d show properly instead of a number showing (Excel thinks of dates in terms of numbers rather than some arbitrary text).

Recap

We covered a lot of ground here, so let’s do a quick recap. We want a report where the user can select a measure and market, hit the build button, then generate a report where the first tab is the data from Essbase, followed by a dynamically generated set of tabs with transaction detail. The first tab in this report is a a very typical Dodeca report – an Essbase retrieve range and a couple of selectors. The second aspect of this report (the other tabs), is also fairly typical, although it’s a little special here for a couple of reasons. We added an additional selector to the view so that we could use it as the basis of generating tabs in the cascade, but what was a little different this time around is that he hid the selector list from the user and automatically selected everything in it. As an additional twist to the report, we used some of the additional cascade settings to tell Dodeca to build the cascade starting with the second tab, and then used a special token to put a “nice name” (the member alias) in for the tab name, rather than the raw member name.

Now to come full circle, here is the final result in all its glory (one of the generated transaction tabs):

The built view!

The built view!

I hope you enjoyed this technique, since I think it’s a really great one, and amazing what we can achieve with a little bit of creativity and configuration, but without having to write any code (not that there’s anything wrong with that). I’ve seen some classic VBA solutions that achieve similar levels of functionality but they have a fair bit of code to connect, perform operations, and all that stuff. And yet here we can do it all pretty seamlessly with out of the box functionality.

Creating Windows symlinks for Java installation

This is a note about configuring Java on Windows that is mostly for reference later. Usually when I set Java up on a Windows machine, one of the first things I need to do manually is make sure that JAVA_HOME is set and that the PATH variable contains the folder with the Java executables. The variable on PATH is typically a “bin” folder, whereas the JAVA_HOME variable is up one from that, or up a few more directory levels if it’s a JDK.

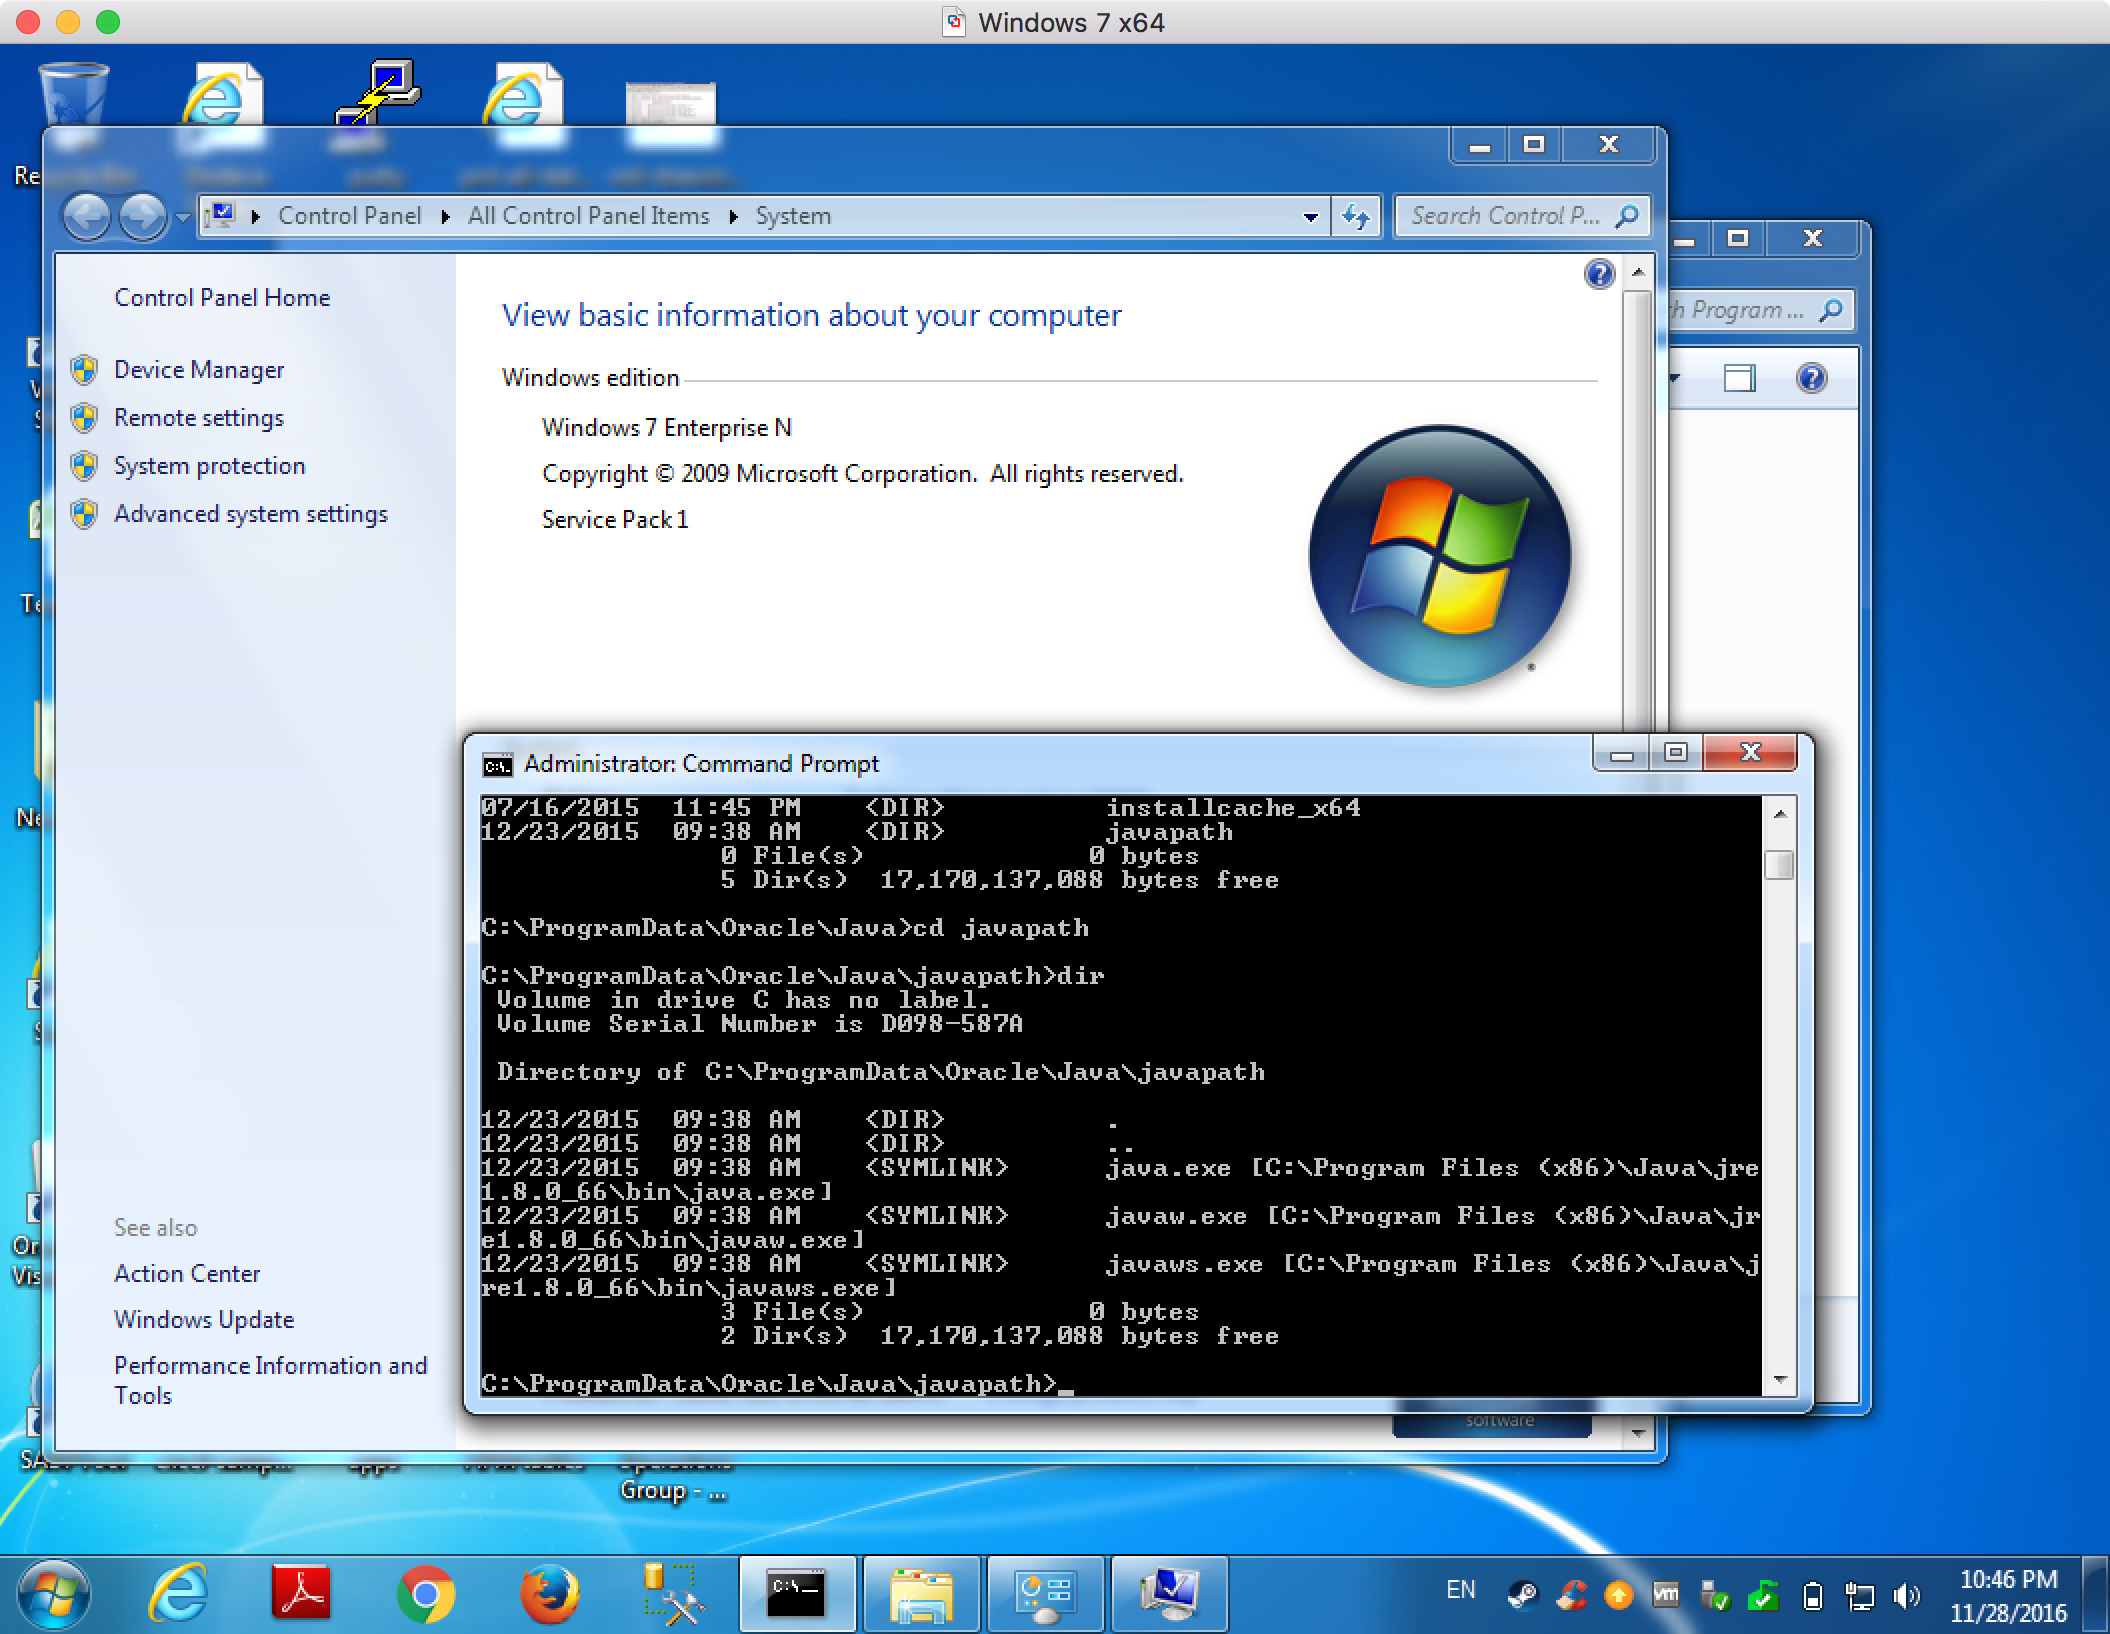
Recent versions of Java on Windows have changed the way that Java is installed. Now it creates a C:\ProgramData\Oracle\Java\javapath folder that is added to the PATH, then this folder contains symlinks to for each of java.exe, javaw.exe, and javaws.exe (the main Java executables) over to wherever they are installed on the file system (typically in C:\Program Files or perhaps C:\Java). This is a nice idea so that people are constantly fiddling with their PATH to configure it to a specific versioned Java install (complete with major, minor, and build numbers).

Yes, Windows supports symlinks. While more commonly seen or known in Linux filesystems, Windows’ NTFS filesystem has had support for file links for quite some time. They’re just not used a whole lot by end users themselves.

In any case, unfortunately, this install/configuration process doesn’t always seem to work in terms of creating/updating the symlinks. But they can be fixed pretty easily. Just navigate to the javapath subfolder:

Viewing symlinks in Java folder on Windows

Viewing symlinks in Java folder on Windows

Then run these three commands, altered of course to match up with your actual version of Java:

mklink java.exe "C:\Program Files\Java\jdk1.8.0_102\bin\java.exe"
mklink javaw.exe "C:\Program Files\Java\jdk1.8.0_102\bin\javaw.exe"
mklink javaws.exe "C:\Program Files\Java\jdk1.8.0_102\bin\javaws.exe"

Using Excel AutoCorrect to help type special characters

A client of ours has a member name with a superscript two in it and users re used to typing it in quickly themselves, using the standard Windows Unicode keyboard shortcut, except the Windows shortcut seemed to stop working. This intrigued me a bit, so I did some digging.

As best I can tell, Excel has quietly dropped support for typing in Unicode characters using the Alt + digits shortcut. There seem to be some articles about how this is possible with Excel 2007, but I couldn’t get it to work with Excel 2010 at all. It’s possible that newer versions of Excel fixed/brought back the support.

I even found some articles about tweaking a registry key in Windows to specifically enable the Alt keyboard shortcut, but didn’t have any luck with that making it work in Excel.

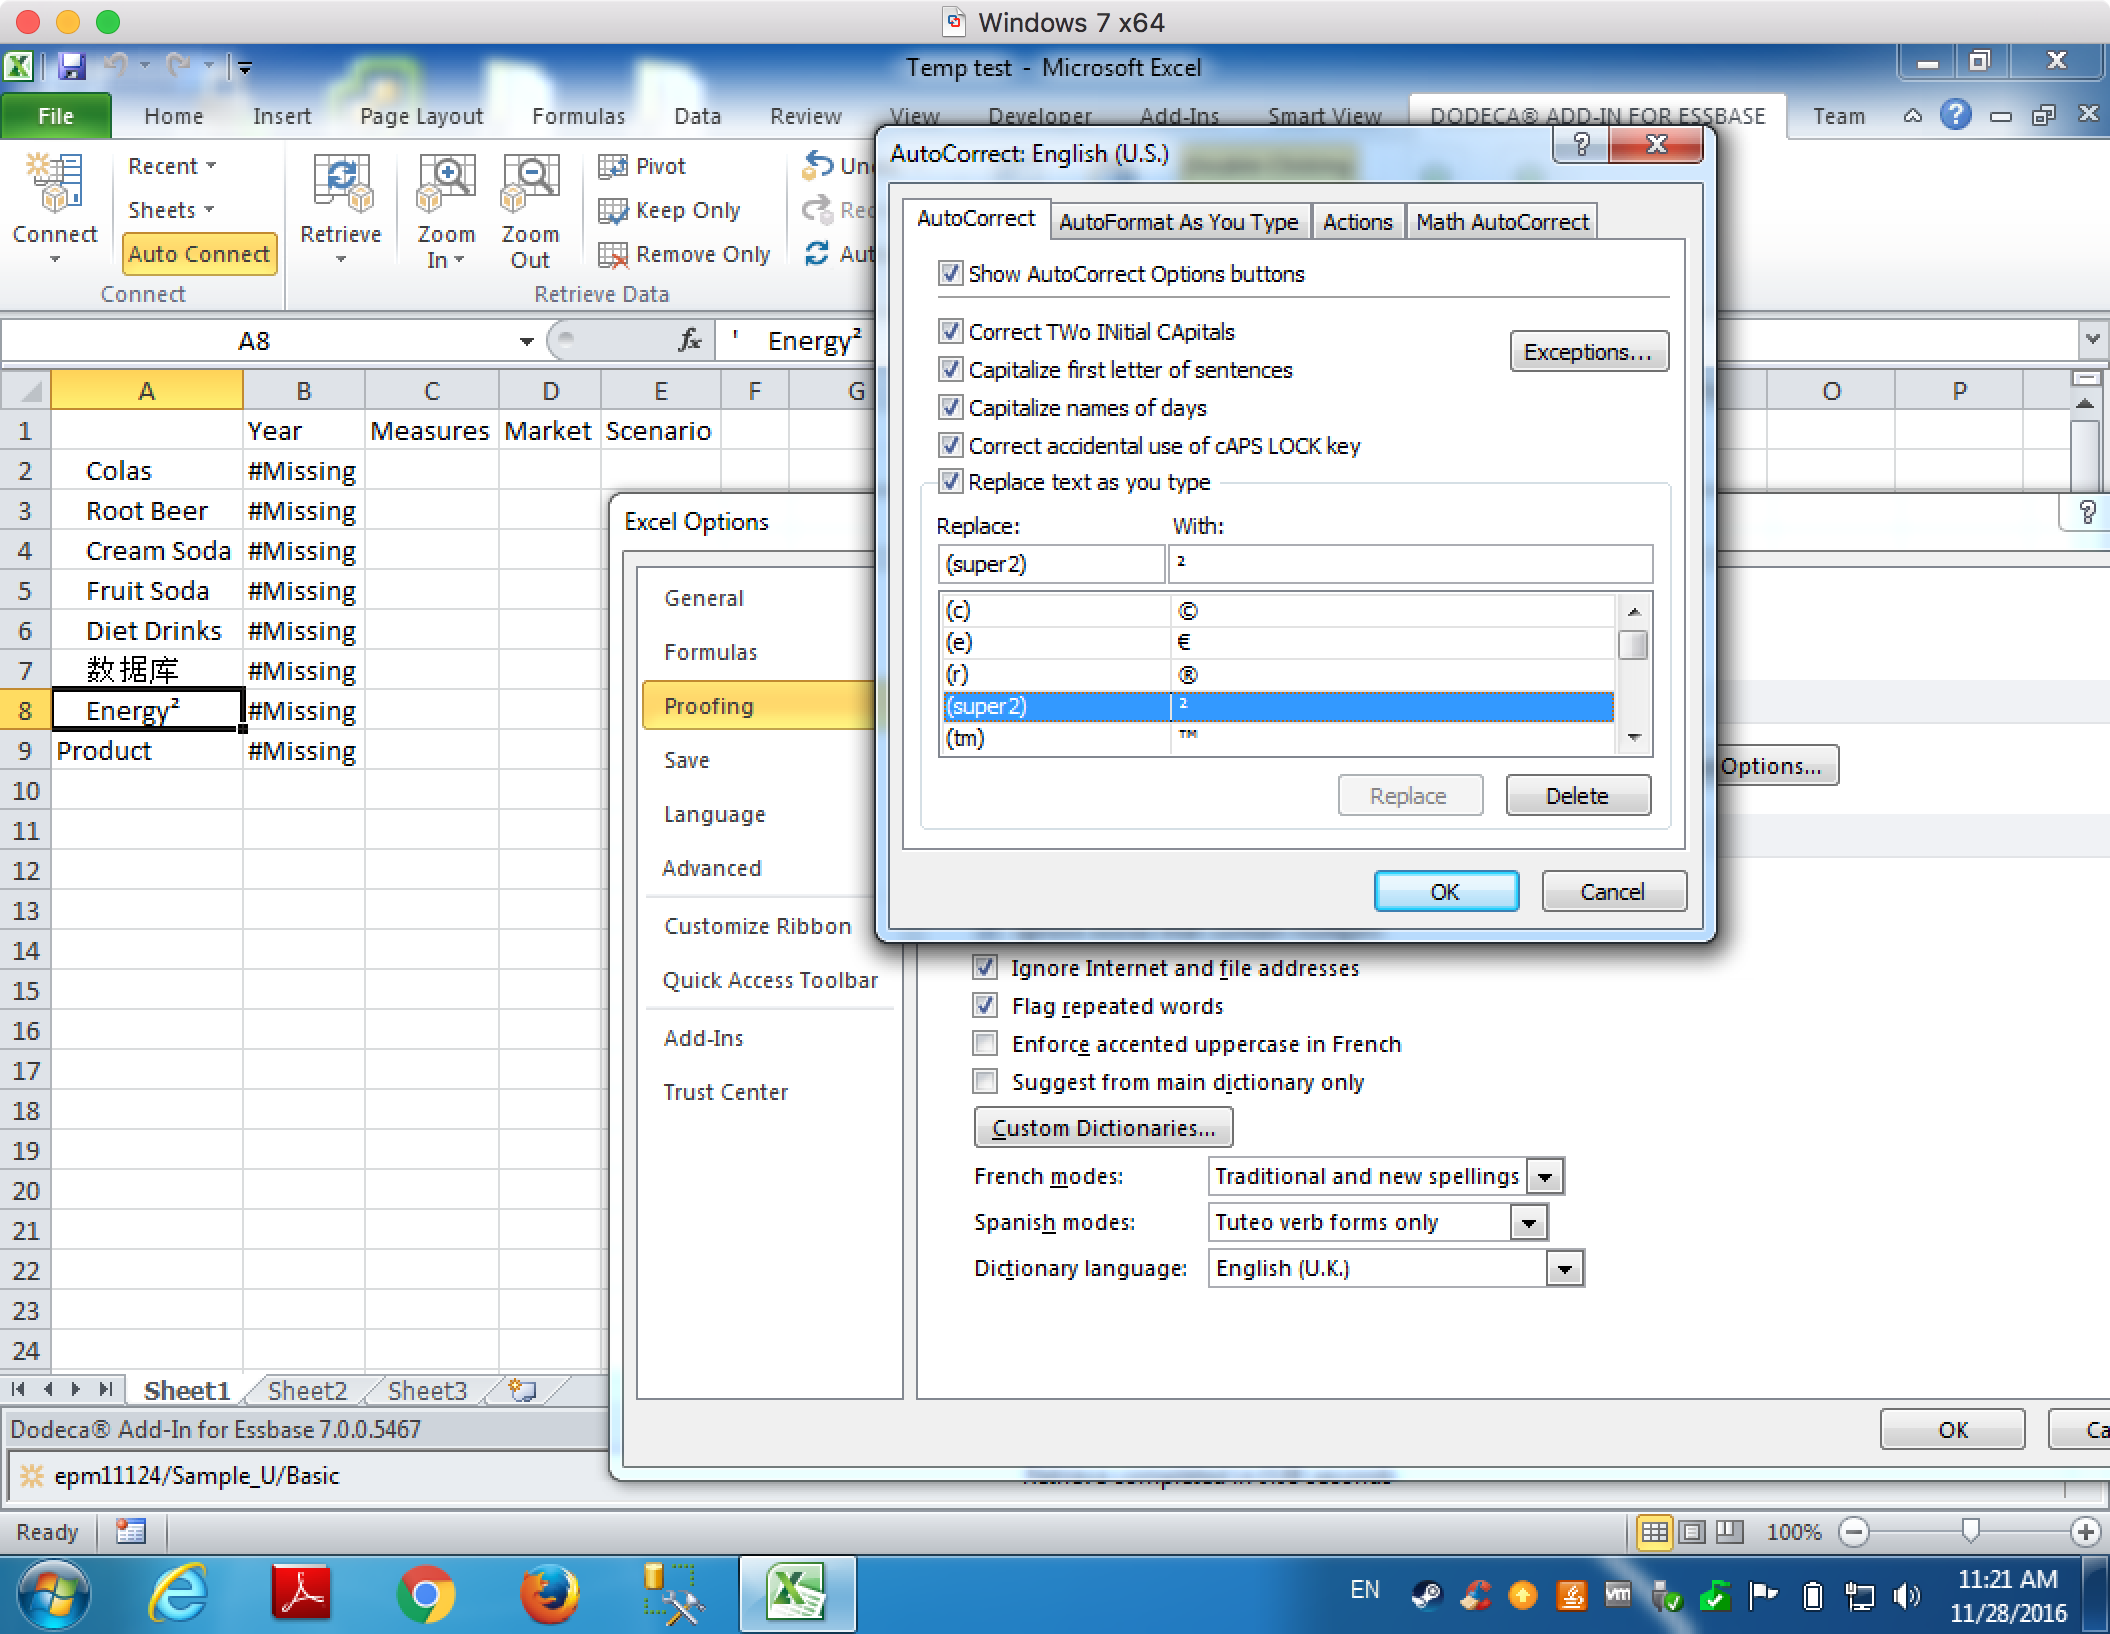
That said, since the only special character in question (at the moment) seemed to just literally be the superscript two, as a quick workaround, I recommended setting up an AutoCorrect shortcut in Excel called (super2) that will put in the needed character. The configuration for this is pretty straightforward, and I used it to manually type in a seemingly new offering at The Beverage Company, called Energy²:

Excel's AutoCorrect can be used to help type commonly used special characters

Excel’s AutoCorrect can be used to help type commonly used special characters

If anyone wants to confirm the behavior in Excel 2013/2016 I’d be curious to know what the official situation is when someone needs to type in special characters via their Unicode code.

Update to Thriller MDX over JDBC driver

I made a few adjustments and fixes to the experimental Thriller MDX over JDBC driver I have been playing with off and on. As a quick recap, Thriller is a normal JDBC driver that essentially passes MDX queries straight through to an Essbase server, and then maps the results into a normal JDBC ResultSet using a set of provided “hints” that tell it how to make George Spofford cry flatten the results.

There were a couple of issues related to how queries with various CrossJoins were handled that should now be fixed. Additionally, there are now a couple of new options to provide more configurability over how tuples are split or joined together. Things are definitely getting interesting for this concept.

As an example of a query you can run on Sample/Basic, check this out (thanks for Kyle Bourelle for doing the hard work of writing the query):


/**
*
* -- column.1.name = ENTITY
* -- column.1.type = VARCHAR
* -- column.2.name = ACCOUNT
* -- column.2.type = VARCHAR
* -- column.3.name = PERIOD
* -- column.3.type = VARCHAR
* -- column.4.name = VIEW
* -- column.4.type = VARCHAR
* -- column.5.name = AMOUNT
* -- column.5.type = DECIMAL
* -- column.5.precision = 9
* -- column.5.scale = 2
*
* -- thriller.print-tuple-member-separately = true
* -- thriller.header-tuple-separator = |
*/

SELECT 
  {[Actual]} 
ON COLUMNS,
  Non Empty(
    Generate(
      {Order(Uda([Market],"Major Market"),[Market].CurrentMember.MEMBER_NAME)}
      ,CrossJoin({[Market].CurrentMember},Union(CrossJoin(Descendants([Profit],[Measures].Levels(0))
      ,CrossJoin(Descendants([Year],[Year].Levels(0)),{[100]}))
      ,Union(CrossJoin(Descendants([Total Expenses],[Measures].Levels(0))
      ,CrossJoin(Descendants([Year],[Year].Levels(0)),{[100]}))
      ,CrossJoin(Descendants([Inventory],[Measures].Levels(0))
      ,CrossJoin(Descendants([Year],[Year].Levels(0)),{[200]})))))
    )
  )
ON ROWS
FROM Sample.Basic

Again, as a recap, the comment section at the top is used to provide specifically crafted ‘hints’ about how to map the output. Notice at the end of the comment section are some new parameters such as thriller.print-tuple-member-separately = true. This particular new option tells Thriller to break apart tuples so they are distinct columns (as opposed to joined together).

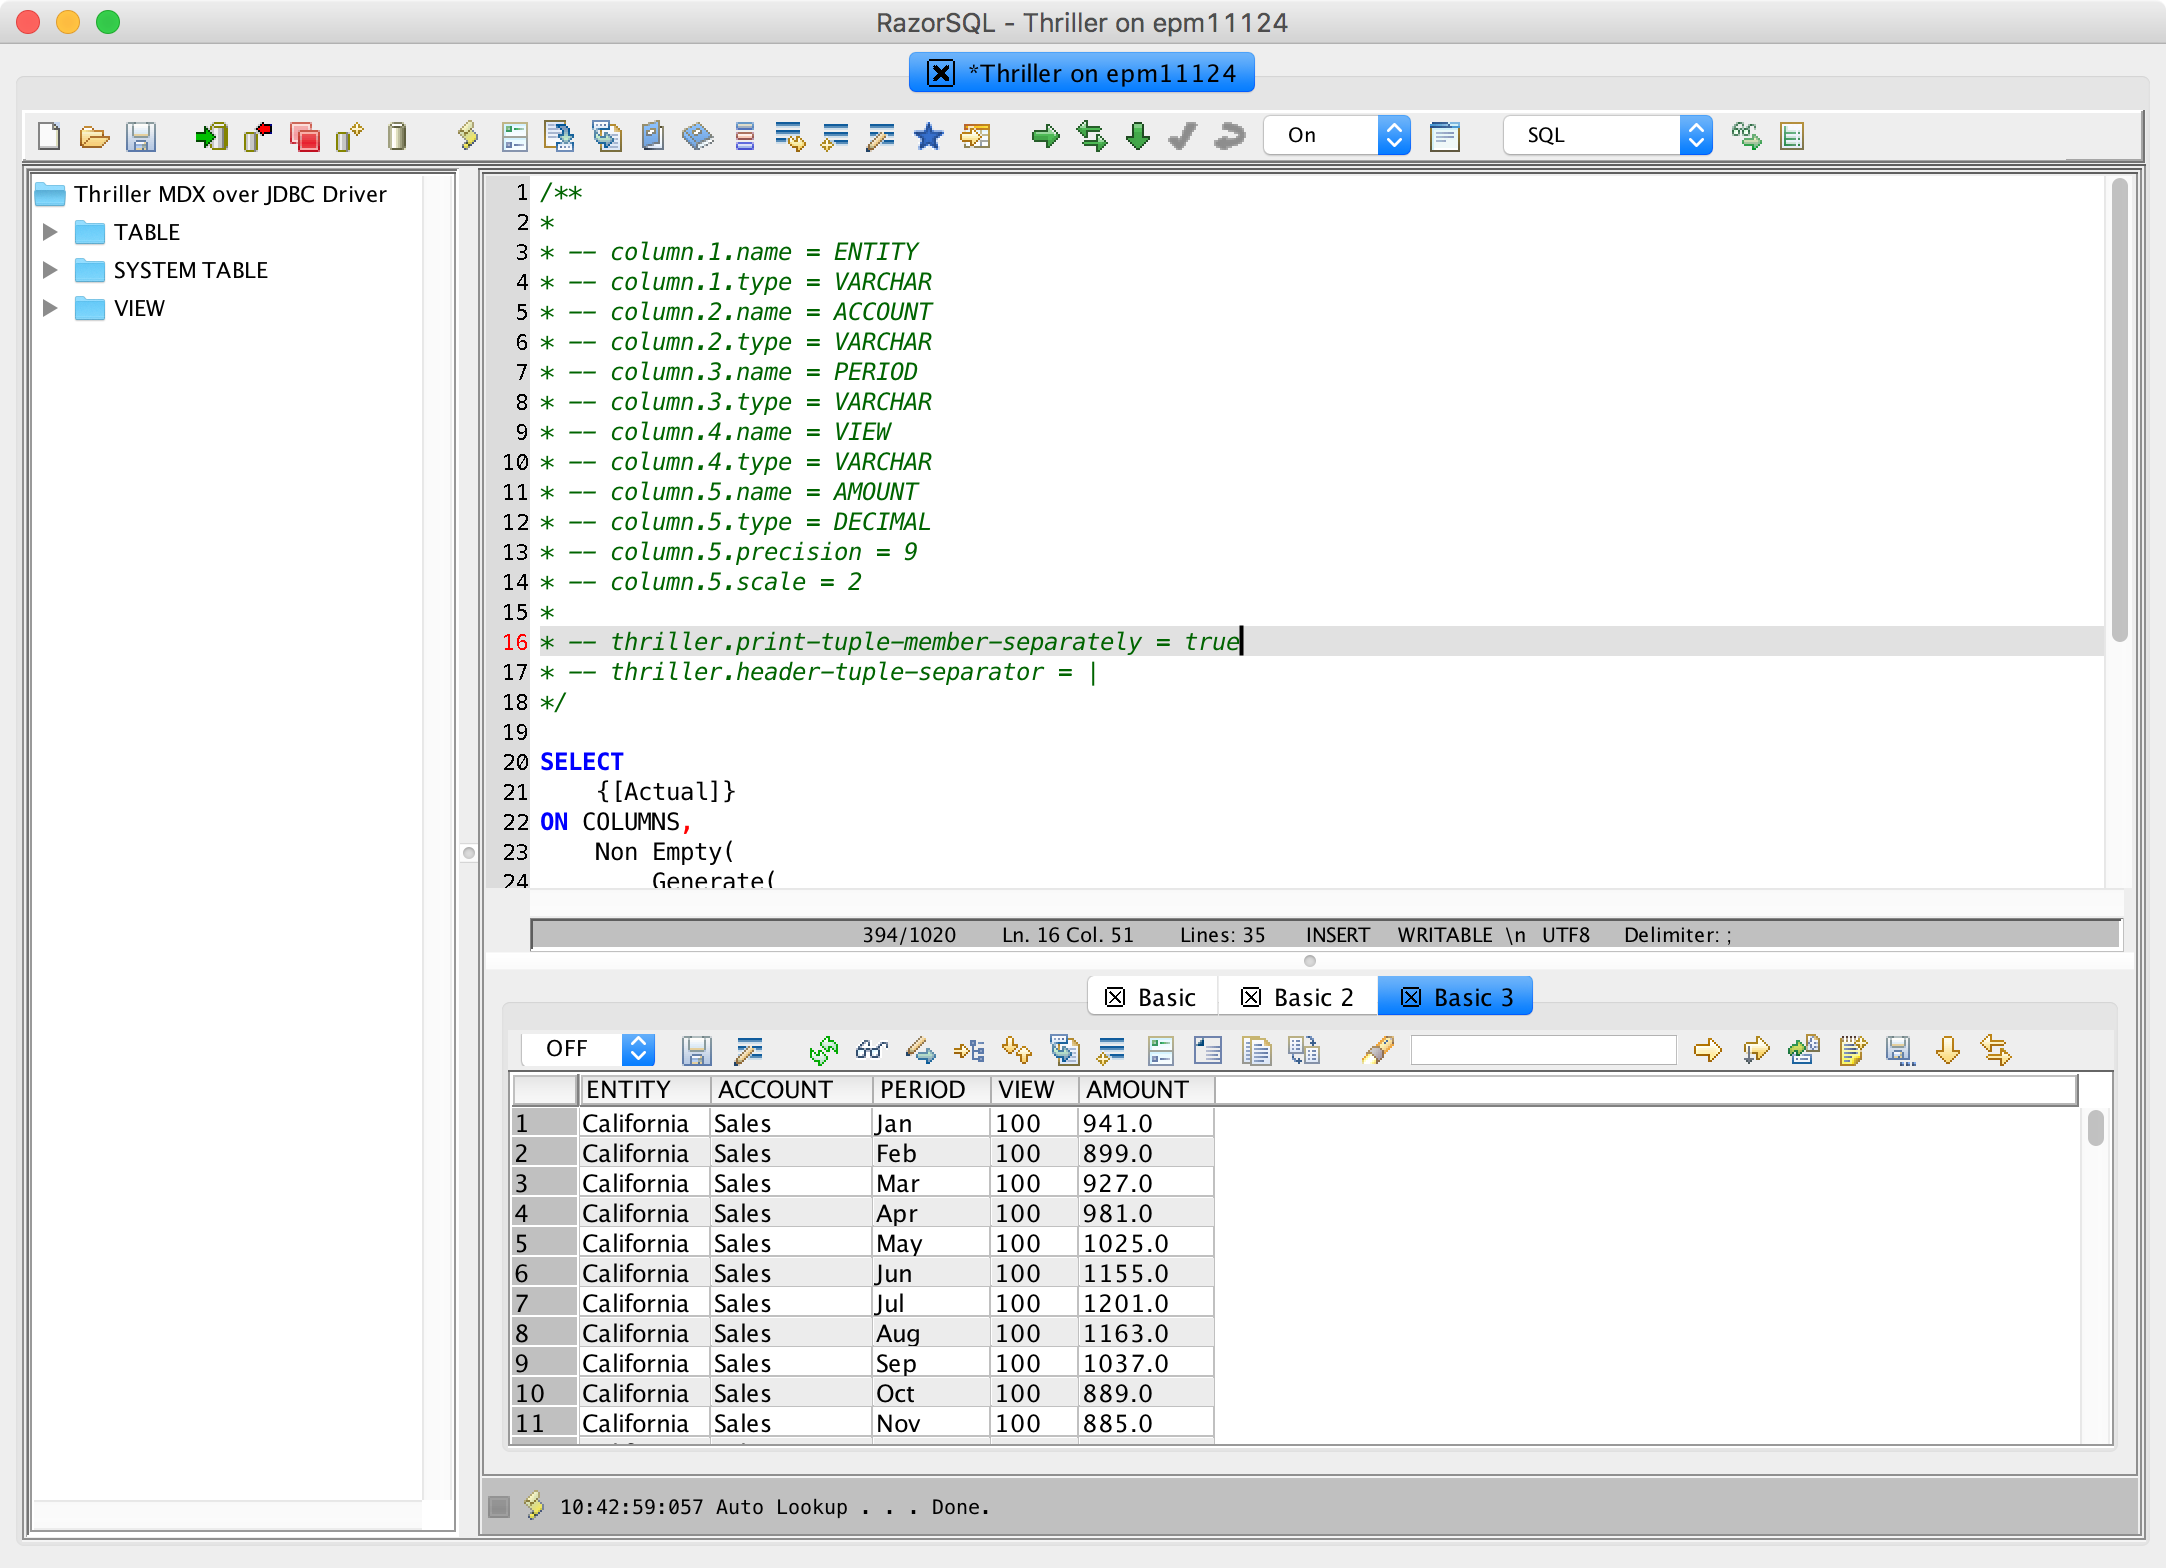
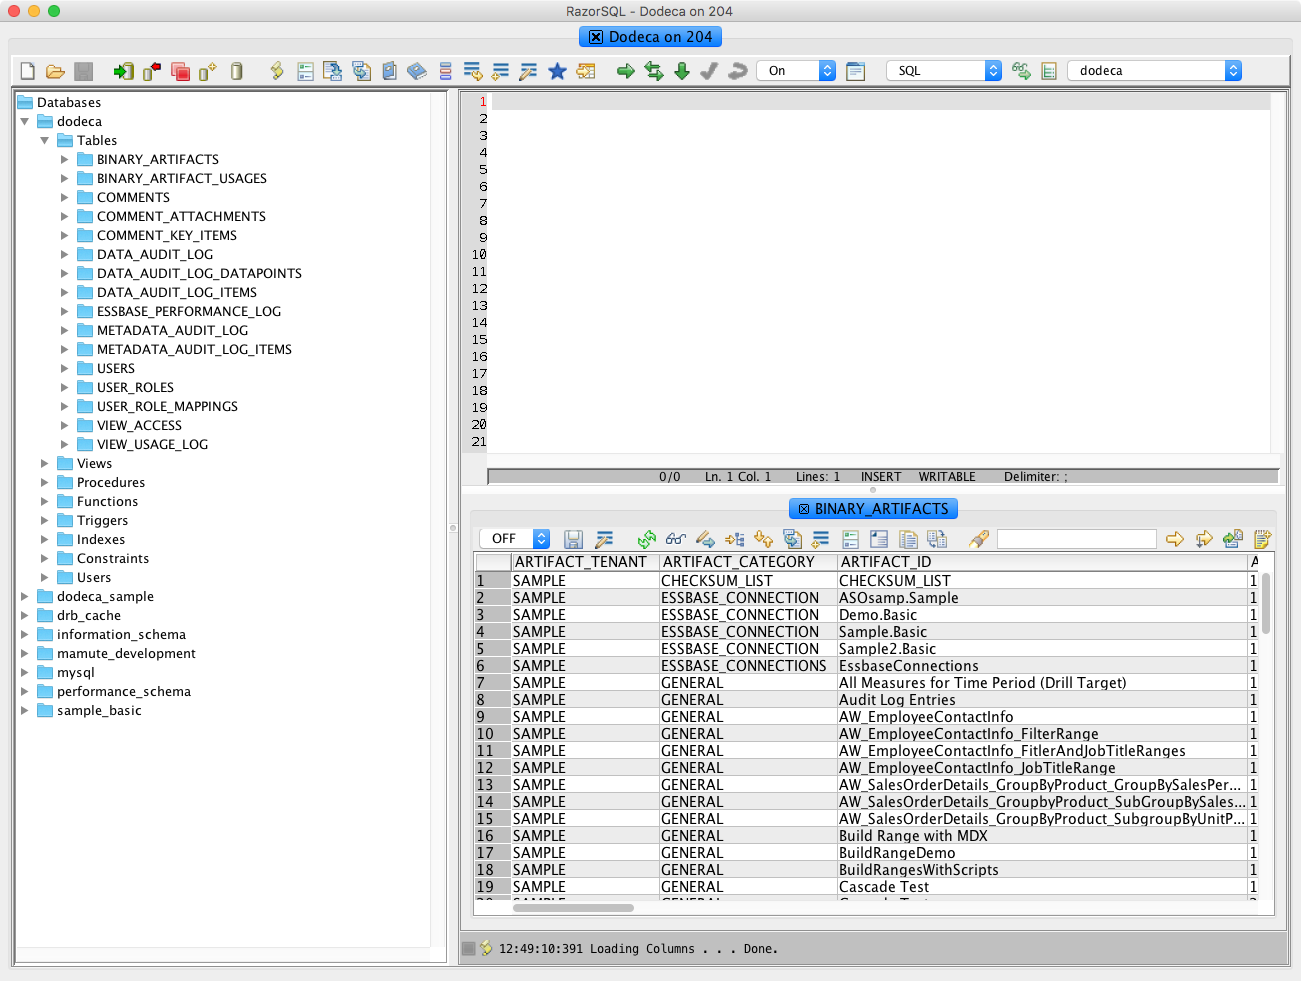
So let’s drop the driver into a generic JDBC tool such as RazorSQL and see what happens:

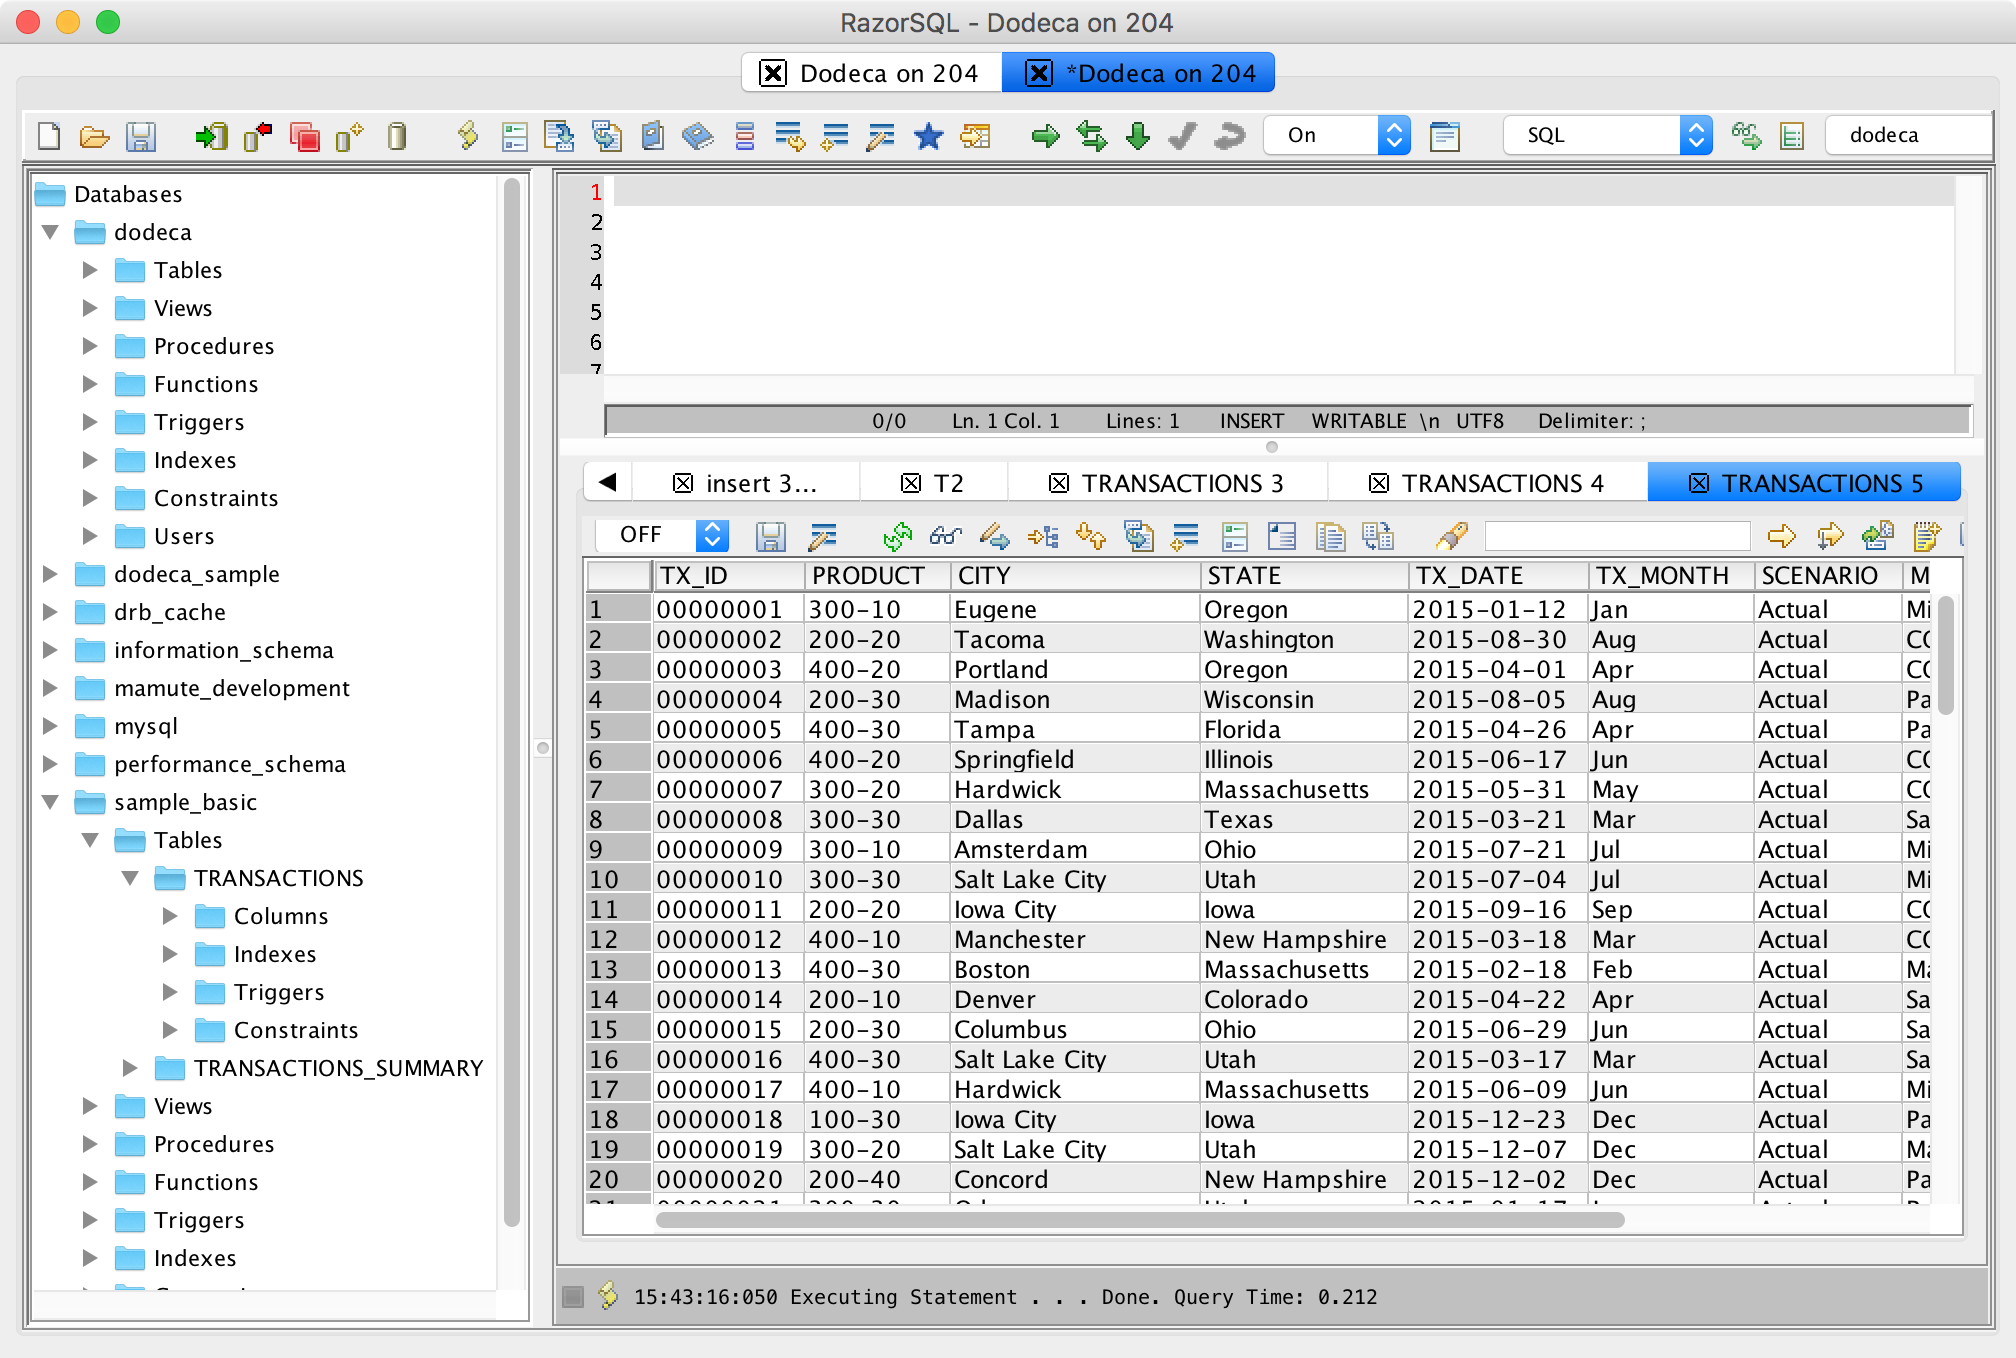
Results of executing MDX query using Thriller driver

Results of executing MDX query using Thriller driver

As you can see, we just type the normal MDX query, preceded with the mapping info, then execute it as normal. The data we’re seeing is coming straight out of the Sample/Basic database. I think it’s even just the default data for that cube as well.

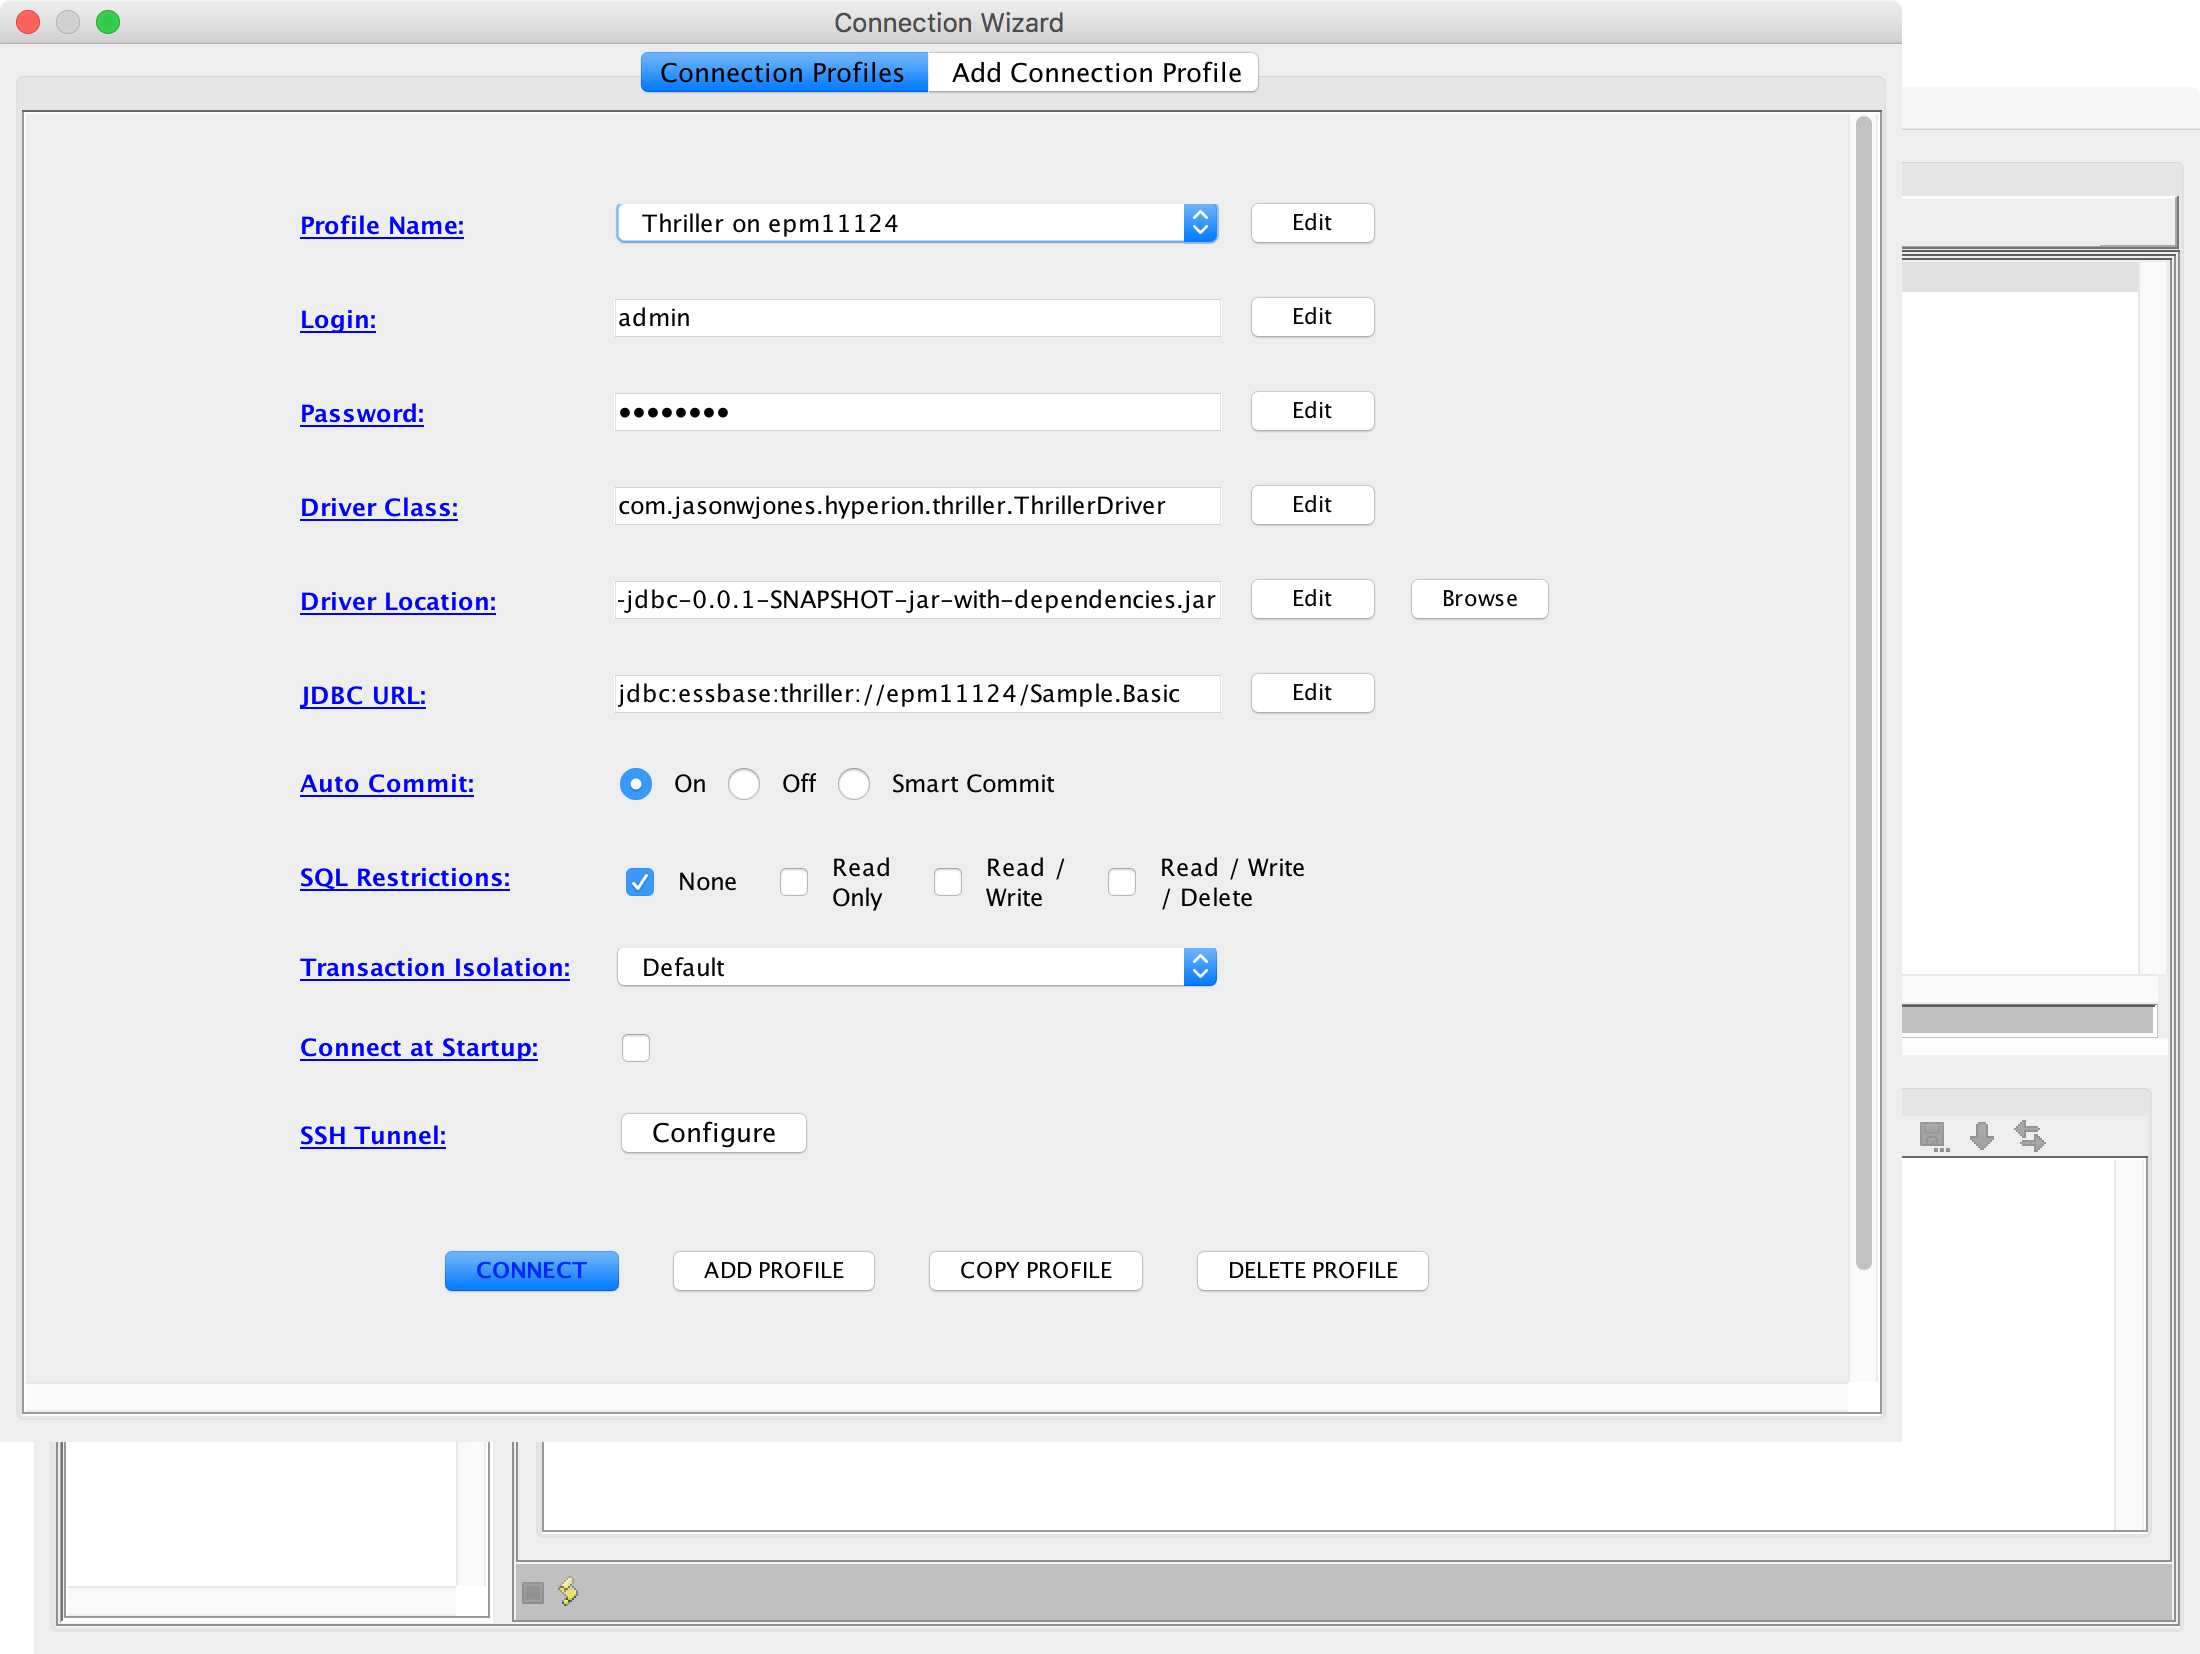
In case you are feeling adventurous, get the driver, and need to set it up, here’s what my driver/connection configuration for this server/cube looks like:

RazorSQL connection configuration

RazorSQL connection configuration

As you can see, there’s the connection parameters, the driver file, and a special JDBC URL that points to my Essbase server and a particular cube.

As with several of the other tools I’ve worked on (Vess et al.), I still classify Thriller as an “interesting” tool/side-project. It certainly works, and I think it could have some interesting use cases inside of tools such as ODI, FDMEE, and others. It’s still a little rough around the edges but feel free to contact me if you’d like a copy to play with.

Want to see a Dodeca Excel Add-In demo? Webinar on Tuesday!

Tomorrow (Tuesday, November 22nd) I am doing a webinar on Applied OLAP’s Dodeca Excel Add-In. The Dodeca Excel Add-In is an Excel plugin that works with Essbase to provide a modern, fast, and streamlined ad hoc experience. The add-in provides a thoughtfully designed native ribbon UI, many convenient UI enhancements, and a VBA compatibility layer that makes it straightforward to convert existing Excel solutions that use the old VBA API.

On the webinar I’m going to talk about why and your organization might want to use the add-in, how it compares to the Dodeca Spreadsheet Management System in terms of functionality, and then do a live demo to show various features off. At the end I’ll take questions from the audience

The webinar is tomorrow November 22nd, 2016 at 9AM PST. You can register here. If you’re interested, please attend!


Understanding Dodeca Tenants

Last week I introduced the concept of different applications in Dodeca. In short, a Dodeca application can be thought of as a completely configurable end-user application with its own authentication mechanism, view selector, and settings. The fact that we can literally spin up a new Dodeca application without having to setup a new database, a new server, or a new anything really is very powerful.

One thing to consider with the application is that the Dodeca objects that we can reference and use within it are limited to those objects that have the same tenant as that application. So let’s talk today about what a tenant is, exactly.

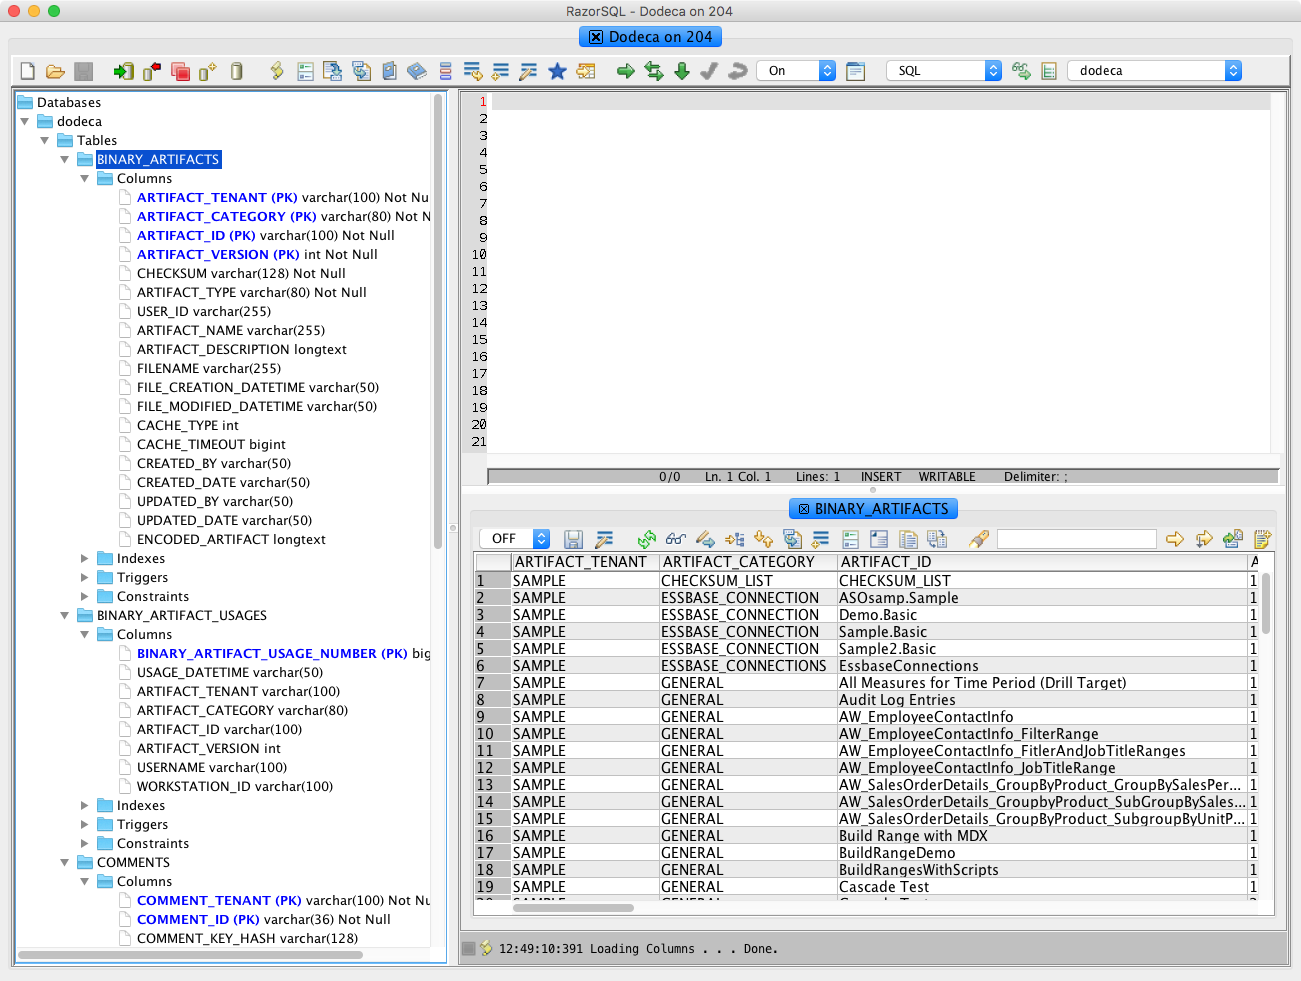
All objects in Dodeca, be they views, selectors, connections, variance commentary, and more, are stored in the Dodeca repository. This is a relational database that is configured when Dodeca is deployed in an organization. This database actually has a deceptively simple table structure, as shown here:

Overview of tables in a Dodeca repository

Overview of tables in a Dodeca repository

Most objects in Dodeca are encoded and then stored in the same table (rather than different tables depending on the type of object or what tenant/application it belongs to): the BINARY_ARTIFACTS table. We don’t really need to worry too much about how the objects are stored there, just that they are.

Let’s say that you are developing a new Dodeca application and building various views and connections in it that users will use. Whether you realized it or not, these views (and the application itself) are created inside of a distinct tenant. This tenant code is associated to every object in the Dodeca repository. Let’s take a closer look at the column definitions for some of these Dodeca repository tables:

Column definitions for various tables in a Dodeca repository

Column definitions for various tables in a Dodeca repository

Look at how there is an ARTIFACT_TENANT column on the BINARY_ARTIFACTS table (as well as BINARY_ARTIFACT_USAGES). This column is part of the primary key for these tables and serves as an absolute way to partition the different objects from each other all in the same repository. When we’re building an application in a given tenant in Dodeca, we can’t even use connections or views from another tenant because the application literally can’t see the objects in the other tenants.

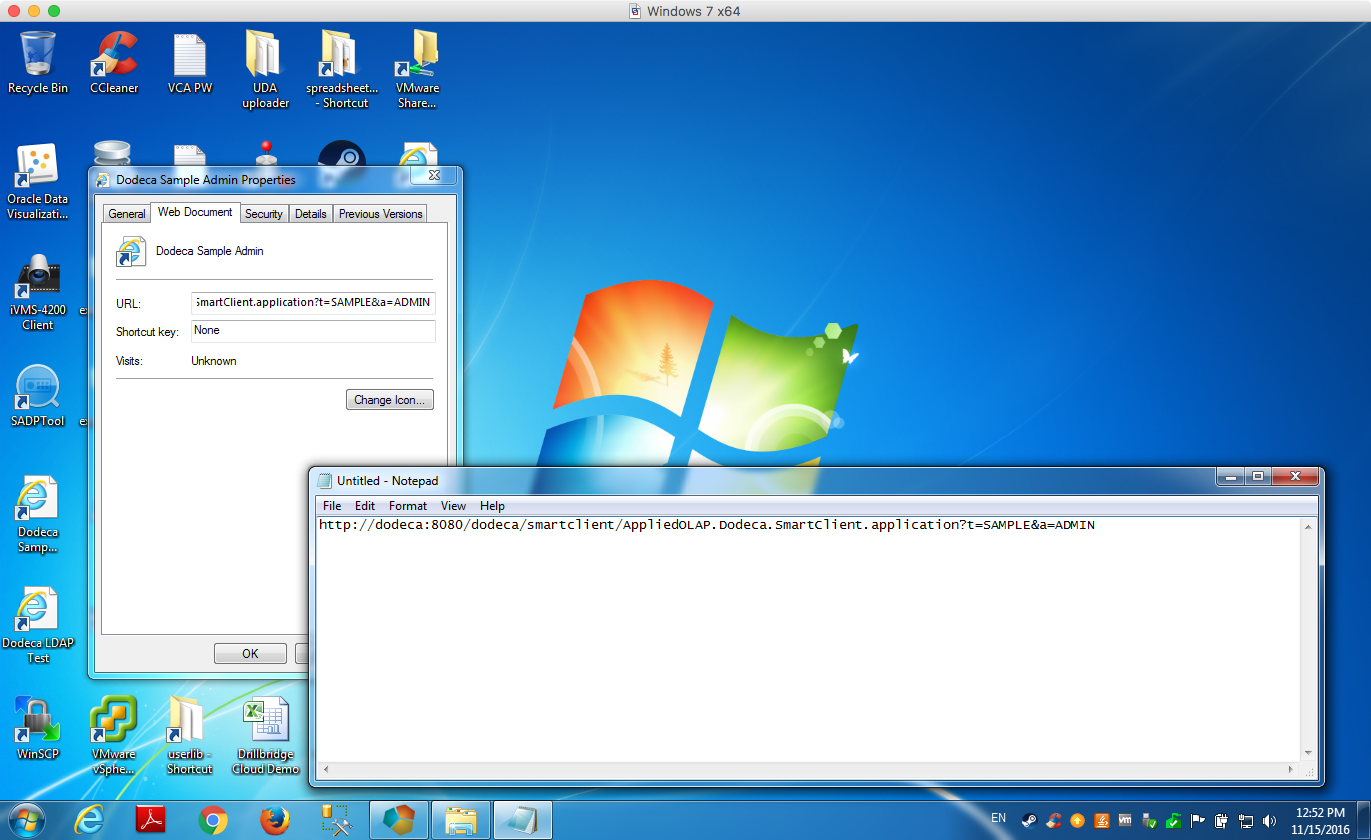
As I mentioned, whether you realized it or not, each application you have run in Dodeca was actually associated with a particular tenant. Let’s actually take a look at the desktop shortcut for a sample Dodeca application in the lab:

Viewing the launch URL for an application in Dodeca

Viewing the launch URL for an application in Dodeca

Notice that the launch URL is a URL containing two parameters: a tenant and an application. When we need shortcuts or links to other applications, we can just change the tenant or artifact reference and jump directly to them. Since these are used in URLS it’s also why I recommend being consistent with them and just making them all caps with no spaces.

So, why is this whole tenant business important, anyway?

The Dodeca architecture (and the repository architecture) let you scale up in functionality very, very, easily. In many software systems, this ability to scale with applications and tenants would frequently involve deploying a new database, a new server, or both (rendering it quickly infeasible for many purposes). Here we can achieve scaling without a new server, without a new relational database, and without even so much as having to reboot the server.

If you need/want to create a new application for users that will be able to reuse connections/views from the existing tenant, then you likely want to just create a new application in the same tenant. If you need to completely partition things off (such as for a new group that is going to deploy Dodeca), you can simply create a new tenant. And of course, if you really need to cordon things off, such as for dev/prod separation, a completely different group, or whatever, you can always deploy a new instance of Dodeca. There are a lot of possibilities.

Multiple Applications in Dodeca

I want to talk about one of the more interesting aspects of Dodeca and its extensibility: applications. In some of my past posts, I’ve alluded to this notion of applications (and also something called a tenant) in Dodeca but haven’t really had a chance to dive into much detail. I’ll get into the notion of tenants some other day, so today’s focus is on what an application is.

In our world (the EPM world, that is), the term application has a lot of meanings. In Essbase-land, it’s a container for cubes or plan types. In the world of software, it usually means a single program. In the world of Dodeca, an application defines the views, behavior, look, and other properties that a user will see when they launch Dodeca.

More specifically, consider that when you login to Dodeca, you are actually logging in to a specific Dodeca application (whether you realized it or not). Typically on the left side of the Dodeca window is the list of views that you have access to. This list of views is called the view selector. Now, the view selector itself has several options that determine which views are shown to a given user, but for now just let’s just think of the whole thing (irrespective of content) as the view selector.

Additionally, when logging in to Dodeca, it’s quite common to use your enterprise credentials (your username and password) that give you access to a given Essbase server and other things around the company. Interestingly enough, the authentication strategy in Dodeca can be configured on a per-application basis. This means that you might want to use a particular cube to authenticate users in one app, but use a different cube, or LDAP or Active Directory, or something else entirely, to control authentication in another application.

If this feels like an amazing amount of configurability to wield, that’s because it is. Many (most?) software programs that allow for enterprise login capabilities (that is, logging in against an LDAP or similar server) tend to have that configuration buried in a configuration file somewhere, and they only support a global authentication provider configuration.

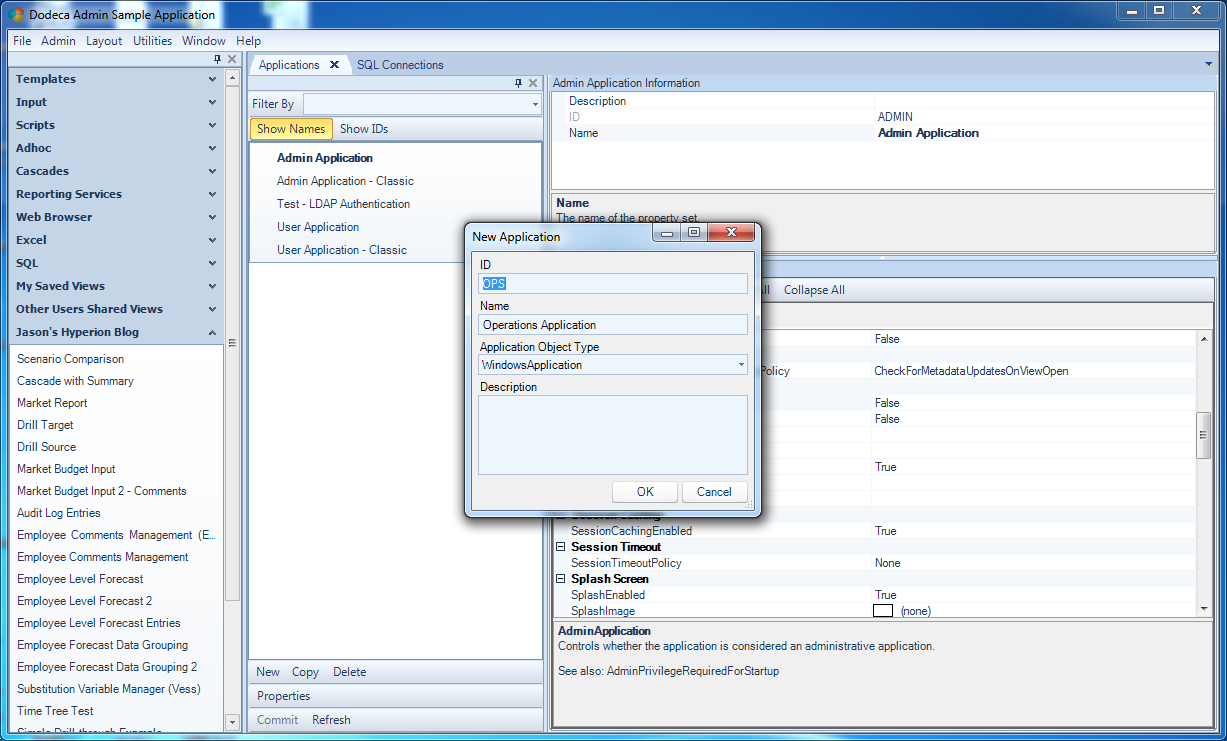
Now that we know a little about what an application is, let’s take a look at the process of creating an new application. As with most objects in Dodeca, Applications have their own menu item under Admin, which brings up a list of apps that can be edited. From there, it’s a simple matter of just selecting New and typing in some details:

Creating a new application in Dodeca

Creating a new application in Dodeca

Let’s give this application an ID of “OPS” – we’ll assume for this example that Dodeca has heretofore been used just in the Finance group, but that the folks in Operations saw how productive and happy the Finance people were and they want to get in on some of that sweet 12-sided action. Also, it’s customary for the application ID to be all capitals and not contain any spaces, as it will be referenced in URLs and shortcuts. We can give it a nicer name, however, which in this case will be “Operations Application”.

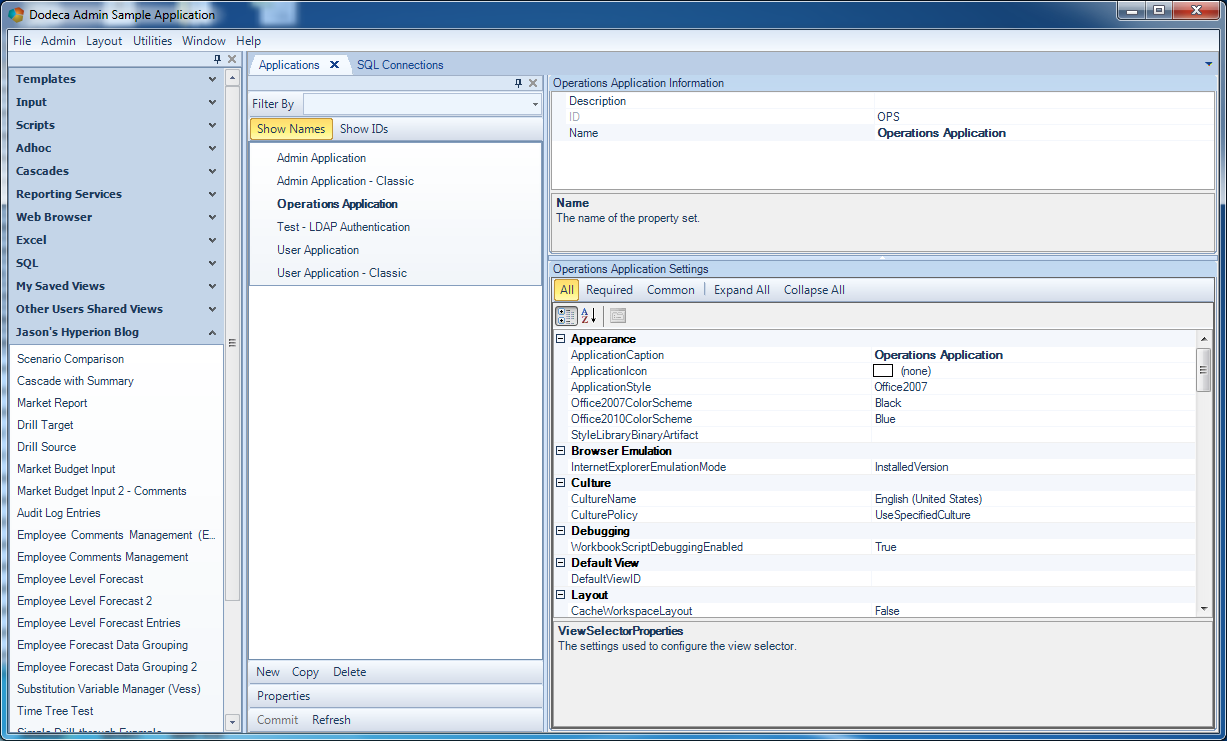
Next, we need to configure some essential properties for the application. There’s a lot we can configure, but for now we’ll stick to the basics. First up, let’s change the caption for the app (the text shown for the titlebar of the program window):

Configuring properties for the new application

Configuring properties for the new application

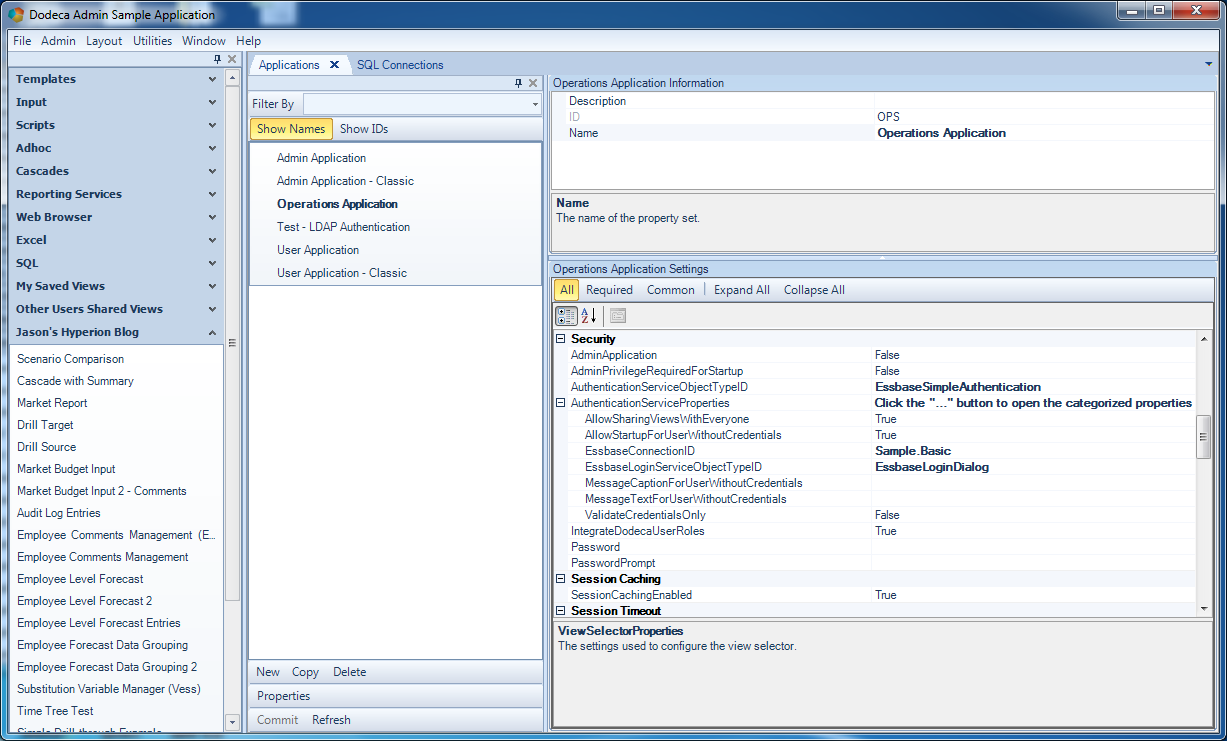
Remember, bold properties are the ones that we’ve changed from the default, so in this screenshot I’ve only changed the caption. Next, let’s set the authentication properties:

Configuring the authentication strategy for the app

Configuring the authentication strategy for the app

There are several choices here. One of the more common and useful is the EssbaseSimpleAuthentication service. This essentially means that a given cube (one of the defined Dodeca Essbase connections) will serve as the object which is logged into in order to validate a user. The EssbaseConnectionID setting is simply a dropdown where we can quickly select an existing connection.

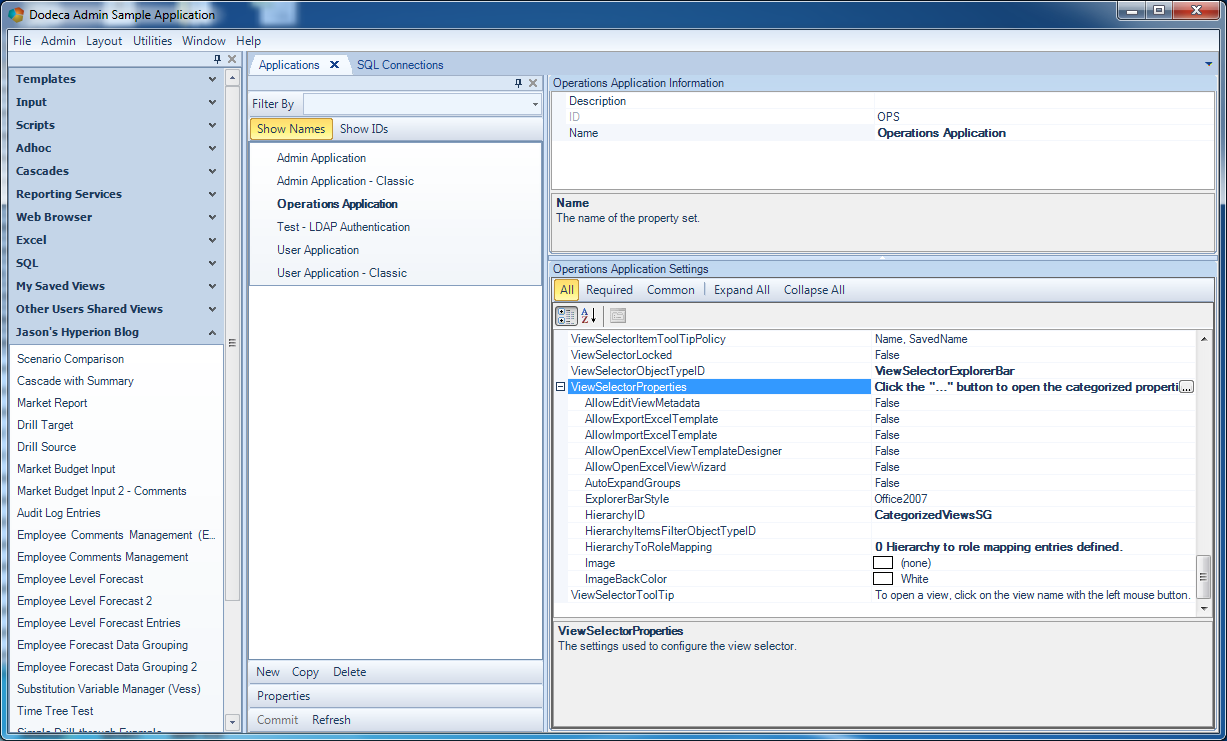
Setting the view selector and hierarchy for the application

Setting the view selector and hierarchy for the application

Next, we configure a view selector. For this application we’ll just go with a ViewSelectorExplorerBar, then choose a HierarchyID (again as a refresher, hierarchies are also defined in Dodeca as with other objects). That’s actually all we need for now. Since I’m just using an existing hierarchy for demonstration purposes, I expect the contents of the hierarchy in the new application to be the same contents as what I see in this existing application used in the screenshots.

After committing the changes, the new application is ready to be used. In my environment, I can launch it with the following launching the URL http://dodeca:8080/dodeca/smartclient/AppliedOLAP.Dodeca.SmartClient.application?t=SAMPLE&a=OPS

Note that I just took an existing URL and changed the last parameter (...a=OPS) so that it points to the OPS application. Upon launching the URL, my new application comes up and I can run a view in there as I normally would:

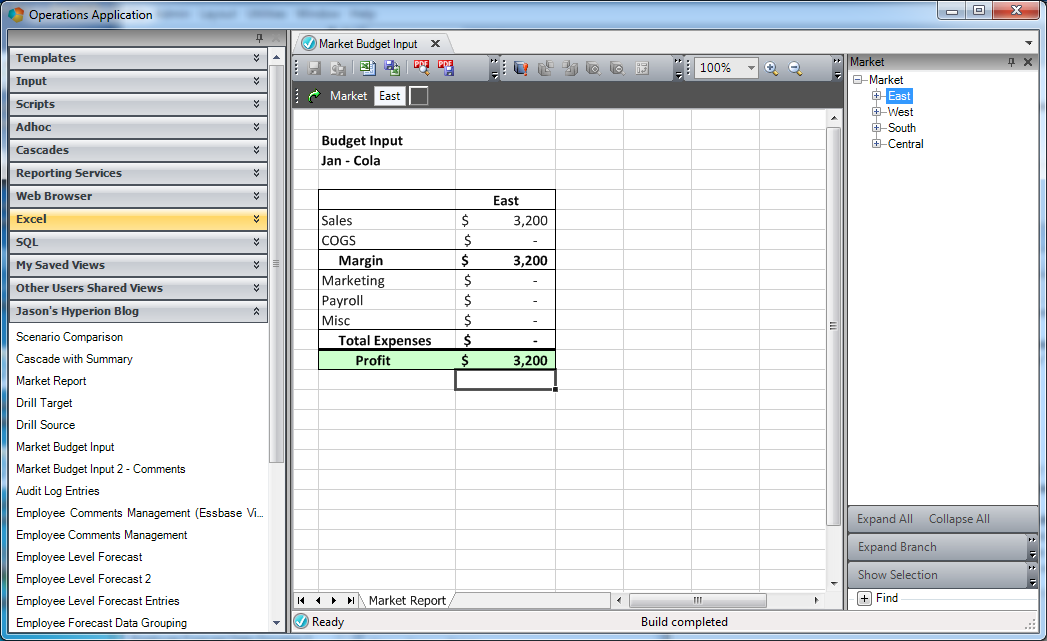
The newly created application has been launched and a report built

The newly created application has been launched and a report built

You may notice that the look of this application is different than the one we were just in. This is just configured on the application properties. While I didn’t change the look of the new application from the defaults, as it turns out, the app we’ve been working in to this point does have a custom style, so that’s the reason for the difference.

Dodeca Applications Summary

Dodeca has an even greater form of partitioning functionality (called tenants) that I’ll cover in the near future, but I hope this gave you an interesting since of some of the power inherent in the Dodeca application model. I think it’s incredible that we’re able to rapidly spin up a completely distinct Dodeca application by just configuring a few properties. One thing to keep in mind is that this didn’t require setting up a new Dodeca server, a new Dodeca repository, installing software or anything. It’s just modularity that’s inherent to the design of the software. Applications can be used to provide specialized behavior for different groups, sub-groups, types of users, divisions, or whatever else makes sense.

Greet your Dodeca users with a custom landing page

Today’s Dodeca post will be on the lighter side, but is nonetheless a pretty useful feature. One of the interesting aspects of Dodeca is its support for multiple tenants and applications. This means that within just a single Dodeca repository (created when the Dodeca service is installed), we can have multiple distinct applications. This allows for creating different applications for different groups of users. It’s really quite powerful and something I will explore more in the coming weeks.

That said, since we can organize Dodeca into multiple distinct applications, that also means we can configure the properties of each application however we want. And one of those settings we can configure is the default view. The default view is a normal Dodeca view that is opened automatically when the application is launched.

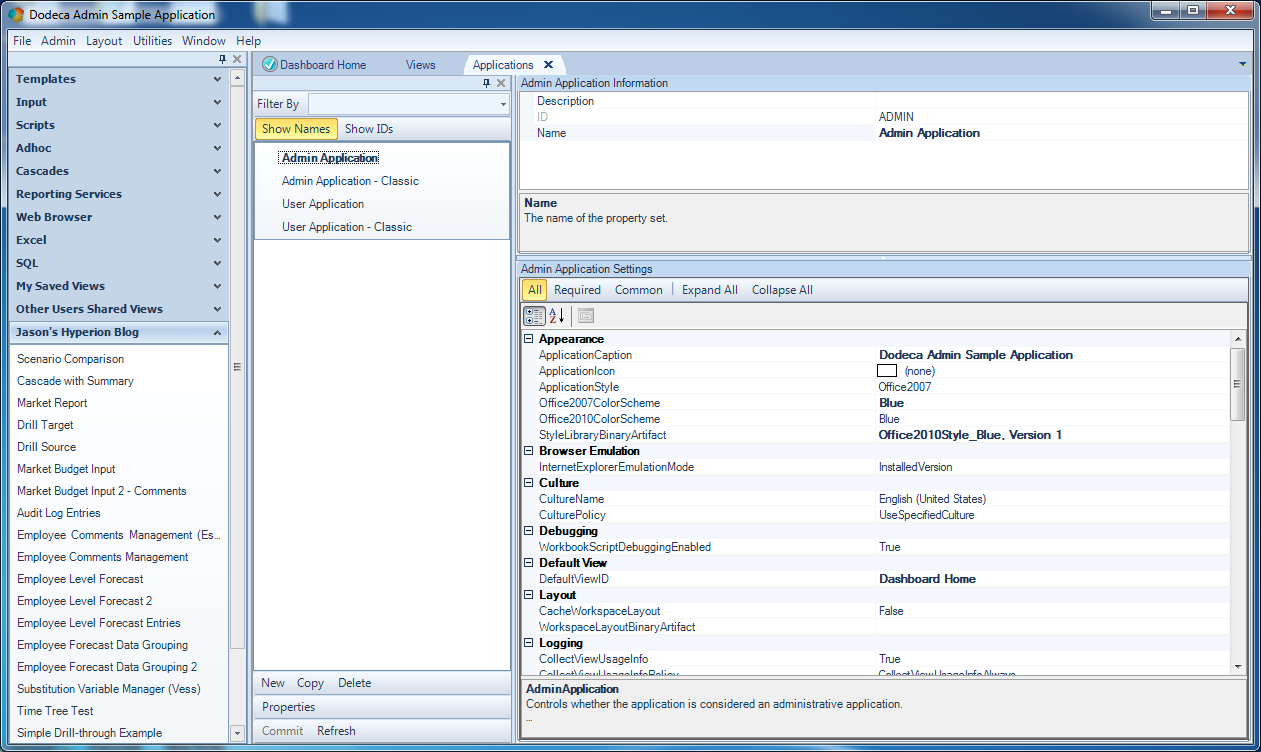
Imagine that you want to have different applications for different groups. For instance, you might want an application for Finance, an application for Operations, and something for the Marketing department. As with just about all other objects in Dodeca, Applications are managed with their own editor, just as one would edit a View or Selector. Here’s a look at the four applications I have in my demo instance right now:

Setting properties for the Dodeca application itself

Setting properties for the Dodeca application itself

You might notice that on a per-application basis, I can control the style/theme of the app, and some other things. As I mentioned, one of those things (and the topic of this post) is DefaultViewID. With this setting, we can tell that Application that when it’s launched, it should run a particular view and open it up. This can be used as a sort of start or landing page for your users. And remember, this is controlled per-app if we want: meaning that we can have different default views for different groups of users, as it makes sense.

Most of the views that I have blogged about in the past have been one of two types of views: either an Essbase Excel view, or a SQL Excel View. But there are actually a handful of other view types, one of which is a Web Browser view. This view type is pretty straightforward. Whereas Essbase views concern themselves with Essbase data and retrieves, the web view is mostly just concerned with showing some HTML or fetching a particular URL.

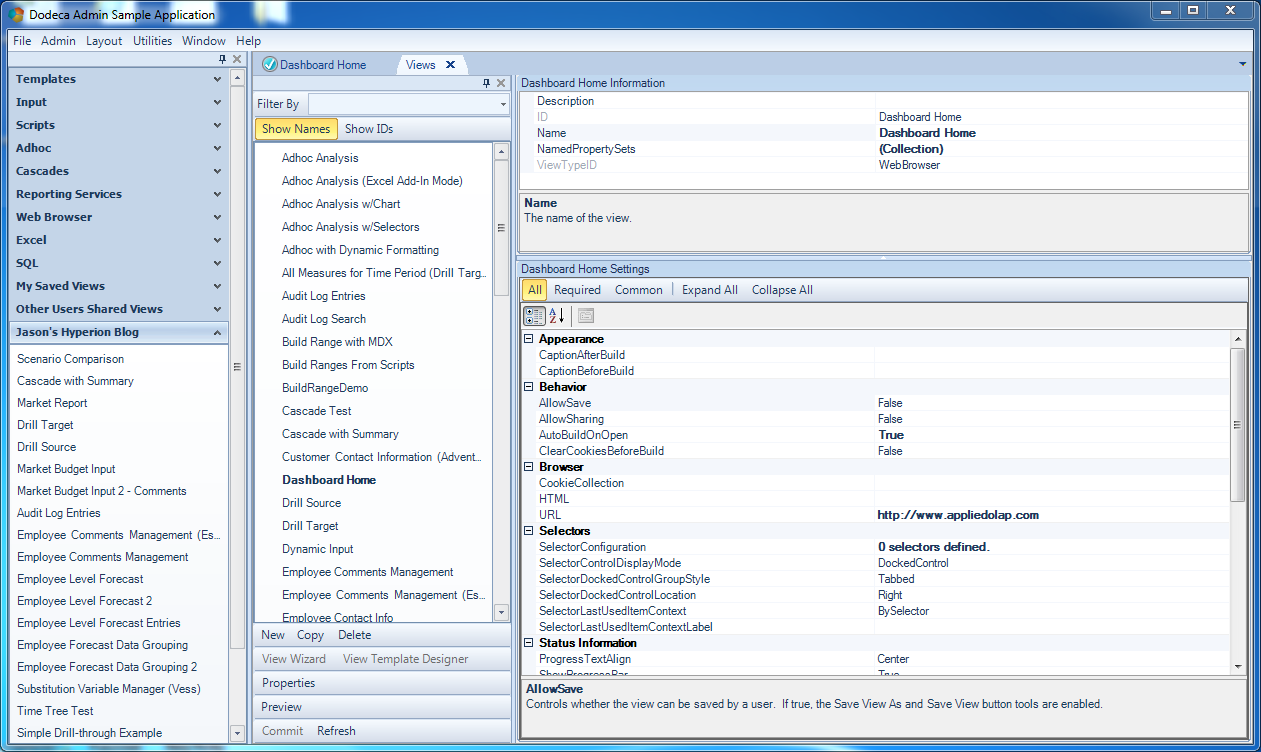
You may notice in the above screenshot that I have set the default view for this app to Dashboard Home. This is a new web view that I will setup in the next couple of steps.

The following screenshot shows the properties for a simple web view that opens up the Applied OLAP home page. If you look at the non-default properties I have set, I turned on AutoBuildOnOpen (so the web page is fetched when the view is opened) and specified a URL:

Dodeca configuration for a WebBrowser view

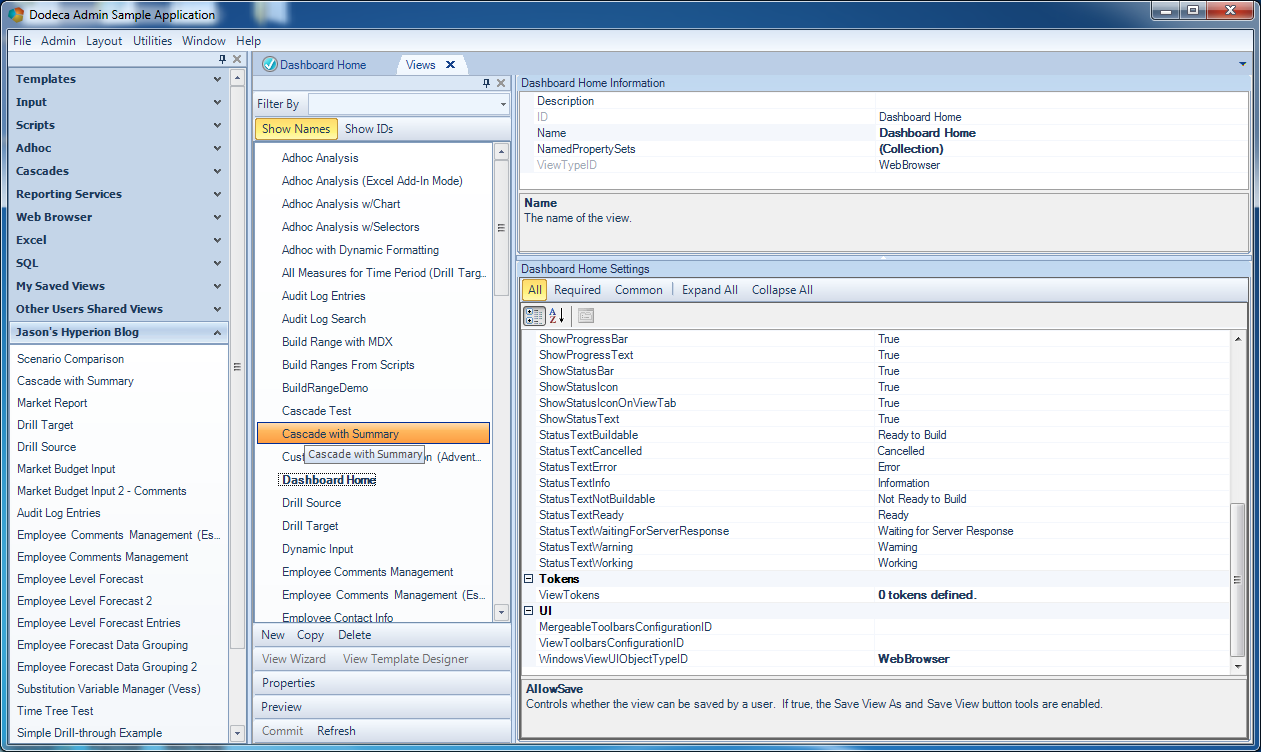
Lastly, I have the WindowsViewUIObjectTypeID set to WebBrowser, which is the last property I need to set in order for this to work:

Part 2 of the view properties available for a web view

Part 2 of the view properties available for a web view

Now to tie it all together. Given that I have created a new web view and set it as the default view for the application, here’s what I am greeted with now if I close and open this application:

Dodeca configuration for a WebBrowser view

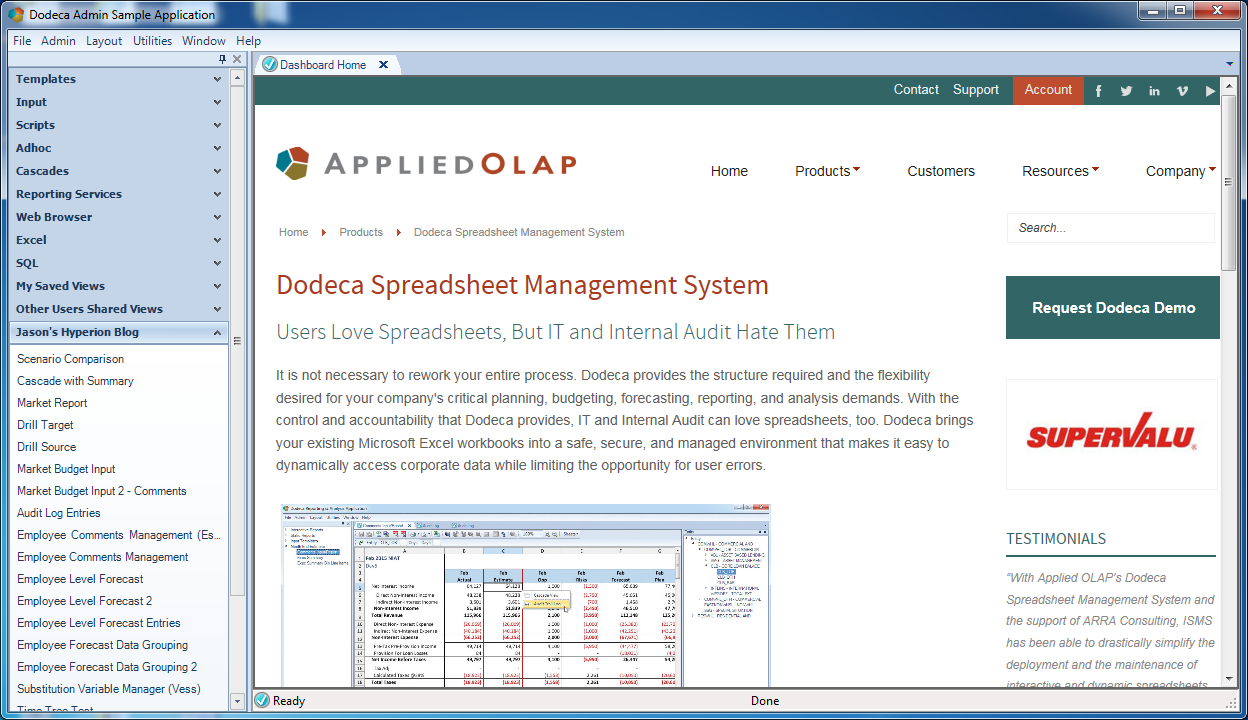
Dodeca client with a Web View displayed

Dodeca client with a Web View displayed

Hopefully the use case for this isn’t too hard to imagine. The most common usage of this type of dashboard/default view that I see is to point it to a group-specific intranet page that has information about the status of Essbase, the current financial period, and links to metadata-related activities (like requesting a new member to be added to an outline or something).